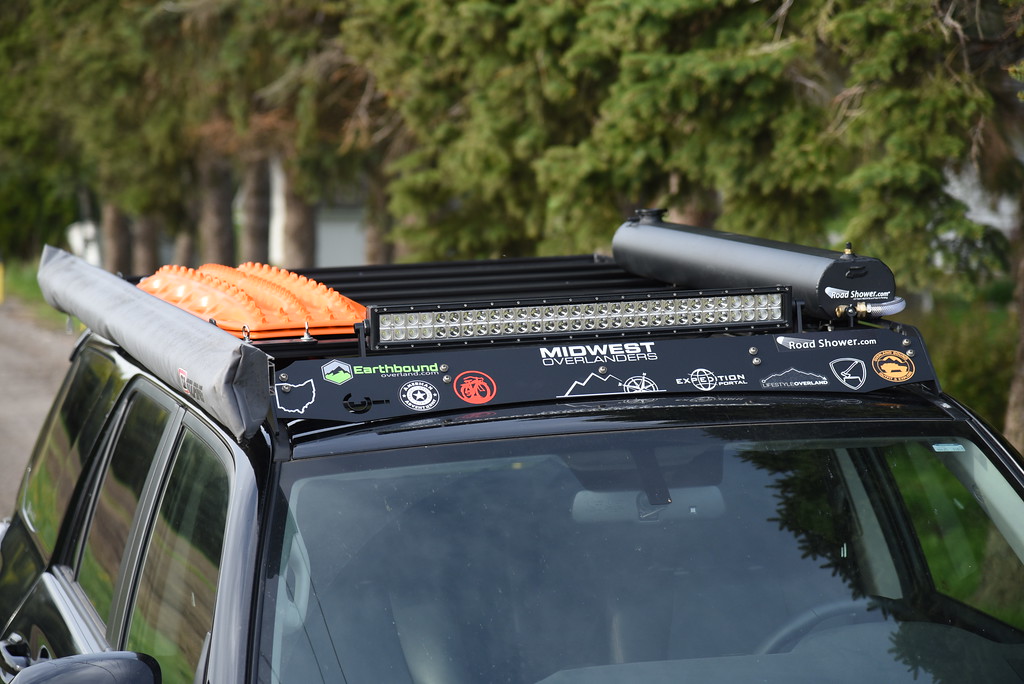
In February, I purchased a five gallon Road Shower 2 from Amazon to mount on the roof rack of my 2016 Toyota 4Runner. Delays in delivery/installation of the Prinsu roof rack, and a cooler than normal spring leave me finally reviewing this product in early June.
While the primary purpose of a solar shower is to provide heated water for showering after a day hiking, at the beach, or in camp, that wasn't why I added a Road Shower on my truck. I wanted to have a convenient supply of pressurized water to wash mud and sand off of the bottom of our kayaks, bikes, muddy feet/shoes, etc. I don't expect to use it as a full shower very often.
The Road Shower 2 is manufactured in China to specifications provided by Road Shower in the USA.
Packaging and Construction
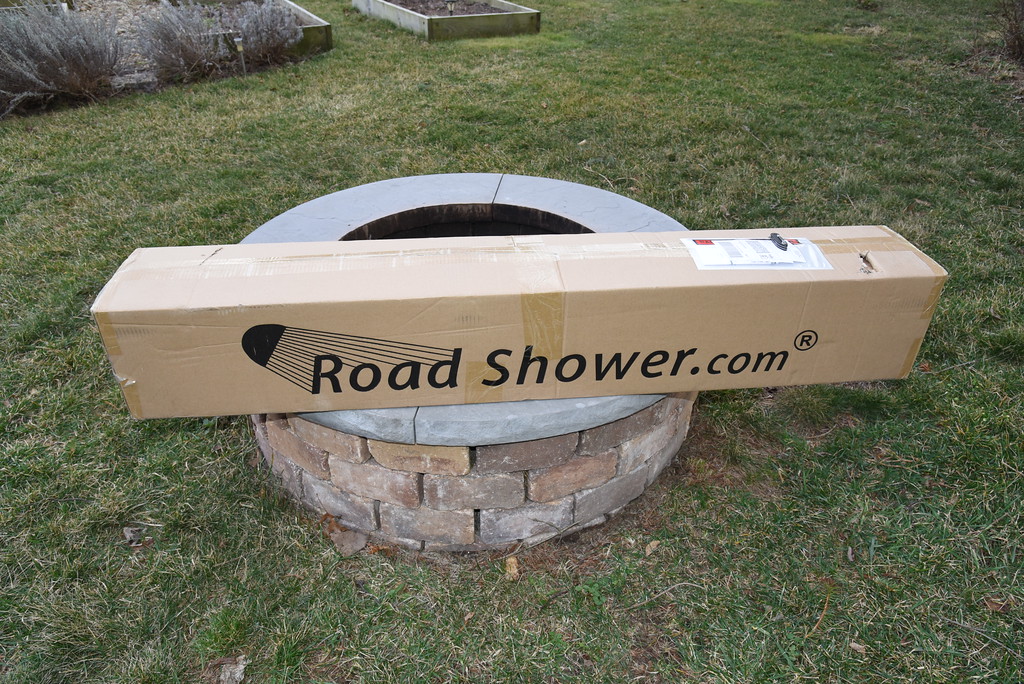
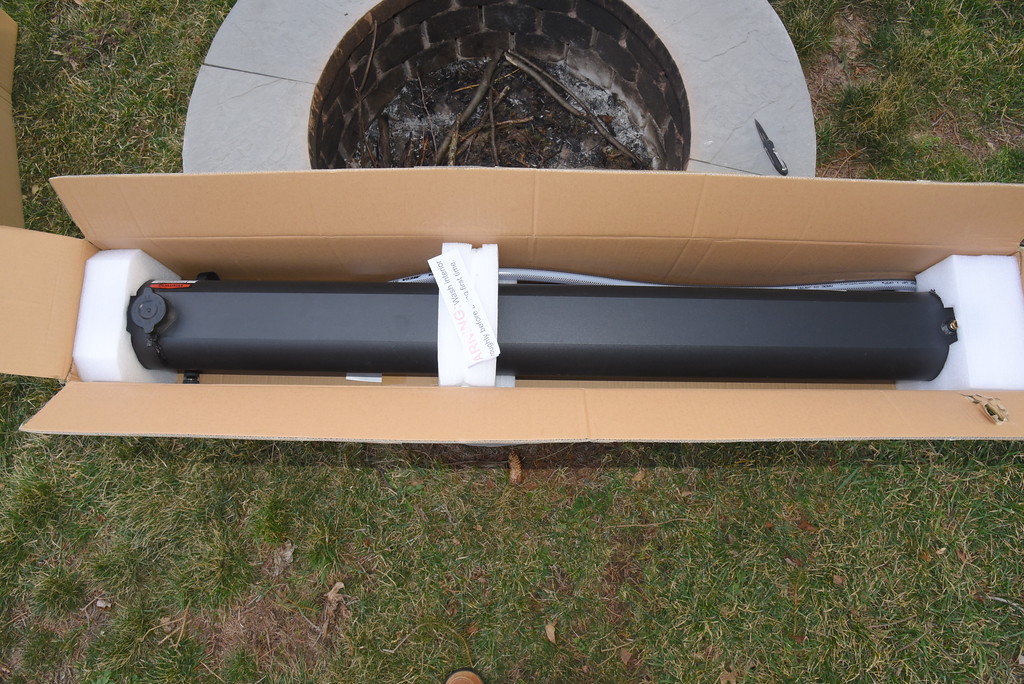
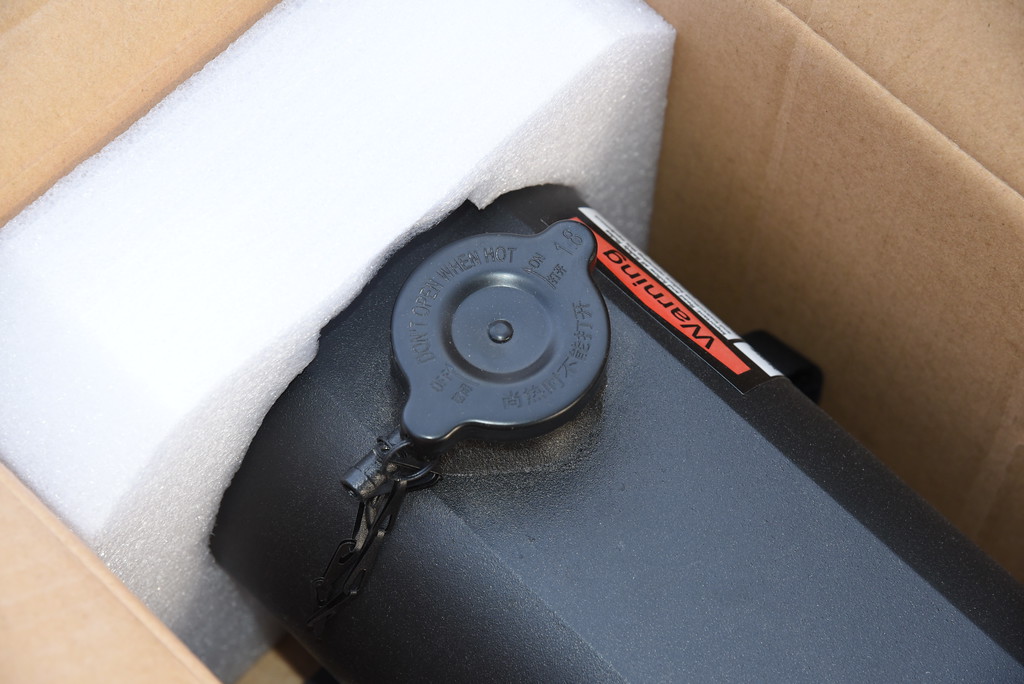
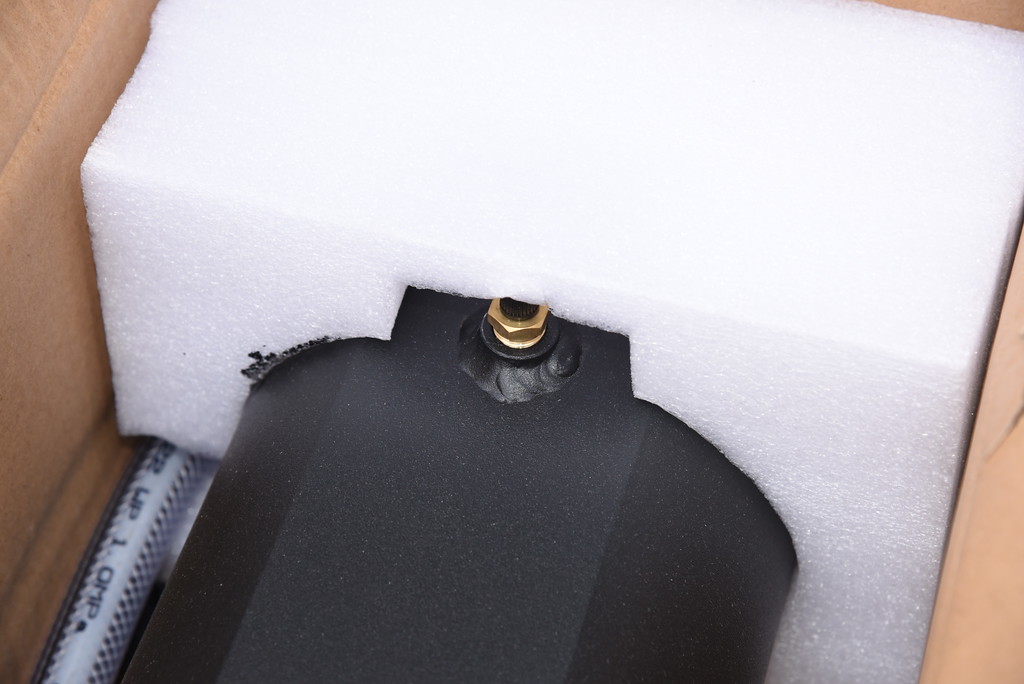
The Road Shower 2 came packaged very well, in a thick corrugated carton of better quality than the typical Chinese cartons. Inside, the tank was completely suspended in fitted closed cell foam blocks. There was no damage to the tank, despite the carton having some minor shipping damage. The aluminum knob on the tank's valve was broken. It looked as if the carton had been dropped on its end. An email to Road Shower resulted in a replacement knob arriving in just a few days at no cost to me. A friend who has a Road Shower 2 had no damage at all to his packaging or contents.
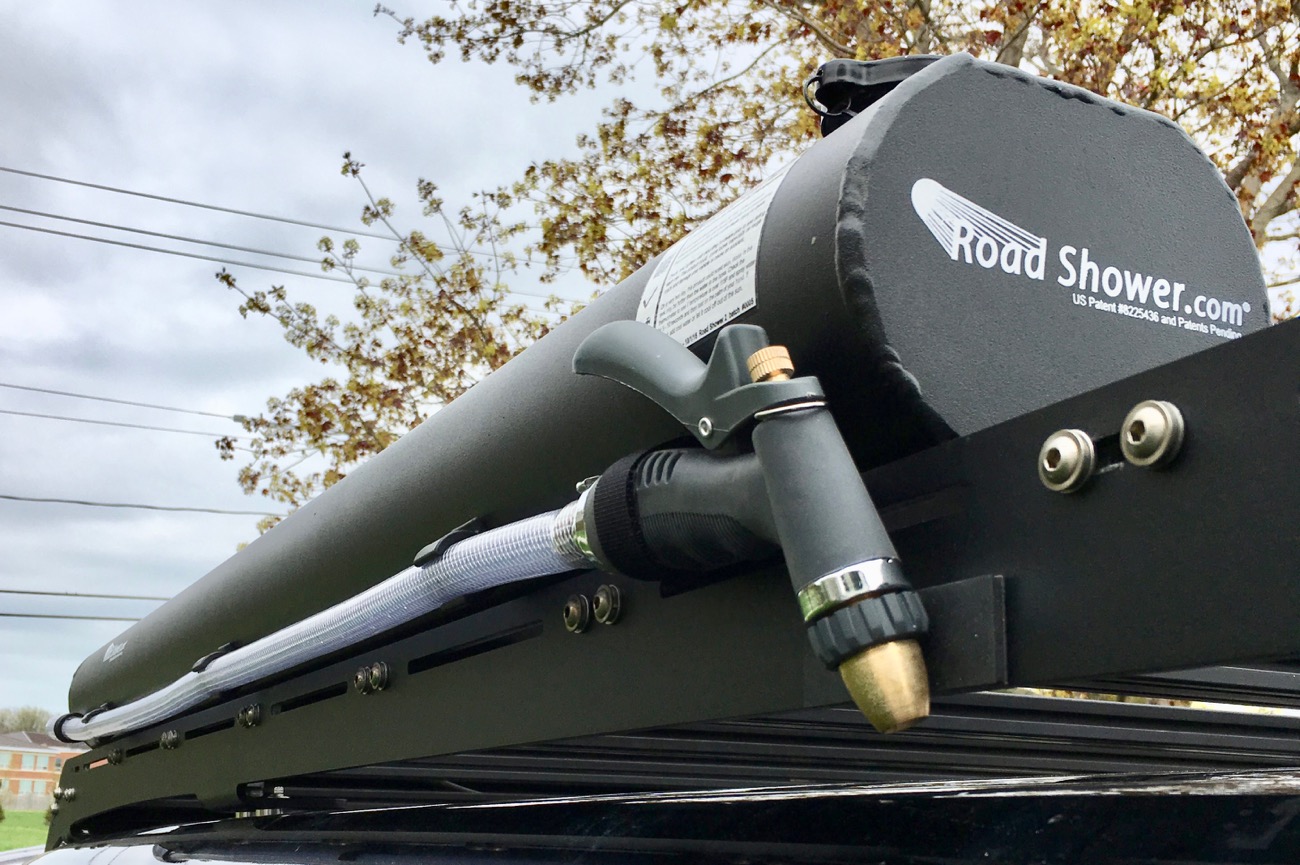
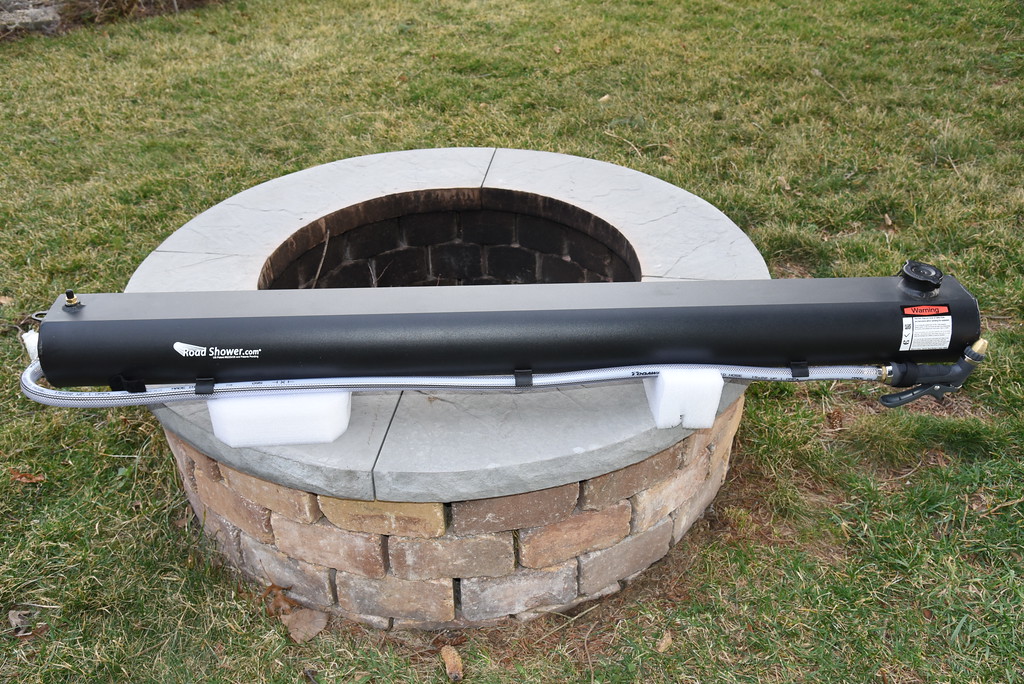
The Road Shower 2 is a 55" long, 6" diameter cylinder; flat on the top and bottom (4-1/2" high.) It is all aluminum construction, and powder coated a textured flat black. The bottom has a full-length T-slot for mounting on a roof rack. It weighs 15 pounds empty, and 55 pounds with five gallons of water. An adhesive-backed LCD thermometer is supplied to stick on the tank. This is to show the relative temperature of the water in the tank.
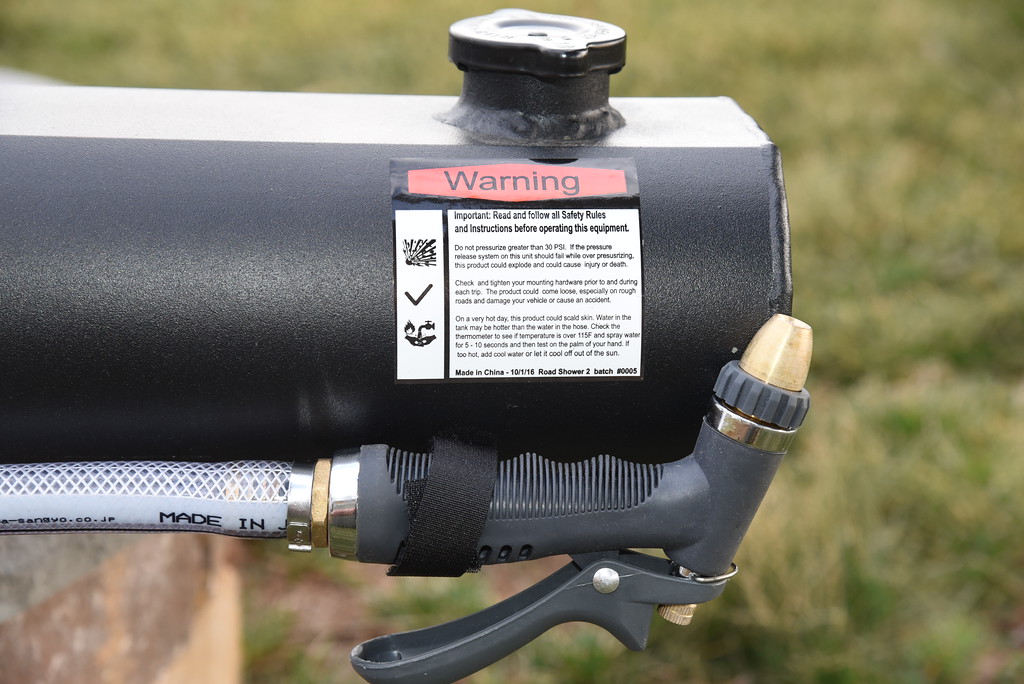
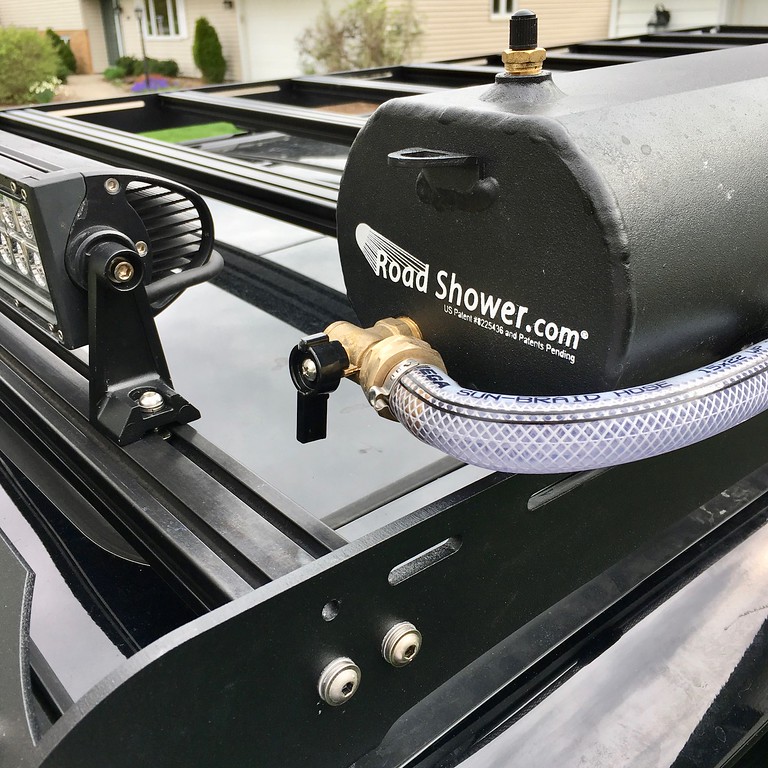
One end has a 25 PSI (1.8 bar) pressure/fill cap, much like a radiator cap. Under the cap is an pressure relief tube for when the pressure in the tank exceeds 25 PSI.
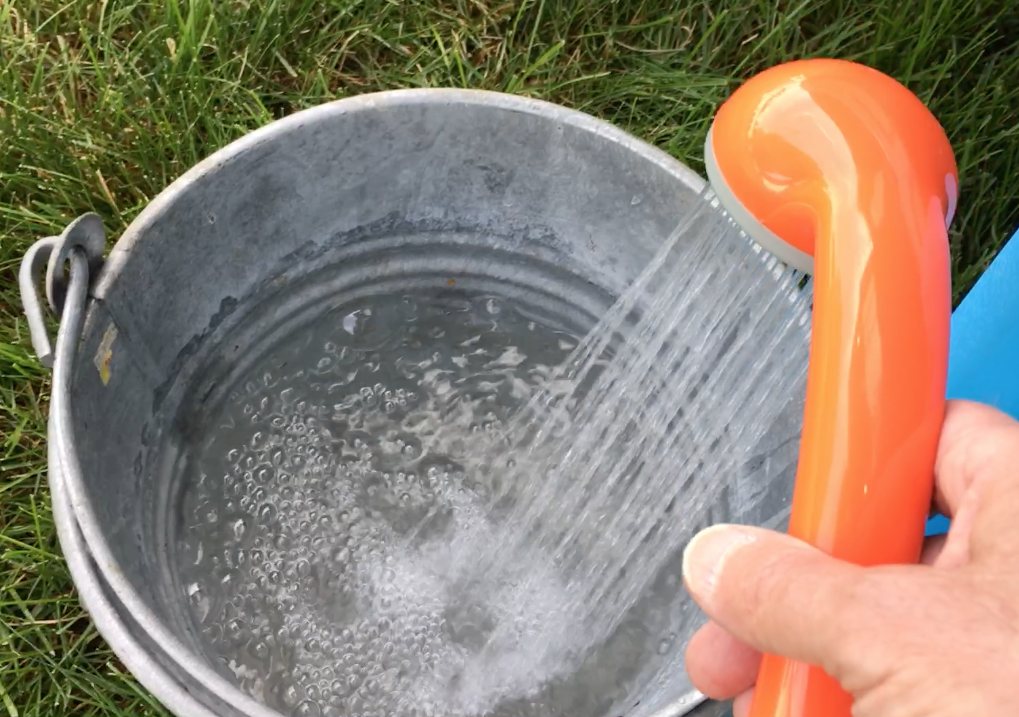
On the opposite end of the Road Shower 2 is a hose valve with standard garden hose threads. Attached, is a 55" long 5/8" diameter food grade hose, with a standard adjustable garden hose nozzle on the end. On the top of the tank is a standard Schrader valve for pressurizing the tank using a tire pump or air compressor.
Installation
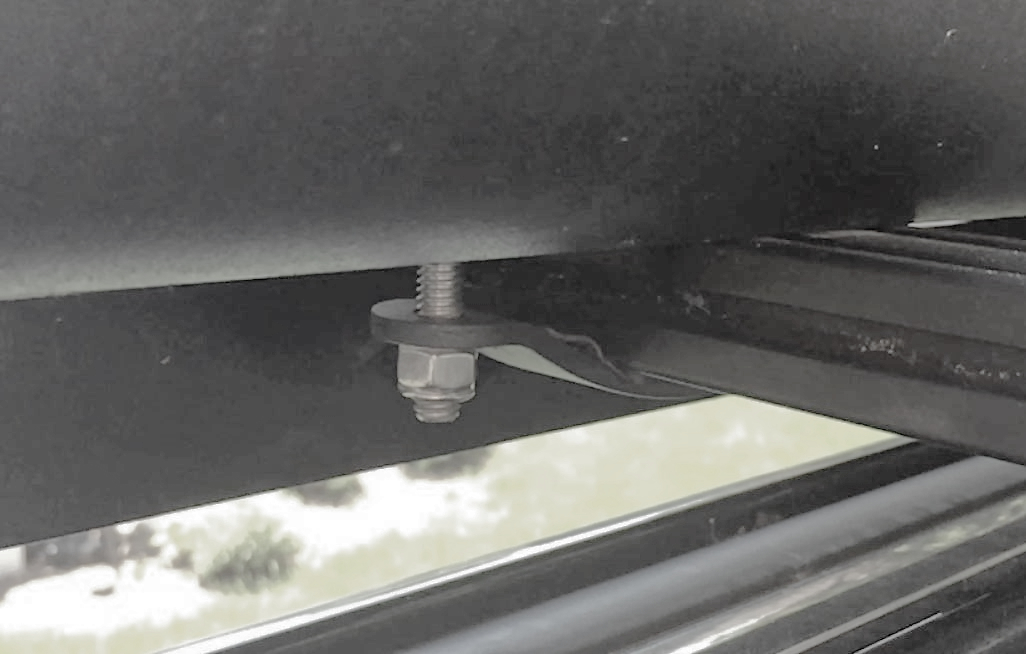
Mounting the Road Shower 2 is very simple, and attaches much like any roof mounted bike/ski rack. Your vehicle must have crossbars. The provided brackets and fasteners will fit 1" round or square crossbars, and aero bars. My Prinsu rack has 1" X 2" rectangular crossbars, and the supplied parts fit it just fine.
Simply slide the four carriage bolts into the T-slot on the bottom of the tank, then lay the tank on top of the crossbars. There are two pieces of adhesive backed foam that can be attached between the bottom of the tank and the crossbars to avoid scratching either, and for vibration isolation. Slip on the two steel straps, then the locking nuts. Tighten all four nuts evenly using a 1/2" wrench, and installation is complete. (I stuck the adhesive foam on the side of my rack, under the nozzle, to prevent rattling.)
A note about orientation: In order to use the full capacity of the tank, it is recommended to have the hose end of the Road Shower 2 at the lower end of the roof rack. My 4Runner is lower in front, so I mounted the Road Shower 2 on the driver's side of the roof rack.
Use
Filling the Road Shower 2 is as simple as removing the fill cap, filling the tank, and then tightening the pressure cap. Just use your garden hose or a water jug. It is recommended to leave about 1/2 gallon of air space in the tank. The Road Shower 2 operates by pressurizing the air in the tank to force the water out though the hose. If the tank is completely full, there will be very little or no air inside, so it can't be pressurized.
From the owner's manual:
In order to pressurize the tank, you will need to have at least 1/2 gallon of air space in the thank. Otherwise there will be no com- pressed air to pressurize the water. You will get about 1 minute of pressurized water after pressurizing with 1/2 gallon of air space. When it runs out, you will have about 1.5 gallons of air space. Pressurize it again and you will get about 5 minutes of pressurized water and be able to empty the tank.
Pressurize the tank by using a tire pump, air tank, or air compressor. The Schrader valve on the tank is the same type as used on vehicle tires. Once the tank is pressurized, you will hear air escaping the relief valve under the fill cap. When this happens, the Road Shower 2 is ready to use.
The tank can also be filled and pressurized by removing the supplied hose and attaching a garden hose attached to your home spigot. This will fill the tank, and at the same time pressurize it up to 25 PSI or the water pressure of your local water supply, whichever is less.
Testing
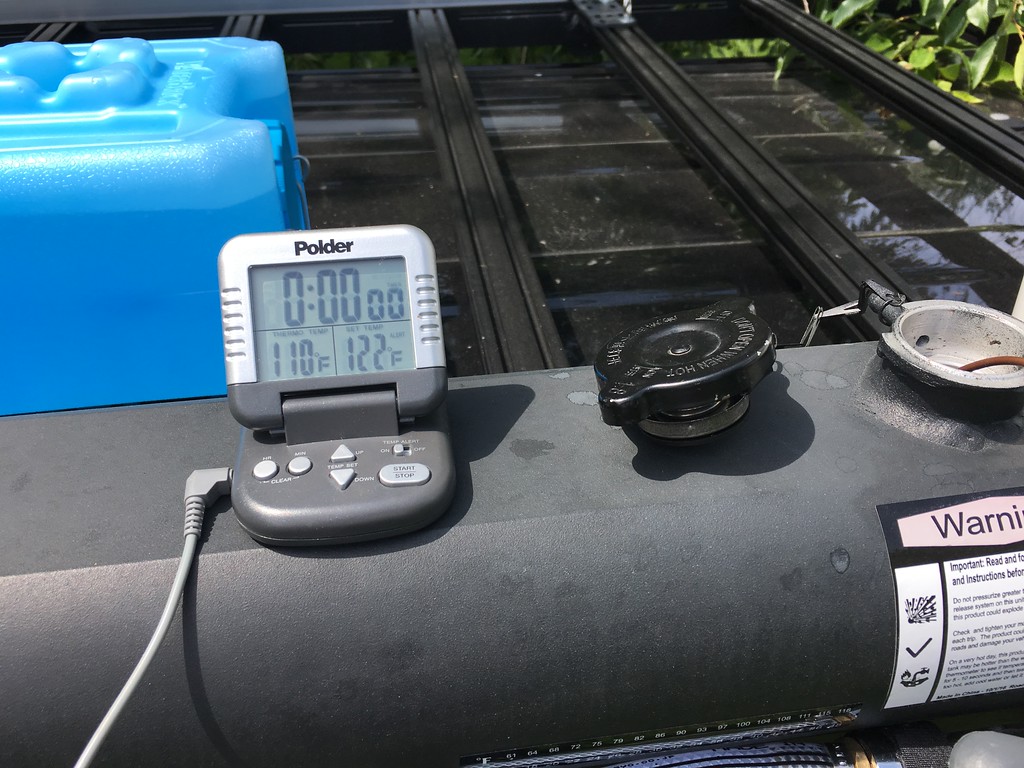
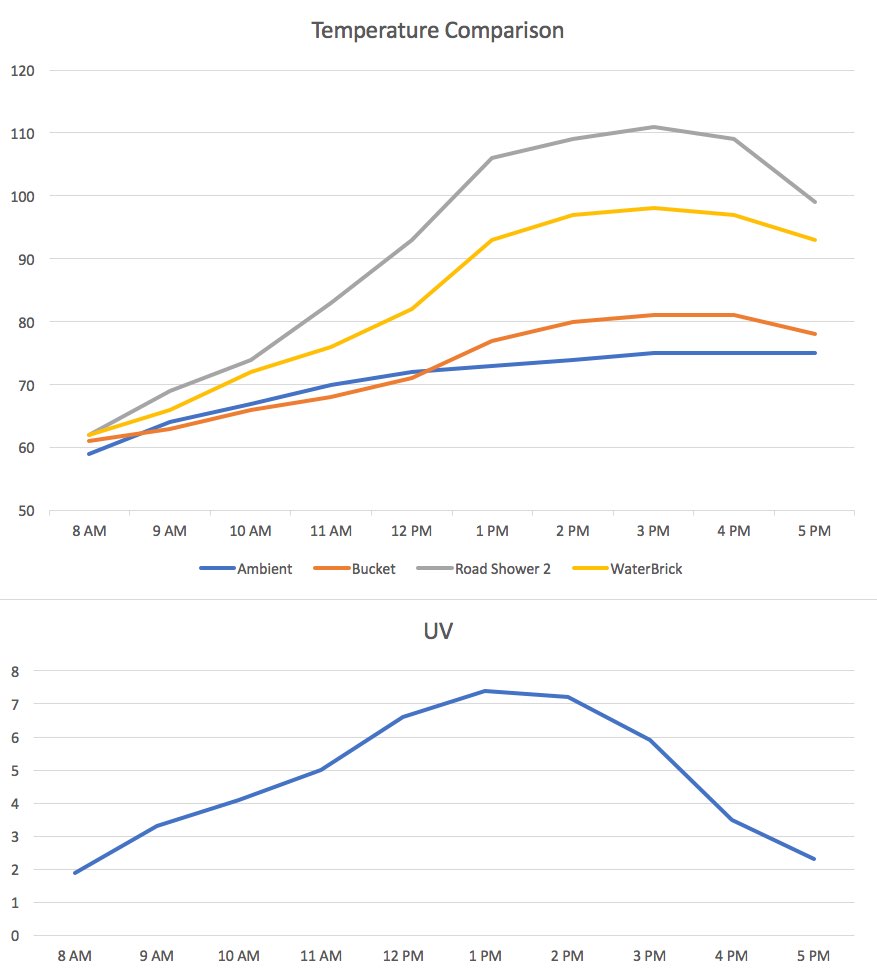
To test the heating capability of the Road Shower 2, I filled the tank with tap water. I also filled a white 5 gallon bucket, and a 3.5 gallon blue WaterBrick. I parked my 4Runner to get full exposure to the sun on the tank, with the other two containers on the roof rack next to the Road Shower 2. All three sat overnight to equalize temperatures. I then checked the temperature of each container every hour during the day. For comparison, I also recorded ambient temperature, the LCD display on the side of the tank, and the UV reading from my Davis Vantage Pro2 Plus weather station.
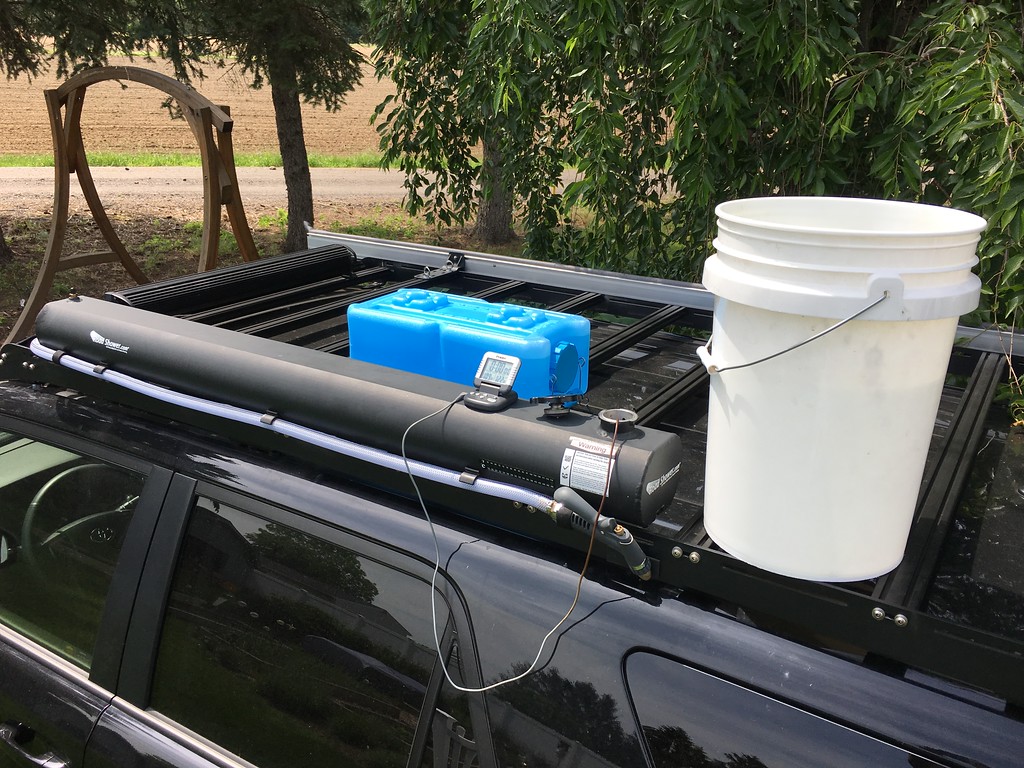
I performed this test on two different days; the first having an ambient temperature range of 59-75°F, and the second a range of 74-91°F.
As shown in the second chart, the water temperature topped out at 121°F in the Road Shower 2. That is about the same temperature as the setting on most home water heaters. Care should be taken to avoid scalding at these temperatures! I left the LCD thermometer's readings off of the charts. Since it is reading the surface temperature of the tank, it was always a few degrees higher than the actual water temperature. The LCD thermometer has a maximum reading of 118°F, so the water temperature line on the chart crossed the LCD line. I found this distracting, so I removed it.
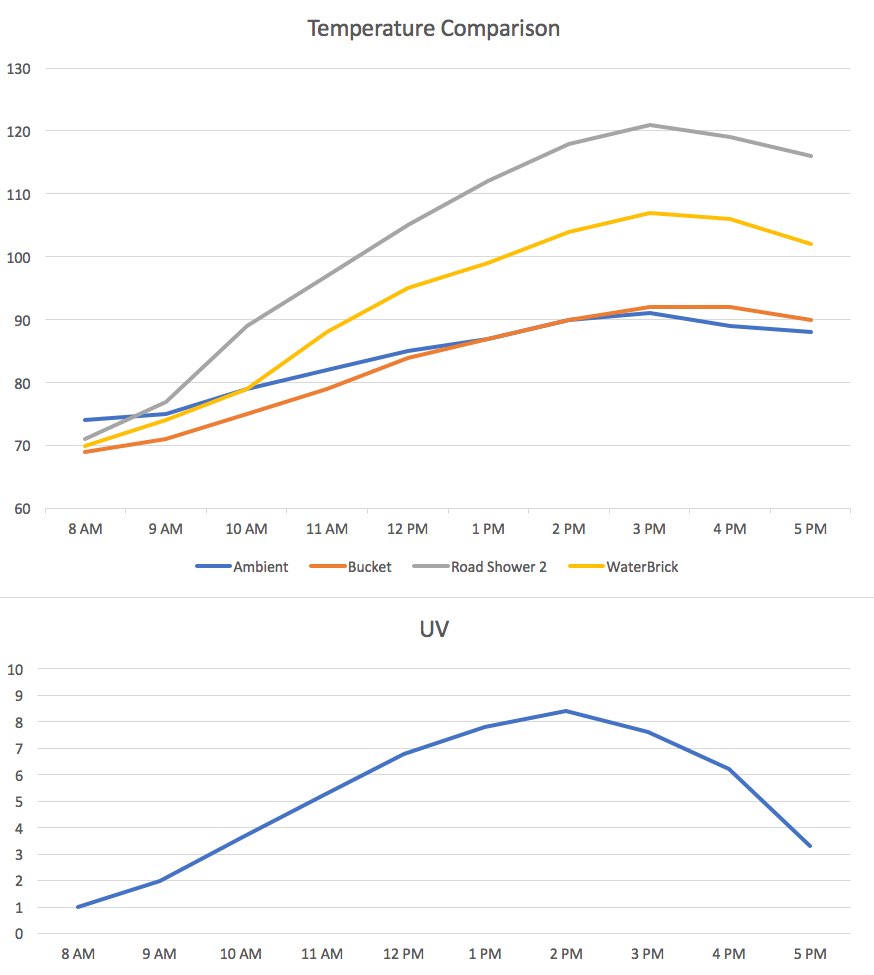
On the second test, I stopped recording at 5 PM, but checked the water temperature in the Road Shower 2 later in the evening. At 7:30 PM, the water temperature was still 104°, and at 8:45 it was 92°.
Location and latitude should be taken into account when considering any solar water heating product. Southern locations will receive much higher levels of solar radiation, while locations further north or climates with frequent overcast would see less solar heating. For reference, the highest UV reading during the first day of testing was 7.4, and 8.4 the second test day. Historically, we will see UV highs during the summer of 11-12, which should result in even higher water temperatures.
The Road Shower 2 heated the water faster and to a higher temperature than the bucket or WaterBrick. This would be advantageous when the temperatures are cooler or there is less sunlight. It also means that the residual heat would be higher later in the day with the Road Shower 2.
The next test was to measure how far, and for how long the Road Shower could spray water with the nozzle set at the hardest setting. This took a few tries, balancing the volume of the water and air. A nearly full tank would spray fairly far, but would reduce in pressure quickly. Too little water gave great pressure for a sustained amount of time, but ran low on water quicker.
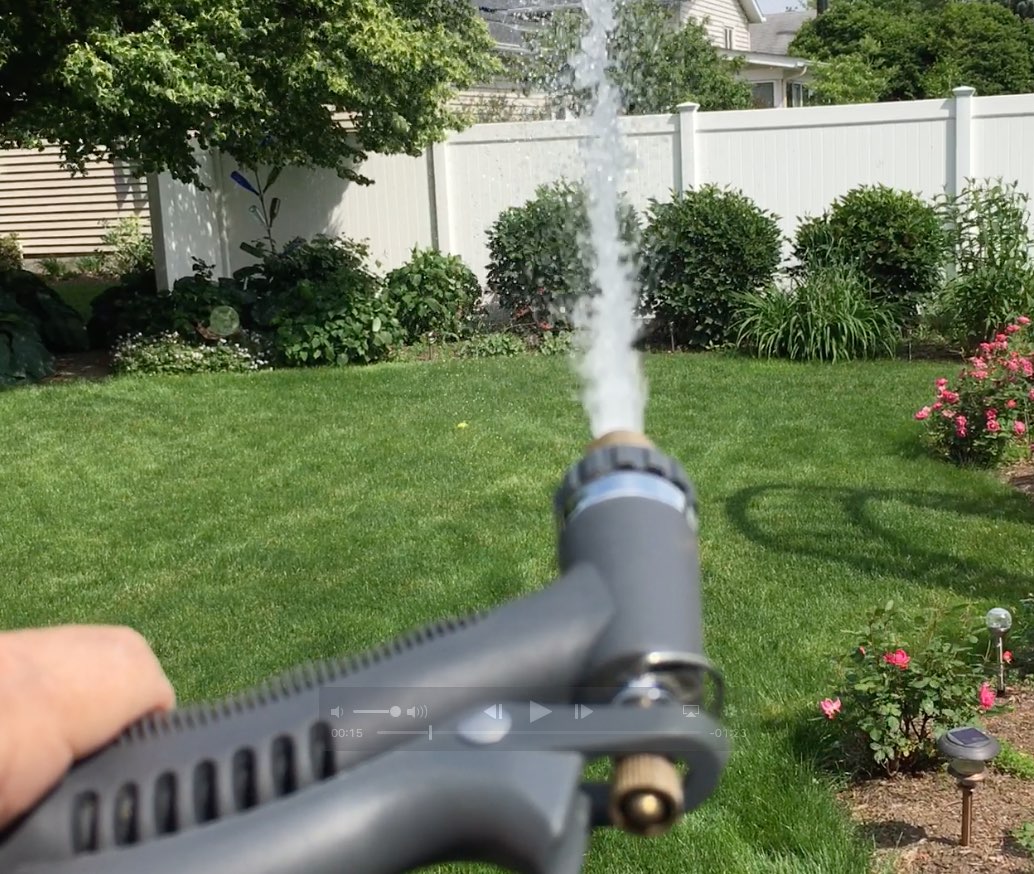
The best results were with the tank about 3/4 full of water and then pressurized to 25 PSI. This resulted in a spray that reached out 36-37 feet, and lasted about 30 seconds, slowly reducing in distance. This isn't a particularly practical test. I just wanted to see how far I could get it to spray. The obvious way to get a long, continuous flow is to fill the tank to the brim, and then leave the air compressor attached, giving a constant full 25 PSI pressure. The spray pressure is quite strong, and is useful for blasting mud and dirt off of my kayaks, shoes, bikes, gear, and the truck. There are several pressurized water options available, and from what I've read, the Road Shower 2 is the highest available. And as described in the conclusion below, will soon be even stronger!
For comparison, before getting the Road Shower 2, I was using 3.5 gallon WaterBricks for water storage, and a 12V Ivation portable outdoor shower from Amazon. This setup only offers a fixed soft shower flow, and only sprays 2-3 feet. However, as it is a 12V submersible pump, it will maintain that same pressure as long as you have a water supply.
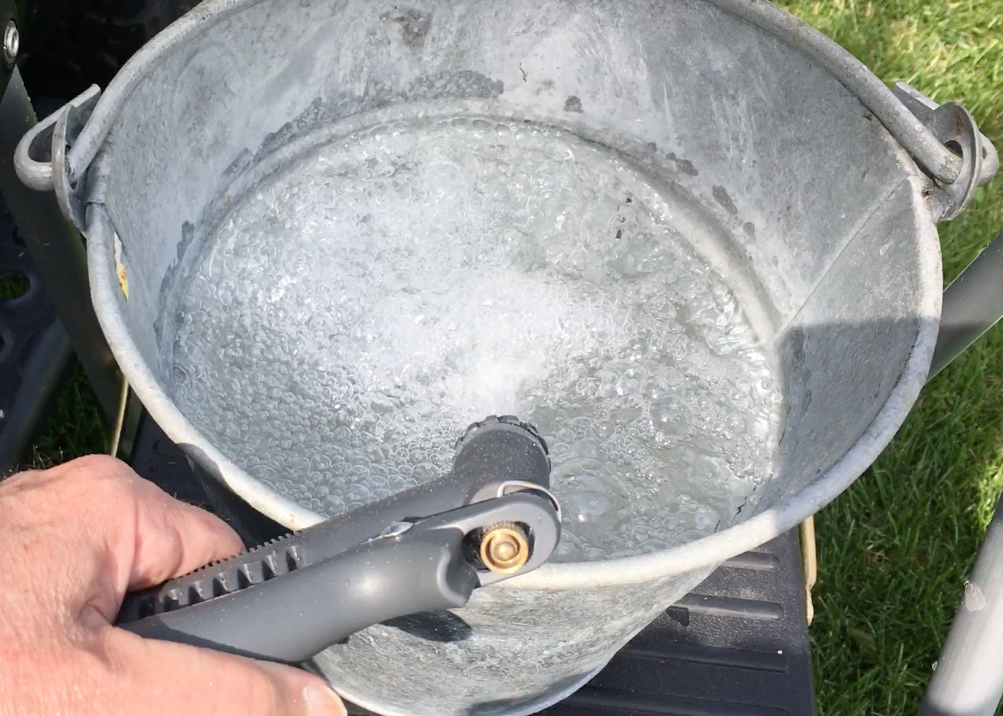
The next arbitrary test was to see how quickly the Road Shower 2 would fill a 2 gallon bucket. Again, filling the tank about 3/4 full and pressurizing to 25 PSI resulted in the best performance. The bucket filled in about 48 seconds. Of course filling the tank full and leaving the air compressor attached would take less time, but that's not how the Road Shower 2 is normally used.
I put the Road Shower's spray nozzle on my house garden hose, and filled the bucket in just 2 seconds. That's with a 3/4" garden hose, and a continuous ~40PSI water pressure, so the Road Shower 2 did okay in comparison. Interestingly, the 12V Ivation shower pumping from the 3.5 gallon WaterBrick only took 55 seconds to fill the two gallon bucket. Even though it had a relatively slow flow, it had a continuous pressure due to the submersible pump.
The Company
My dealings with RoadShower.com have been fantastic. As previously noted, the broken knob was replaced quickly, and they noted that they were already redesigning the foam end support in the packaging. Driving around the northern Ohio exurbs where we live, I get questions about the tank on my roof rack. I contacted the folks at Road Shower, and they sent a pile of their business cards for me to hand out to anyone curious. The RoadShower.com web site has extensive information available. There are frequently asked questions (FAQs), specifications, instruction videos, suggested uses, and more.
The Road Shower has gone through several iterations. Mine is the 4th generation of the Road Shower 2, the latest version available. There is also an eight-gallon Road Shower 3. Both of these will soon be replaced by the recently announced Road Shower 4 and 4L. The 4 is the same length as the Road Shower 2, but a larger diameter, holding 6 gallons. The 4L is the same length as the Road Shower 3 in a larger diameter, holding 10 gallons. The new tanks can be pressurized to 60 and 65 PSI, respectively, which should result in a stronger spray for a substantially longer duration. According to Road Shower, the next version will be able to be completely emptied on a single pressurization. Each new model is $50 more than its predecessor, and pre-orders are now being taken.
Conclusion
The Road Shower 2 is a high quality addition to your hiking, camping or sporting equipment. The all aluminum construction and quality components should result in many years of reliability. It requires no electricity or propane, and can be used as a simple gravity shower if there's no means to pressurize the tank. A little time in direct sunlight should result in at least warm water, and longer exposure a comfortable shower. The company stands behind their product, and is constantly innovating.
Some balk at the cost of the Road Shower products compared to the hard plastic alternative, hanging black plastic bag showers, or the DIY versions made from black plastic sewer pipe. The prospective buyer needs to weigh the quality and performance of each option. Prior to the Road Shower, I used two $18 WaterBricks in the rear footwell for storage (which never heated up), and the $35 Ivation pump. The Road Shower gets the water out of the way and out of the vehicle, avoiding any possible leaks.
The Road Shower will heat the water hotter and faster than the other options, and offers substantially higher water pressure than anything available. It is convenient to use, with no setup, no dragging the WaterBricks or jugs out of the vehicle, no 12V pump to mess with, and it is easy to fill. It is handy in camp or while traveling. It is far and away the best product of its type on the market today.
The only thing I regret about getting the Road Shower 2 is that I didn't wait until the Road Shower 4 was available! If this is a product that you've been considering, my recommendation is to pre-order one. You will not regret it once you've started using it.
Rating: 5 Stars (out of 5)

Products mentioned in this article:
Road Shower 2
Prinsu Design Full-Length Roof Rack
3.5 Gallon Blue WaterBrick
Ivation Portable 12V Shower
'Toyota 4Runner
Davis Vantage Pro2 Plus