Bluebonnet Tear Progress

General Discussion about almost anything Teardrop or camping related

Bluebonnet Tear Progress

Postby davel » Sat Feb 19, 2005 8:18 pm

Started out today to get the bulkhead started in the back and got a little more done.
Image
Bulkhead fit well. Really stiffens the trailer.
Image
Started getting the spars screwed and glued, it's starting to look like a tear now.
Image
The better half came home and had to check it out for size.
Image
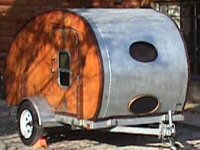
Couldn't resist, I had to see what the outside was going to look like with the masonite wrapped around, of course when I do it for real it will go all the way from one side to the other.
User avatar
davel
Donating Member
 
Posts: 1369
Images: 32
Joined: Mon Apr 26, 2004 9:42 pm
Location: Ennis, Texas

Workin

Postby Boodro » Sat Feb 19, 2005 8:37 pm

Hey Davel , lookin good! It makes a difference when it start lookin like a Tear Huh? :applause: What are ya gonna skin it with ? I see you used the same panelling on the inside as I did. What size is it?
We are all travelers in this world , from the sweet grass to the packin house , birth till death , we travel between the eternities . ( Robert Duvall as Prentiss Ritter)
User avatar
Boodro
1000 Club
1000 Club
 
Posts: 1052
Images: 101
Joined: Sun Oct 10, 2004 9:35 pm
Location: Sylvania, Ohio

Postby Steve Frederick » Sat Feb 19, 2005 8:39 pm

Looks great Davel! It gets exciting once you start closin' her up!! :thumbsup:
Blessings, Steve
Adirondacks, Upstate New York
Building Journals
The Shop Manual's 8-years old!! Thank's everyone!
New! 'Rondack Lodge Plans!Order Here!
Image
User avatar
Steve Frederick
Custom Teardrop Builder
 
Posts: 1984
Images: 29
Joined: Thu Apr 15, 2004 5:02 pm
Location: Upstate New York, Adirondacks (Great Sacandaga Lake)
Top

Postby davel » Sat Feb 19, 2005 9:05 pm

Boodro,

I'm planning on epoxy paint. It will be white with bluebonnet murals on the side. It's turning out to be 4' X about 9' 5".
User avatar
davel
Donating Member
 
Posts: 1369
Images: 32
Joined: Mon Apr 26, 2004 9:42 pm
Location: Ennis, Texas
Top

Postby TomS » Sat Feb 19, 2005 9:19 pm

That's some beautiful work. I like how you set the spars inside the notched frame.
Tom Swenson
[email protected]
User avatar
TomS
1000 Club
1000 Club
 
Posts: 1367
Joined: Thu Nov 18, 2004 2:06 pm
Location: Fitchburg, MA
Top

Postby davel » Sat Feb 19, 2005 9:48 pm

Thanks, Tom. Notching the spars allowed me to follow one of my woodworking rules. You never do a project without buying a new tool. Although I have several routers I used this as an excuse to but a little trim router, these little tools are marvelous.
http://www.tearsoftexas.com/IM000692.JPG
User avatar
davel
Donating Member
 
Posts: 1369
Images: 32
Joined: Mon Apr 26, 2004 9:42 pm
Location: Ennis, Texas
Top

Postby steve wolverton » Sat Feb 19, 2005 10:11 pm

davel wrote:...my woodworking rules. You never do a project without buying a new tool.


I wish I could afford those woodworking rules. :) 
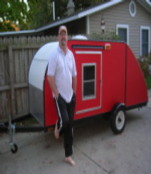
Your project is really coming along nicely.

Steve
�veni, vidi, vici.�
User avatar
steve wolverton
1000 Club
1000 Club
 
Posts: 1676
Images: 11
Joined: Sun Nov 07, 2004 9:39 pm
Location: Brazoria, TX
Top


Return to General Discussion

Who is online

Users browsing this forum: No registered users and 26 guests