PICTURES PLEASE --- GALLEY HINGE ENDS THE RIGHT WAY

General Discussion about almost anything Teardrop or camping related

Postby mikeschn » Thu Apr 14, 2005 8:23 am

Denny Unfried wrote:I also put a four wire trailer plug on the hatch that can be unplugged. Then the hatch can be easily be slid off to remove and clean any sand or grit that might get into the channel. It was removed several times during the build to install the electrical et cetera and it works great. Denny


We did that on the Baja Benroy and it worked great. I think I'd like that on the Lil Diner too!

Mike...
The quality is remembered long after the price is forgotten, so build your teardrop with the best materials...
User avatar
mikeschn
Site Admin
 
Posts: 19202
Images: 479
Joined: Tue Apr 13, 2004 11:01 am
Location: MI

Postby bdosborn » Thu Apr 14, 2005 2:02 pm

Denny Unfried wrote:I also put a four wire trailer plug on the hatch that can be unplugged. Then the hatch can be easily be slid off to remove and clean any sand or grit that might get into the channel. It was removed several times during the build to install the electrical et cetera and it works great. Haven't had remove since finished but I haven't been in any blowing sand - yet.

Denny


Hey! That's a great idea! Thanks Denny and Mike. :thumbsup:
Bruce
2009 6.5'X11' TTT - Boxcar
All it takes is a speck of faith and a few kilowatts of sweat and grace.
Image
Boxcar Build
aVANger Build
User avatar
bdosborn
Donating Member
 
Posts: 5494
Images: 772
Joined: Wed May 05, 2004 11:10 pm
Location: CO, Littleton

Postby TonyCooper » Thu Apr 14, 2005 3:30 pm

I believe this is how Kuffel Creek recommends doing it. I grabbed this pic off of a tear build site and would give credit if I knew whose it was. Anyway, this is how I'm doing mine.

Image
Tony

My Tear Build Site

"No comment"
User avatar
TonyCooper
Official Pot Stirrer
 
Posts: 446
Images: 35
Joined: Wed Oct 27, 2004 12:51 pm
Top

Water Diverter

Postby OkieSailor » Thu Apr 14, 2005 6:54 pm

The water diverter looks great, but where can you get one. I could hand make one but it would be a pain. PS thanks for all of the great answers and photos. I am fixing to put my hinge on when I get it and welcomed all of the information.
Yes OkieSailor is an Oxymoron!!
OkieSailor
Teardrop Advisor
 
Posts: 79
Joined: Sun Jan 16, 2005 12:40 am
Location: Oklahoma City Metro
Top

Postby mikeschn » Thu Apr 14, 2005 6:59 pm

No pain, no gain... plan on making it from scratch... ;)

Mike...
The quality is remembered long after the price is forgotten, so build your teardrop with the best materials...
User avatar
mikeschn
Site Admin
 
Posts: 19202
Images: 479
Joined: Tue Apr 13, 2004 11:01 am
Location: MI
Top

Pain

Postby OkieSailor » Fri Apr 15, 2005 9:30 pm

Yea! like I'm going to get a lot of sympathy from Mike! :D
Yes OkieSailor is an Oxymoron!!
OkieSailor
Teardrop Advisor
 
Posts: 79
Joined: Sun Jan 16, 2005 12:40 am
Location: Oklahoma City Metro
Top

Postby mikeschn » Sat Apr 16, 2005 3:16 am

Aluminum is very easy to cut.

Start with a piece of angle from Home Depot, and cut on your band saw, scroll saw, jig saw, or whatever... File off sharp edges and install! 8)

Mike...
The quality is remembered long after the price is forgotten, so build your teardrop with the best materials...
User avatar
mikeschn
Site Admin
 
Posts: 19202
Images: 479
Joined: Tue Apr 13, 2004 11:01 am
Location: MI
Top

Postby TonyCooper » Sat Apr 16, 2005 9:40 pm

mikeschn wrote:Aluminum is very easy to cut.

Start with a piece of angle from Home Depot, and cut on your band saw, scroll saw, jig saw, or whatever... File off sharp edges and install! 8)

Mike...


Probably about 20 minutes work for each side.
Tony

My Tear Build Site

"No comment"
User avatar
TonyCooper
Official Pot Stirrer
 
Posts: 446
Images: 35
Joined: Wed Oct 27, 2004 12:51 pm
Top

galley hinge

Postby doug hodder » Sat Apr 16, 2005 11:43 pm

While I don't have my hinge installed, I plan on doing it this coming week. What I did was rout out the crossmember that the hinge mounts to. I routed it to the depth and width of the extrusion flange. That way, I can overlay the roof skin over the top of the hinge right up to the vertical hinge portion itself. I also ripped up a piece of wood to fill the gap in the extrusion. I can now overlay the roof so that it butts against the vertical portion of the hinge as I previously mentioned. No extra hinge showing. I won't have any silicone sealant except right at the point where the skin meets the vertical part. On the aft side of the hinge, Mine will tuck under the flange without adding any 1/4 inch piece. Just like a shingle on a roof. I get the same curve profile. By routing out that portion, everything lays down in place and doesn't rise up high on the roof. Just my ideas on it. I'll try to get a photo tomorrow and post it. Doug Hodder
doug hodder
*Snoop Dougie Doug
 
Posts: 12625
Images: 562
Joined: Tue Dec 14, 2004 11:20 pm
Top

Hurricane hinge

Postby J.T. » Mon Feb 18, 2008 10:41 pm

Ok, now as I understand it, you're spose to trim back the bottom ( hatch side) of the hinge about 1/8 or 1/4 of an inch on each side, right? But if you make your TD 4 feet wide? then how does the top piece hang out over the side? do you have to order a 5 foot section? instead of a four foot section? and does trimming the back part make water able to slide into the hatch? Isn't there a seam or small gap there where the hatch and the side meet? Originally I thought that building one would be fairly easy but I'm having trouble visualizing how the doors seal up, how the hatch seals on the side, etc. :( On the door handles? do the doors need to be a certain thickness or what?
:oops: Any and all suggestions and help would be apreciated. thanks guys , ahead of time.
Comparing what I have seen you guys build? I'll be doing good just to know what a board is.lol You fellas do outstanding work. Oh yeah, another thing, is there a site or anything that gives you help in building a woody?
J.T.
Teardrop Builder
 
Posts: 26
Joined: Mon Feb 11, 2008 9:23 am
Location: Dayton,Texas
Top

Re: Hurricane hinge

Postby grant whipp » Tue Feb 19, 2008 4:59 am

J.T. wrote:Ok, now as I understand it, you're spose to trim back the bottom ( hatch side) of the hinge about 1/8 or 1/4 of an inch on each side, right? But if you make your TD 4 feet wide? then how does the top piece hang out over the side? do you have to order a 5 foot section? instead of a four foot section? and does trimming the back part make water able to slide into the hatch?


Hi, J.T.!

I don't know how anyone else is selling theirs, but when you buy a Galley Lid Hinge from me (Li'l Bear Tag-Alongs - www.LilBear.teardrops.net/parts.html ), I send you 3/4" more than the overall width of your trailer's body - 48" wide body gets a 48-3/4" hinge - which nets a 3/8" overhang of the body side hinge piece on each side.
• The mounting flange of the body side piece (that part that screws onto the roof) should be trimmed flush with the sides of the body, leaving the "crown" and verticle locating flange overhanging the sides that 3/8" (depending on how you framed and cut/notched your Galley Walls, you may have to notch the locating flange to fit over the galley wall ...).
• Ideally, your Galley Lid should overhang your Galley Walls by 1/8" on each side, and the Galley Lid side of the hinge should be trimmed flush with each side (with its verticle flange trimmed flush with the bottom the Lid's overhang and even with the Lid's frame)
Before final assembly of the Galley Lid to the body, measure in about 5/8" to 3/4" from each end of the "crown" on the lid side hinge piece and carefully cut a 1/8" slot in that crown, enough to go through the "crown" but not all the way to the base, and mark the slot on the top flange with a pencil mark.
• At the time of final assembly (after everything is lined up and as evenly overhung as you can get), drive a #6x3/8" self-tapping sheet metal screw through the "crown" of the body side hinge piece into the slot of the lid side hinge piece - this will keep the lid from shifting from side to side.

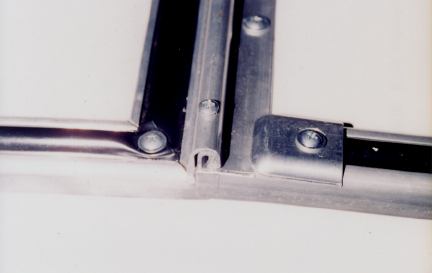
This picture shows the old style Hurricane Hinge and the RV Roof Edge Moldings I sometimes use (the moldings, I mean ...), but I think you can get the idea of what I'm saying ...

Image

Isn't there a seam or small gap there where the hatch and the side meet? ... I'm having trouble visualizing how the doors seal up, how the hatch seals on the side, etc.


Yes, there's a gap where the hatch meets the sides. The hatch sides (or ends) should have some kind of Roof Edge Molding with a lip that hangs down over the sides and (if you are lucky) hangs down past the galley walls a bit when closed. Most folks put the Hatch Seal (a closed-cell foam tape of some kind) on the overhanging portion of the hatch lid, against the lip of the Roof Edge Molding. Some folks put a narrower seal between the Galley Lid Hinge pieces, but if properly fit & trimmed, it's not really necessary.

If you use T-Molding to trim out the non-hinge sides of your side entry door(s), then Door Seal (another kind of closed-cell foam tape) is affixed to the inside of the T-Molding where it closes against the side wall(s).

On the door handles? do the doors need to be a certain thickness or what?


That depends on what style of door handle & latch you choose. If you go with a standard L-Handle and slam-type latch, then thickness isn't really an issue, as the shafts on most L-Handles ara about 4" ...

Hope this helps and answers a few of your questions. Good Luck on your project! If I can be of further assistance, please give me a holler! As always, then ...

CHEERS!

Grant
Celebrating Retirement after over 32 Years of Building, Promoting, Supporting, Supplying, Living the Lifestyle, and Loving Teardrop Trailers!
"Life Moves a Little Slower When You're On Teardrop Time"
The nature of Life, itself, is change ... "Those who matter, don't mind, and those who mind, don't matter."
Image
User avatar
grant whipp
Teardrop Manufacturer
 
Posts: 1815
Images: 117
Joined: Sun Jan 16, 2005 2:00 pm
Location: Jefferson State ('tween CA & OR!)
Top

Previous

Return to General Discussion

Who is online

Users browsing this forum: No registered users and 7 guests