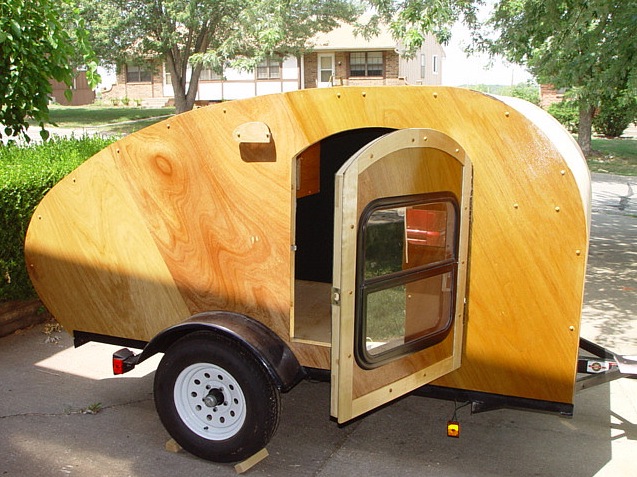
I've got a big woody...

General Discussion about almost anything Teardrop or camping related

I've got a big woody...

Postby R Keller » Fri Jul 02, 2004 2:37 am

...but it's only temporary!

Sorry for the bad joke, but I am rather excited. That's right, the Road Toad is now in its temporary "woody" configuration and on the road! It will be skinned in aluminum. But for now it has three coats of epoxy over the wood. And none of the seals are in place. But this is Northern California in the summer, so it's relatively safe for now.

And it's road-worthy. Got the plates/registration three weeks ago. Two weekends ago was the maiden voyage. Just an overnight 30 miles away, and with an air mattress. I subsequently got the foam cushions and last weekend was an extremely comfortable 4 night outing with the wife and baby to the Kate Wolf Memorial Music Festival in Mendocino County.

Here are some pics. The plan is to do the roof in white aluminum and the sides/hatch in anodized aluminum - a two-tone effect. I've located the 5x10' 0.040 pre-painted white aluminum for the roof, but I'm still trying to track down 5x10' .032 for the sides. Anybody have any leads?

You can check out more photos at:
http://webs.lanset.com/rikeller/Trailer/index_trailer.htm

Still have lots of work to do, but the end is in sight and it's great to be actually using it.

Have a great weekend everybody.

Rik

Image
Sunset at the barn on the first night on the road.

Image
View of rear hatch before draw latched installed. Three screws did the trick to keep the hatch closed on this trip! Had to borrow the neighbor's Jimmy for this trip, since the hitch was being put on my car.

Image
Camped at the music festival. We had a constant stream of interested visitors throughout the day and night. Note the cool Falcon van located behind the Road Toad.
R Keller
Teardrop Master
 
Posts: 187
Images: 1
Joined: Thu Apr 15, 2004 4:01 pm
Location: Sacramento, CA

Postby mikeschn » Fri Jul 02, 2004 3:58 am

I like it. It looks great. Are you sure you want to put aluminum over it? What is this epoxy you are talking about? Is it CPES?

Mike...
The quality is remembered long after the price is forgotten, so build your teardrop with the best materials...
User avatar
mikeschn
Site Admin
 
Posts: 19202
Images: 479
Joined: Tue Apr 13, 2004 11:01 am
Location: MI

Postby BufordT » Fri Jul 02, 2004 4:42 am

Great job Rik. I really like it. More pic's of the kitchen please.

Bufordt :twisted:
"RUSH" The Man, The Legend, The Way Of Life.
User avatar
BufordT
2nd Teardrop Club
 
Posts: 661
Images: 23
Joined: Wed Apr 14, 2004 3:50 pm
Location: Palm Bay Fl.
Top

Postby mikeschn » Fri Jul 02, 2004 6:04 am

I agree, I'd like to see more pictures too. For example, I'd like to see how you finished off the access doors to your tongue storage, behind these cushions...

Image

Also show us, what kind of cabinettes you have above your feet in the cabin, and yes, a close up picture of the galley too! :wink:

Mike...
The quality is remembered long after the price is forgotten, so build your teardrop with the best materials...
User avatar
mikeschn
Site Admin
 
Posts: 19202
Images: 479
Joined: Tue Apr 13, 2004 11:01 am
Location: MI
Top

Postby Shrug53 » Fri Jul 02, 2004 7:44 am

It seems a shame to skin this. A nice sanding and a coat of varnish would really make it look nice. Maybe even a little trim work.
Have you weighed this yet? What was the final number?
"Better living through reckless experimentation"
http://www.forgottenclassics.com
User avatar
Shrug53
500 Club
 
Posts: 546
Joined: Tue Jun 08, 2004 9:17 am
Top

Postby Chip » Fri Jul 02, 2004 7:47 am

Rik,,,let me add my high 5's and congrats on ya "towed",,its looking mighty fine,,you and bufford may have started a small revolution here,,,now ya done got me thinking,,lord help me,,,Just an observation but I believe I would leave the sides a-la-natural and just do the top,,,the wood looks nice,,,kep tha pics coming,,

chip
Living large,,,travling small !!!
54"x9'4" tear
4'x8' tear
Serro Scotty rebuild(in progress)
User avatar
Chip
2000 Club
2000 Club
 
Posts: 2534
Images: 49
Joined: Sat Apr 17, 2004 7:33 pm
Location: Greenville, S.C.
Top

Postby Grant » Fri Jul 02, 2004 10:23 am

Lookin' GOOD, Rik!

Will you be bringing it up to Bob's I.A.D.Y.7 July 16-18 on Clearlake? Love to check it out and high-5 you personally.

As far as your 5'x aluminum in .032" goes, it's darn near impossible to find ... you'll have better luck finding it in .040". I'm not sure if Curt at Cardo on West El Camino can point you in the right direction, but I'd start with him. I have a source, locally, for 103"W .040" in any length I want it - if worse comes to worse, you can get some of that and cut it down to the 5'W you need.

I am looking forward to seeing your teardrop! In the meantime ...

CHEERS!

Grant
"Life Moves a Little Slower When You're on Teardrop Time" ... so kick back and focus on the Good Stuff!
Image
User avatar
Grant
Teardrop Manufacturer
 
Posts: 94
Joined: Wed Jun 16, 2004 4:37 pm
Location: Redding, CA (the REAL Nor-Cal)
Top

Postby tdhombre » Fri Jul 02, 2004 10:33 am

Nice job and I agree with you about the aluminum skin. It will take on a completely different, more finished look with the siding in place.

Nice job and enjoy the fruits of your labor.

:D
tdhombre
Teardrop Advisor
 
Posts: 95
Images: 8
Joined: Tue Apr 20, 2004 11:19 am
Location: Morro Bay, CA
Top

Postby Shrug53 » Fri Jul 02, 2004 11:05 am

Just one other option. If you do not want to leave it wood, and the aluminum is too hard to find you can always seal the wood and then prime it with spray primer you get at the auto parts store. If you finish the prep work well, you can then take it to someplace like One Day Paint and get it shot to match your tow vehicle for les than $200.00
"Better living through reckless experimentation"
http://www.forgottenclassics.com
User avatar
Shrug53
500 Club
 
Posts: 546
Joined: Tue Jun 08, 2004 9:17 am
Top

Postby tdthinker » Fri Jul 02, 2004 11:58 am

I would keep it a woody. I like the wood you used, what kinde? I hope you had fun on your outing, bye
Ryan
User avatar
tdthinker
500 Club
 
Posts: 512
Images: 1
Joined: Wed Jun 09, 2004 10:23 pm
Location: Illinois
Top

Postby Jiminsav » Fri Jul 02, 2004 10:29 pm

Lookin good, bubba..do what you need to do with it..don't listen to these wood heads.. :lol:
Jim in Savannah
If you can read this bumper sticker, my camper fell off.
User avatar
Jiminsav
3000 Club
3000 Club
 
Posts: 3059
Images: 40
Joined: Sat Apr 17, 2004 8:49 pm
Location: Georgia, Savannah
Top

Postby tdthinker » Fri Jul 02, 2004 10:30 pm

I agree with Jim, do what you have to do. And Jim, you have to admit that wood looks really good on it. O well, more pics would be nice if possible, bye
Ryan
User avatar
tdthinker
500 Club
 
Posts: 512
Images: 1
Joined: Wed Jun 09, 2004 10:23 pm
Location: Illinois
Top

Postby R Keller » Mon Jul 05, 2004 1:38 pm

Thanks all!

Wow, so many questions. I'll try to get to them here. If I skip something let me know...

Mike: CPES? Does that stand for penetrating epoxy sealer or something like that? I used straight ("neat") System Three epoxy. The epoxy sealer stuff has solvents added to it, which explain the toxic fumes. The solvents reduce the viscosity and let the epoxy penetrate into the wood further. You could add 10% solvent to neat epoxy yourself for the same effect. I wanted to go solvent free though. The birch plywood soaks the stuff up pretty well on the first coat anyway. And then the next coats provide a nice surface.

No photos of the galley for now. I'll post those as soon as I actually have something to show. It's basically the countertop right now. I'm looking into getting stainless steel fabricated for it. But the first quote I got was outrageous, so we'll see.

I did just take some photos of the main cabin interior though (ignore the severe barrel distortion from the wide angle attachment on the video camera):

Image
This one shows the front inside storage area. The cushions are 5" thick each, so when stacked on top of each other are exactly the 10" height of the bottom of the storage area. I can also configure the cushions so that one becomes a back rest and covers up the access to the storage.

Image
As you can see here, I routed some grooves at just over 1/4" to allow two 1/4" plywood sliding doors to cover the storage area. I haven't made the doors yet.

Image
This photo shows the storage space at the foot of the bed, along with the fold-out child's bed platform. The storage area will have sliding doors just like the front storage. Neither frame nor doors are constructed yet though. The child' bed is 13.5" deep when folded and 27" when unfolded, as you can see in the following photo...

Image

As far as the wood exterior, thanks for the advice both ways, but it's probably going to be covered. The wood may look nice in the photos, but you can't really see all of the filled screw holes, filled routed grooves to run wiring, etc. It wouldn't look so great in real life and I would have had to have built it differently from the get-go. The plywood is all Finland Birch. It's the whole interior too, so at least I get to look at it! Very pretty stuff. Though you might notice the grain runs the opposite direction of most 4x8 plywood. It runs in the 4' direction, so I have vertical grain on my side walls.

Anyway, I want a low-maintenance, durable exterior and don't want to have to refinish exterior wood every so often. As far as painting the wood, I guess I should look into that. Though skinning in aluminum would seem to offer more protection from dings and scrapes. If anyone can convince me otherwise, I'm open to suggestions...

As far as the weight goes, as configured in the latest photos, and not counting the mattress, cooler, water, etc., the dry weight is around 850 lbs. Galley cabinets, fenders, and aluminum will bring that up 975-1,000 lbs.

And finally, Grant: when I finish this thing and the time comes to thank the multitudes of people without whom I would not have been able to do this project, your name will be at the top of the list (and I won't forget about you either, Mike!). We won't be able to make the Clearlake event this year unfortunately. Might get up to Redding later this summer though.

If I can't find .032 or .040 anodized aluminum at 5' wide for the sides (actually I just need 52" wide) , I'm thinking of running a horizontal seam halfway up (or down) the side. Or maybe getting the aluminum powdercoated to match the frame and fenders.

To everyone else: if you can manage to get ahold of Grant on the phone or e-mail; he's got incredible experience, knowledge, and advice. Take copious notes. And search the archives on Teardrop Times for his posts. Invaluable stuff.

Rik
R Keller
Teardrop Master
 
Posts: 187
Images: 1
Joined: Thu Apr 15, 2004 4:01 pm
Location: Sacramento, CA
Top

Postby Chip » Mon Jul 05, 2004 9:08 pm

Rik,,,,discuss siding with Beverly,,she used a commercial roofing PVC single ply membrane,,I am gonna use TPO which is a pvc hybrid,,,not a large choice of colors but it can be had in 10' wide rolls,,,not too heavy and is right durable,,,just a option to think about,,,Ill let ya know how mine works out in a couple of weeks,,right now just struggling to get to that point,,

chip
Living large,,,travling small !!!
54"x9'4" tear
4'x8' tear
Serro Scotty rebuild(in progress)
User avatar
Chip
2000 Club
2000 Club
 
Posts: 2534
Images: 49
Joined: Sat Apr 17, 2004 7:33 pm
Location: Greenville, S.C.
Top

Postby DLucas » Mon Jul 05, 2004 9:24 pm

Hey Rik,
All I can say is WOW!!!! It looks great, and I can only wish I was as far along as you. Hope to have my frame done in the next 2 weeks though, then I can start the woodwork! Keep up the great work, and keep sending those pics in! Again.... WOW! Makes me want to work faster!!!

DLucas
DLucas
Teardrop Inspector
 
Posts: 8
Joined: Tue Apr 27, 2004 6:26 pm
Location: Maryland
Top

Next

Return to General Discussion

Who is online

Users browsing this forum: No registered users and 5 guests