Insulated Weekender

General Discussion about almost anything Teardrop or camping related

Insulated Weekender

Postby mikeschn » Sat Aug 07, 2004 5:40 am

I'm going to be building an insulated version of the Weekender for us. Michelle likes it just the way it is. She doesn't want me to round it off like a modernistic. :cry:

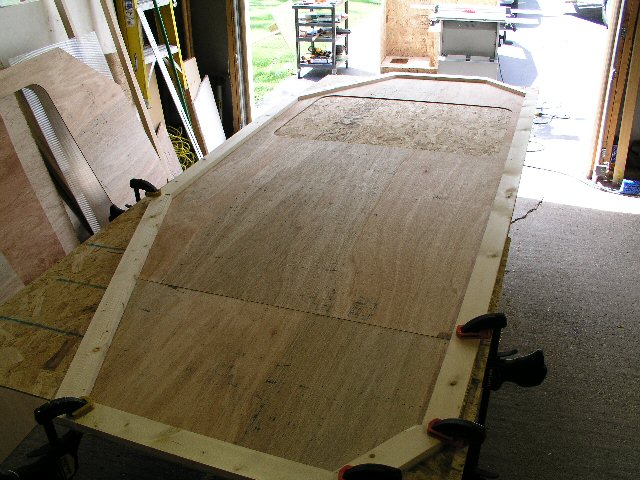
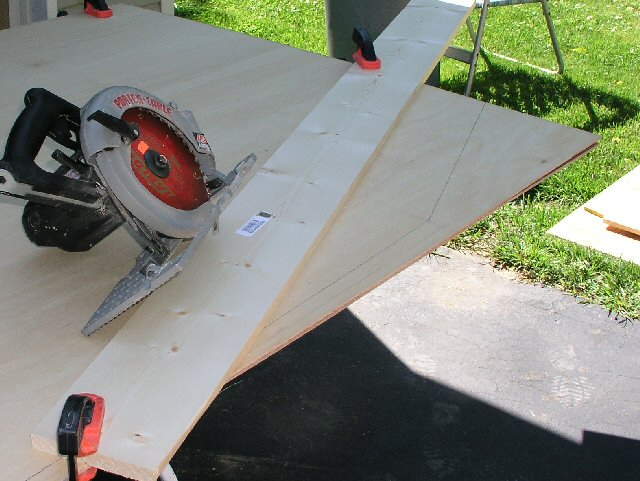
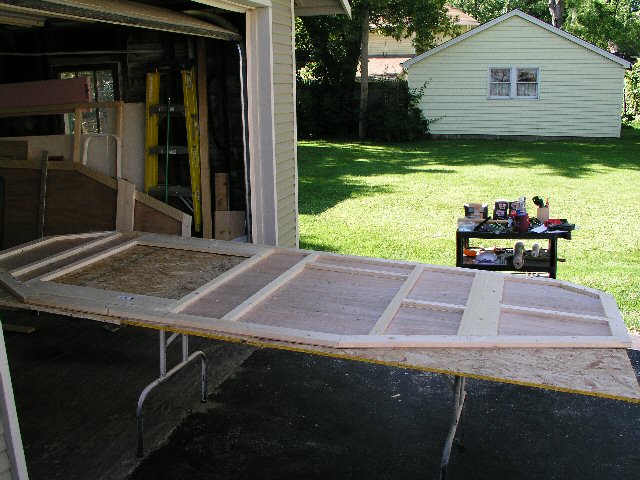
I'm going to build 3/4" thick pine frames instead of using 3/4" thick plywood. These frames will be covered with 1/4" moisture resistant luan, (actually 5.2mm thick). Optionally, I can glue in some 3/4" polystyrene insulation and cover it with 1/8" birch plywood.

Does anyone want me to take photos of how this goes together? :?:

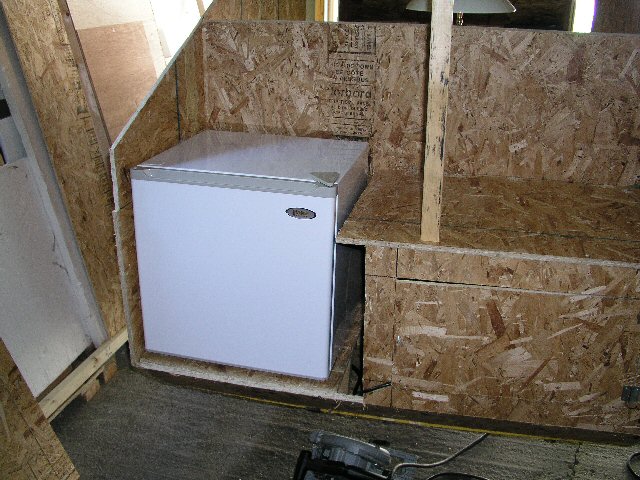
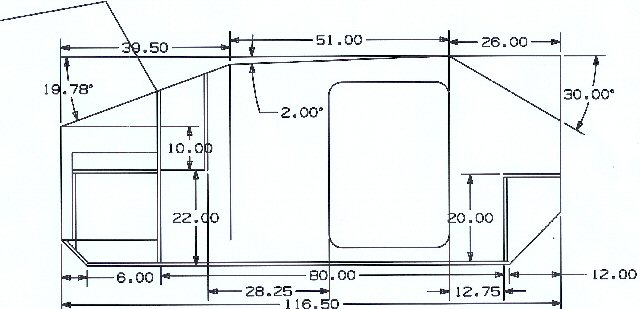
Oh, btw, it's going to be 5' wide and 9 1/2' long. It's designed for a real refrigerator in the back, and a drop in propane stove. There will be a window in the front, sized to take a window air conditioner. The a/c will ride in the back seat of the Jetta, if we go to FL, or if it's really really hot here. Otherwise it'll stay home. Other features? Sure, drop down hinged table on the inside, drop down benches and a fantastic fan roof vent. The electrical is going to be simplified on this one. 12vdc lighting coming from the battery. And a pair of 110v plugs.

I haven't estimated the costs yet, but my goal is to make it the lightest weight and most affordable teardrop I've built yet! Oh yes, the fastest teardrop too! And no, I didn't mean 85MPH. :shock: I mean 1 weekend to build the frames, 1 weekend to skin it and 1 weekend to paint it.

Mike...
The quality is remembered long after the price is forgotten, so build your teardrop with the best materials...
User avatar
mikeschn
Site Admin
 
Posts: 19202
Images: 479
Joined: Tue Apr 13, 2004 11:01 am
Location: MI

Postby beverlyt » Sat Aug 07, 2004 6:54 am

Mike,
YES, YES, lots of pictures!!!
It's going to be great for pulling behind the Jetta!
And I can't wait to hear what it winds up weighing, fully loaded for camping.

bev
User avatar
beverlyt
500 Club
 
Posts: 955
Images: 20
Joined: Sat Apr 17, 2004 4:50 am
Location: Grand Haven, Michigan

Postby mikeschn » Sat Aug 07, 2004 7:27 am

Okay then, lots of pictures...

But Bev, your avatar isn't red... :?

Mike...
The quality is remembered long after the price is forgotten, so build your teardrop with the best materials...
User avatar
mikeschn
Site Admin
 
Posts: 19202
Images: 479
Joined: Tue Apr 13, 2004 11:01 am
Location: MI
Top

Postby angib » Sat Aug 07, 2004 8:12 am

Mike,

This sounds excellent and the structure sounds just right - durable but lightweight.

One thing, why are you doing the frames first? If you're a wood craftsman and you like the challenge of building a separate frame, that's fine. But it isn't really necessary (and is beyond the skill of a wood butcher such as myself). Why not simply add the framing to the ply panels - really clever joints aren't that important and a good glue with corrugated connectors would be enough. You could even make up square edge panels and then bevel the edges on your table saw (yeah, keeping the corrugated connectors out of the way).

The way I see it, the 1/4" ply is nearly enough on its own, but would be real wobbly in the middle of flat panels, so you add some framing (preferably across the shortest dimension). Then you need some 'meat' at the edges for screws, so you add some more framing there. But you're not trying to build a self-supporting framework.

Just my twopennyworth*.

Andrew

*Where did you all think your expression came from? :wink:
User avatar
angib
5000 Club
5000 Club
 
Posts: 5783
Images: 231
Joined: Fri Apr 30, 2004 2:04 pm
Location: (Olde) England
Top

Postby mikeschn » Sat Aug 07, 2004 8:22 am

My logic, right, wrong, or indifferent, was to build the frames, like in a cabinet carcass, then bolt the frames together through the pine, and then glue the skins on, tacked with an occassional staple for good measure. This way I could put a little dab of putty in the staple holes and be ready to paint.

I could build the side panels the way you suggest, but then I would have to countersink the screws, and putty those holes. Also it would be a little more difficult to string the wires (the few that I still have) because the skins are in the way of the drill motor.

But I'll keep those thoughts in mind, and try to come up with what I think is the easiest way for a "butcher" to make those panels.

Later!

Mike...

P.S. I'm surprised no one asked any more about the refrigerator... Here's a picture to give you an idea how it might look... :D

Image

P.P.S. Was that twopence or twopenny?
The quality is remembered long after the price is forgotten, so build your teardrop with the best materials...
User avatar
mikeschn
Site Admin
 
Posts: 19202
Images: 479
Joined: Tue Apr 13, 2004 11:01 am
Location: MI
Top

Postby mikeschn » Sat Aug 07, 2004 8:39 am

Oh the plan changed slightly too! A higher backend so we can get the coffee pot in there, a hatch that goes all the way to the floor so we can open the door to the fridge, and it's a few inches longer too.

Image

Now's the time to tell me, what did I miss/forget?

Mike...
The quality is remembered long after the price is forgotten, so build your teardrop with the best materials...
User avatar
mikeschn
Site Admin
 
Posts: 19202
Images: 479
Joined: Tue Apr 13, 2004 11:01 am
Location: MI
Top

Postby DANL » Sat Aug 07, 2004 8:51 am

Your plan sounds great. As a former carpenter and display maker (before my design career), I can say that either carcass then skin or frame/skin composite should work just fine. More a matter of personal work style.

You mentioned wood filler in the screw and staple holes and that hit a nerve with me. I had learned in the past to go easy on the filler but for some reason seem to have forgotten the lesson. There are a lot of screws in my trailer and I used too much filler. Now I'm sanding that filler and will be for many hours yet.

I've also been reminded why the pros use high quality paint. Benjamin Moore is the "best" paint we can get here--WAY more expensive than the paint you might get at a home center but oh so sweet to work with.

Hey, please do take lots of pix. I find there's as much to be learned from HOW others do things as there is from all of the great ideas that appear here on the forum.
The tiny trailer in the avatar is designed to carry our recumbents and sometimes sleep in. We LOVE having a kitchen in the woods and a place for most of our gear.
Dan Jones http://sunsetlanding.com/teardrop/teardrop_intro.html
User avatar
DANL
Donating Member
 
Posts: 199
Joined: Mon May 24, 2004 10:42 pm
Location: Plymouth MN
Top

Postby mikeschn » Sat Aug 07, 2004 4:26 pm

Insulated sidewalls stink. They are hard to build, the two sides don't match, and they take all day to build. :cry:

Image

I have two of these now, and that's all I have to show for a day outside. Lets see, these sidewalls, with the inner skin will weigh about 50#.
That's 25# for the outside luan, 12# for the inside birch, and 13# of pine framing.

I could have gotten a piece of 1/2" plywood for the same weight!!!!!

So that sounds like another lesson learned!

Mike...

P.S. I gotta stop learning lessons like this!!!

P.P.S. My 13 yr old told me she wants a "Weekender" when she is 16 so she can go camping!!!
The quality is remembered long after the price is forgotten, so build your teardrop with the best materials...
User avatar
mikeschn
Site Admin
 
Posts: 19202
Images: 479
Joined: Tue Apr 13, 2004 11:01 am
Location: MI
Top

Postby beverlyt » Sat Aug 07, 2004 8:21 pm

But Mike, you'll have the insulation this way, right?

Looks like you got plenty done to me.... maybe tomorrow will go even faster!
User avatar
beverlyt
500 Club
 
Posts: 955
Images: 20
Joined: Sat Apr 17, 2004 4:50 am
Location: Grand Haven, Michigan
Top

Postby Grant » Sat Aug 07, 2004 8:29 pm

"Insulated sidewalls stink. They are hard to build, the two sides don't match, and they take all day to build."

Ummmm, Mike ...

... sounds like a good argument for cutting the walls out (together) first, then building the framework to match, eh what? ;-} ;-}

"That's 25# for the outside luan, 12# for the inside birch, and 13# of pine framing. "

So, you ended up with a 1-1/8" INSULATED wall that weghs the same as a 1/2" UN-insulated wall? Sounds O.K. to me. I think I'd have gone with 1x2s for the perimeter frames instead of the 1x4s, but that'd only save 6-1/2#.

Oh and, hey - don't get too discouraged! Your kids are watching, and you DO want them to grow up to be Teardroppers, right?

Just havin' a little fun with ya, Mike! Enjoy the build - EVERY teardrop is a learning experience, even the ones I'm building 20 years after I started.

Continued Good Luck, and as always ...

CHEERS!

Grant
"Life Moves a Little Slower When You're on Teardrop Time" ... so kick back and focus on the Good Stuff!
Image
User avatar
Grant
Teardrop Manufacturer
 
Posts: 94
Joined: Wed Jun 16, 2004 4:37 pm
Location: Redding, CA (the REAL Nor-Cal)
Top

Postby mikeschn » Sun Aug 08, 2004 4:07 am

Oh yes, the two sides were clamped together for cutting...

Image

But here's what I learned... You can't screw thru 2 1/2" wide pieces to make the frame. You can, but you have to make sure you drill straight thru the entire 2 1/2" You have to have long screws, and your angles better be cut perfectly. Not exactly what I would recommend to a butcher!

So instead I glued the framing pieces to the plywood. I'll trim both sides to the same size with a flush trim router bit today.

Maybe I'll even start putting some joists on today! But it's going to be a short day, we have places to go and things to do. :roll:

Mike...
The quality is remembered long after the price is forgotten, so build your teardrop with the best materials...
User avatar
mikeschn
Site Admin
 
Posts: 19202
Images: 479
Joined: Tue Apr 13, 2004 11:01 am
Location: MI
Top

Postby mikeschn » Sun Aug 08, 2004 5:31 am

DANL wrote:
You mentioned wood filler in the screw and staple holes and that hit a nerve with me. I had learned in the past to go easy on the filler but for some reason seem to have forgotten the lesson. There are a lot of screws in my trailer and I used too much filler. Now I'm sanding that filler and will be for many hours yet.

I've also been reminded why the pros use high quality paint. Benjamin Moore is the "best" paint we can get here--WAY more expensive than the paint you might get at a home center but oh so sweet to work with.
.


Hey Dan,

I don't use wood filler. I use Fill it, epoxy filler...
http://www.rotdoctor.com/house/Hfiller.html
And to remove material fast, use a belt sander! :lol:
But I prefer a random orbital sander!!!

As for paint, there's only 1 paint in my book now. It's the Uniflex 255 epoxy paint you can get here.
http://www.rotdoctor.com/poly/uniflex.html

Someone here once said they used a too thin floor in their teardrop. Was that you? How thick is it? How thick should it have been?

Mike...
The quality is remembered long after the price is forgotten, so build your teardrop with the best materials...
User avatar
mikeschn
Site Admin
 
Posts: 19202
Images: 479
Joined: Tue Apr 13, 2004 11:01 am
Location: MI
Top

Postby Chip » Sun Aug 08, 2004 6:46 am

Mike it may be a good thing to take a little more time,,if ya finish real quick then you may be the first charter member of the "4" dropper club or would that be number 5,, :lol: one other thing you could try is make a pattern for the sides and framing and cut all out of one piece of ply,,insulate the cavity areas and lam luan to both sides,,every thing would be same same layout may take a while though.

chip
Living large,,,travling small !!!
54"x9'4" tear
4'x8' tear
Serro Scotty rebuild(in progress)
User avatar
Chip
2000 Club
2000 Club
 
Posts: 2534
Images: 49
Joined: Sat Apr 17, 2004 7:33 pm
Location: Greenville, S.C.
Top

Postby mikeschn » Sun Aug 08, 2004 6:55 am

I really like the idea of starting with plywood, and cutting out holes for the insulation... but plywood is not quite 3/4" thick, and the polystyrene is a full 3/4" thick.

Maybe I could use that white beadboard insulation???

Mike...
The quality is remembered long after the price is forgotten, so build your teardrop with the best materials...
User avatar
mikeschn
Site Admin
 
Posts: 19202
Images: 479
Joined: Tue Apr 13, 2004 11:01 am
Location: MI
Top

Postby mikeschn » Sun Aug 08, 2004 9:49 am

This morning I stumbled on the easiest way to build and attach the framing to the 1/4" luan. Now some of you guys will say, well hey, that's almost the way I built mine.

Normally when you build a framed wall, you screw the framing to the outside wall, which is typically about 1/2" thick. That doesn't work on 1/4" luan.

Unless... :idea:

... you screw the framing to the table underneath it, and sandwich the 1/4" luan inbetween. :shock:

I've completed the framing for 1 side this morning and it's out there drying.. I would definitely recommend this method to anyone building a 1/4" outside skinned wall!!!

Image

:wink: Mike...
The quality is remembered long after the price is forgotten, so build your teardrop with the best materials...
User avatar
mikeschn
Site Admin
 
Posts: 19202
Images: 479
Joined: Tue Apr 13, 2004 11:01 am
Location: MI
Top

Next

Return to General Discussion

Who is online

Users browsing this forum: MSN [Bot] and 28 guests