
Whew! Finally got my site updated.
The rest of the construction photos, some shots at the campout, and comments are at this link. Lots of pictures so please be patient on download.
http://home.att.net/~daniel.v.jones/tea ... age_2.html
The profile and dimensions have been added at the bottom of this page.
http://home.att.net/~daniel.v.jones/tea ... esign.html
Might get the chassis back from the welder today so I can put it back together and start on interior varnishing and decorating.
Teardrops n Tiny Travel Trailersor t n ttt for short (tnttt.com) |
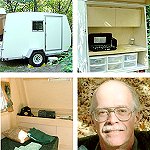
Cargo-Camper pictures and profile posted
4 posts
• Page 1 of 1
Cargo-Camper pictures and profile posted
![]() by DANL » Fri Aug 20, 2004 10:24 am
by DANL » Fri Aug 20, 2004 10:24 am
The tiny trailer in the avatar is designed to carry our recumbents and sometimes sleep in. We LOVE having a kitchen in the woods and a place for most of our gear.
Dan Jones http://sunsetlanding.com/teardrop/teardrop_intro.html
Dan Jones http://sunsetlanding.com/teardrop/teardrop_intro.html
-
DANL - Donating Member
- Posts: 199
- Joined: Mon May 24, 2004 10:42 pm
- Location: Plymouth MN
![]() by mikeschn » Fri Aug 20, 2004 10:43 am
by mikeschn » Fri Aug 20, 2004 10:43 am
Hey Dan,
That's a might fine looking Pod you got. Couple quick questions...
What do you have on the floor in there?
Where did you get your windows, and what size are they?
You mentioned that you are going to cover your counter with formica. Will you document that process for us. I think I'm going to cover the counter in the Weekender with Formica.
Thanks,
Mike...
The quality is remembered long after the price is forgotten, so build your teardrop with the best materials...
-

mikeschn - Site Admin
- Posts: 19202
- Images: 479
- Joined: Tue Apr 13, 2004 11:01 am
- Location: MI