Puffin 2

Anything to do with mechanical, construction etc

Postby john » Sat Nov 29, 2008 2:28 pm

I believe it would be possible to make the backrest portion of the bed in two halves.

If so desired the side opposite the door could be left in the bed position while the side next to the door could be in chair position.

This could help in the transition from bed to seating and also eliminate bed and seating set up while being used solo.

This of course would require different sheets and a support leg of some sort on the side opposite the door.


I'm kind of partial to the Kama Sutra solution, though. :R :R
Build I -- Scenic ---
http://www.flickr.com/photos/8121727@N04/
Goto the Tear Build file

Build II -- Scenic II ---
viewtopic.php?t=29603

Build III -- Scenic Solo---
viewtopic.php?f=50&t=50324

Travel Blog----Now without Political Commentary
http://polifrogblog.blogspot.com/2009/0 ... -2009.html

The Constitution was ratified, not an interpretation thereof...

Penomeli ikibobo
john
User avatar
john
500 Club
 
Posts: 663
Images: 261
Joined: Tue Oct 05, 2004 6:26 pm
Location: eden nc

Postby steve wolverton » Sat Nov 29, 2008 2:52 pm

angib - There you go again Andrew - always making sense. I actually hadn't put much thought into the bed, but I think the easiest way would be to slide the small section into place while standing outside the camper. I'll just have to remember to have my door latch mounted above the bed level. ;)

mikeschn - 72" is too wide for this build. I think the extra width caught a lot of wind while towing, so I'm hoping the narrower camper will do better. I also will be able to slide my shoes, clothes, squeeky vibrating toys, etc. onto the counter which will be at the foot of the bed. BTW, those are nice looking cushion covers. What size foam is that, and did you make the covers?

RAYVILLIAN - Thanks Gary. I always like the 8' long look, so that's what I'll do with this build. Something about those round numbers seem safe. I'm heading to Houston this afternoon to pickup my welder and hood. I'll start looking for trailers tomorrow.

shopfabricator - I love my boat! :D I spent way too much money on that thing. I had to sell the Puffin because I needed the money for a move, and I had to pay to keep the camper in storage. Now that I have enough storage for both, I've decided to start my next build. Don't sweat the queen size-convertable-standy-counter-smaller-lighter-formula (qscscslf?) it'll make sense once it's complete. It makes sense in my head - I'm probably just not explaining it well.

john - That's actually quite an interesting idea. I think it would be best to keep the backrest one section though. It would be easier to set it up as a backrest as one piece, and the bed would only have 1 seam. Methinks Andrew left out the calculations of what Kama Sutra #83 does to one's back. I'm getting older now - not as talented as my younger days.
�veni, vidi, vici.�
User avatar
steve wolverton
1000 Club
1000 Club
 
Posts: 1676
Images: 11
Joined: Sun Nov 07, 2004 9:39 pm
Location: Brazoria, TX

Postby Miriam C. » Mon Dec 01, 2008 8:46 am

:lol: Glad to have you back and building. Ya know if the top part lifts to make a back support you can put the bottom 2/3 on a slider or rollers and just kick the foot board to get it out of the way for dressing. ;)
“Forgiveness means giving up all hope for a better past.â€
User avatar
Miriam C.
our Aunti M
 
Posts: 19675
Images: 148
Joined: Wed Feb 15, 2006 3:14 pm
Location: Southwest MO
Top

Postby Bill_Storey » Sun Dec 14, 2008 9:45 am

Steve, any updates? Are you almost finished with this one yet?
Bill_Storey
Teardrop Advisor
 
Posts: 75
Images: 0
Joined: Wed Dec 01, 2004 12:03 pm
Location: Oklahoma
Top

Postby steve wolverton » Sun Dec 14, 2008 7:23 pm

Bill_Storey wrote:Steve, any updates? Are you almost finished with this one yet?


:lol: I'm tooling up for the build. I may pick up the trailer tomorrow (they have 4 of the trailers at Tractor Supply in stock) after work. I've ordered the paint, sanding longboards, sand paper, door latch, and microspheres.

I picked up my welder last weekend, epoxy, and grinders. I should be able to start posting photo updates this coming weekend. :thumbsup:
�veni, vidi, vici.�
User avatar
steve wolverton
1000 Club
1000 Club
 
Posts: 1676
Images: 11
Joined: Sun Nov 07, 2004 9:39 pm
Location: Brazoria, TX
Top

Postby RAYVILLIAN » Sun Dec 14, 2008 8:02 pm

All Right next week the big bad wolverton will be huffin and puffin and blowing us all away.
Sorry Steve I don't know where that came from. Maybe from a case of cabin fever.

Gary :lol:
Where ever we raise the hatch is home.
Darn blank states keep getting further away and we keep traveling slower ain't never gona get this map full.
111961Image
User avatar
RAYVILLIAN
Lifetime member
 
Posts: 1434
Images: 109
Joined: Thu Aug 05, 2004 9:33 pm
Location: Rayville MO
Top

Postby Bill_Storey » Sun Dec 14, 2008 9:04 pm

I see you ordered the door latch a little earlier in the build this time. :)
Bill_Storey
Teardrop Advisor
 
Posts: 75
Images: 0
Joined: Wed Dec 01, 2004 12:03 pm
Location: Oklahoma
Top

Postby steve wolverton » Sun Dec 14, 2008 9:07 pm

RAYVILLIAN wrote:All Right next week the big bad wolverton will be huffin and puffin and blowing us all away.


This build should go quickly as it's not nearly as difficult as the first Puffin. The trailer frame will be a little more work as I'll need to shorten it, and I'll have to make fender cutouts on the floor. I'm using a marine paint for the sides, so the body work will need to be flawless - that's where I'm anticipating spending most of the time. Fortunately I have 3 weeks off coming up, so I'll have plenty of time to work on it.

I'm going to build this one to sell. I'm hoping to make a little money on this one to finance my next one. I also have a friend wanting one, so I may have 3 to build. :thinking:
�veni, vidi, vici.�
User avatar
steve wolverton
1000 Club
1000 Club
 
Posts: 1676
Images: 11
Joined: Sun Nov 07, 2004 9:39 pm
Location: Brazoria, TX
Top

Postby steve wolverton » Sun Dec 14, 2008 9:15 pm

Bill_Storey wrote:I see you ordered the door latch a little earlier in the build this time. :)


Yes indeed! I'm trying to get all the parts in before I start the build. I don't want to hunt parts while I'm working this time.

I also have a better idea of what I'm doing now. This is the design that I think will serve me best. I'm shooting for a 700 lb. (or less) weight. I will implement stitch-n-glue methods in this build.

I will use a vinyl top on this one, so that's about the only new thing I'm trying. I really like the looks of the vinyl tops (Napsack) and I'm hoping that will save a lot of build time (not as much fairing/sanding) as well as improve the looks. The only part I'll need to hunt is the roof edge insert molding, and the flat insert molding. It's sold in 16' lengths, so I'll have to drive to Austin or Houston to get that stuff.

I'm looking forward to making sawdust. I have a helper this time so that should be a wonderful asset. :thumbsup:
�veni, vidi, vici.�
User avatar
steve wolverton
1000 Club
1000 Club
 
Posts: 1676
Images: 11
Joined: Sun Nov 07, 2004 9:39 pm
Location: Brazoria, TX
Top

Postby shopfabricator » Sun Dec 14, 2008 11:11 pm

Steve, I like the idea of stitch-n-glue construction. I've done a couple of 1/4 inch ply sailing dinghies using that method. Had them out in pretty stiff winds and they would heal to the chine without so much as a "creek" out of the ply. I assume you will be painting the interior as well? Coves will make stain difficult to finish.
...materials can no longer be purchaced at quite those prices mentioned here!
User avatar
shopfabricator
Donating Member
 
Posts: 189
Images: 138
Joined: Fri Aug 24, 2007 9:51 pm
Location: Mooresville, NC
Top

Postby steve wolverton » Sun Dec 14, 2008 11:37 pm

shopfabricator wrote:Steve, I like the idea of stitch-n-glue construction. I assume you will be painting the interior as well?


Basically the sides/roof will be joined with epoxy fillets. I will also epoxy the front counter area. It will be easier/cleaner to epoxy those in place rather than screw them from the outside and fill holes.

Yes, I will paint the interior. I will also wrap foam with fabric and place it between the spars to insulate, as well as clean up the interior and keep it light.

I'll use garage paint for the floor, latex for the interior, marine polyurethane for the exterior sides, vinyl red for the stripe(I have my own vinyl cutter), Herculiner for the bottom, and cover the roof with white vinyl.

I think it should work well. It works on my CAD program, so I as long as stick to that I should be close. :thumbsup:

I'm thinking the biggest selling points are the ability to stand inside the camper, small enough for a 7' garage, queen bed, and low weight.

Image

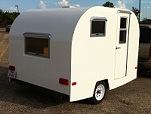
This is the most recent drawing I have. The camper is 6" from the ground. It measures 6'6" tall. I've made the stripe solid as it will be easier to apply it as a solid. I also need to modify the cutout for the tire as I want it more rounded.
�veni, vidi, vici.�
User avatar
steve wolverton
1000 Club
1000 Club
 
Posts: 1676
Images: 11
Joined: Sun Nov 07, 2004 9:39 pm
Location: Brazoria, TX
Top

Postby Donutboy » Sun Dec 14, 2008 11:51 pm

I like the look, but do you think having the wheels pushed back that far will put too much weight on the tongue?
Jerry
Retro-Kamper
(Puffin for Four)
User avatar
Donutboy
Teardrop Master
 
Posts: 163
Images: 126
Joined: Thu May 31, 2007 10:11 pm
Location: Volente, Texas
Top

Postby steve wolverton » Sun Dec 14, 2008 11:53 pm

Donutboy wrote:I like the look, but do you think having the wheels pushed back that far will put too much weight on the tongue?


That is something that concerns me, but considering the entire thing will weigh less than 700 pounds, I don't think it will be too bad. I'm hoping one of the math gurus around here could give me an idea. Worst case I could always add a marine battery at the very rear of the camper as ballast. :thinking:
�veni, vidi, vici.�
User avatar
steve wolverton
1000 Club
1000 Club
 
Posts: 1676
Images: 11
Joined: Sun Nov 07, 2004 9:39 pm
Location: Brazoria, TX
Top

Postby WarPony » Mon Dec 15, 2008 8:35 pm

Steve, good to see you back. Hey, I don't think I'd worry about the axle being too far back. My Jim Dandy has axle set back about the same as your drawing and I don't have any trouble moving it around and it weighs about 625 lbs. Now, your profile is alot taller than the JD but weight is weight...............


Image

Jeff
ImageImage

Still a million dollars away from being a millionaire!!
User avatar
WarPony
Donating Member
 
Posts: 2089
Images: 289
Joined: Tue Sep 14, 2004 12:10 pm
Location: Kansas, Topeka
Top

Postby steve wolverton » Mon Dec 15, 2008 10:07 pm

WarPony wrote:Steve, good to see you back. Hey, I don't think I'd worry about the axle being too far back. My Jim Dandy has axle set back about the same as your drawing and I don't have any trouble moving it around and it weighs about 625 lbs.


Hi Jeff. I'm thinking the same. I'll build it and go from there. ;)

I sure like your new camper. Got any more pics of it online, or a build thread? I saw some pics of it from Madjack's Louisiana trip.
�veni, vidi, vici.�
User avatar
steve wolverton
1000 Club
1000 Club
 
Posts: 1676
Images: 11
Joined: Sun Nov 07, 2004 9:39 pm
Location: Brazoria, TX
Top

PreviousNext

Return to Teardrop Construction Tips & Techniques

Who is online

Users browsing this forum: No registered users and 17 guests