Newbie Class - BASIC WALL ANATOMY

Anything to do with mechanical, construction etc

Re: Newbie Class - BASIC WALL ANATOMY

Postby DMcCam » Tue Mar 18, 2014 7:07 pm

Howdy Jenn,

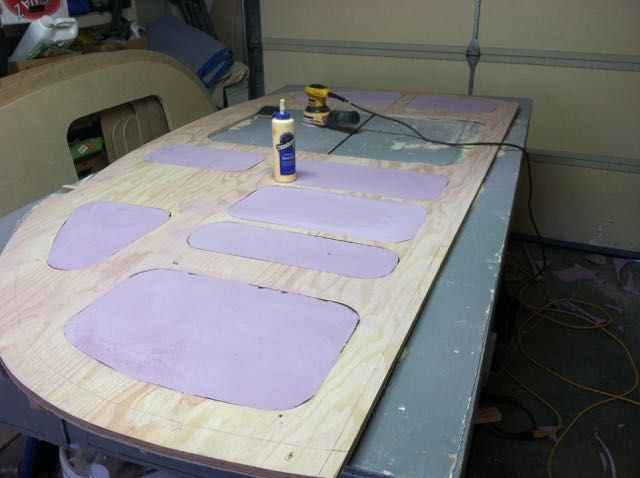
Our walls are the skeletonized 3/4" ply with 3/4" rigid insulation, 1/8" Baltic birch inside and out sandwich walls. We've slept in 28 degree nights comfortably warm. We do use a 12 volt mattress warmer to heat up our 5" foam bed before turning in and have not turned it back on during the night. Our dear friends Debbie and Randy have only 3/4" plywood walls on their woody and have awakened to several inches of snow without issue. These little trailers are much warmer than you'd think.

Image
Here's a shot of our walls with insulation and the interior 1/8" ply in place.

Cheers,

Dave
User avatar
DMcCam
Gold Donating Member
 
Posts: 883
Joined: Wed Jan 06, 2010 8:30 pm
Location: Reno, Nevada

Re: Newbie Class - BASIC WALL ANATOMY

Postby KCStudly » Wed Mar 19, 2014 9:59 pm

The Poet Creek Express is a hybrid foamie with 5mm marine ply inner wall and ceiling skins, and 1-1/2 inch thk foam cores. The outer skin will be canvas glued to the foam and painted over. The floor is 5mm skins top and bottom on a 2x2 and 1x2 (on edge) sub-frame infilled with 1-1/2 thk foam. The floor skins are fully glued to both the foam and sub-frame, both top and bottom. Doors are same construction as walls.

I can't say how it will be in cold weather, other than to say that all indications from other people's experience suggest that this is plenty of insulation. In fact, some feel that this much insulation in the floor is overkill, but in a foamie the foam is a major construction element and the farther apart you spread the skins, the stronger the panel becomes, so that is part of the reason to go with the thicker 1-1/2.

I can say that I have no regrets about choosing the 5mm ply. Anything more would be excess (unless you are building a standy and plan on walking on your floor). In fact, I'm using it for all of my cabinetry, as well.

I am currently at the stage of installing my cabinets and shelving, which in my design take the place of most of the roof spars, and I can tell you, even w/o the roof or outer skin on yet, the cabin is becoming impressively rigid!
KC
My Build: The Poet Creek Express Hybrid Foamie

Poet Creek Or Bust
Engineering the TLAR way - "That Looks About Right"
TnTTT ORIGINAL 200A LANTERN CLUB = "The 200A Gang"
Green Lantern Corpsmen
User avatar
KCStudly
Donating Member
 
Posts: 9616
Images: 8169
Joined: Mon Feb 06, 2012 10:18 pm
Location: Southeastern CT, USA

Re: Newbie Class - BASIC WALL ANATOMY

Postby Diemjoe » Mon Nov 24, 2014 1:48 pm

So slightly off topic. I was doing some mockups this weekend to test my Skeleton. I pocket drilled 4 pieces of 1x4 poplar into a square to test it. Per Kregs screw length table I used 1.25 inch screws. I was able to pull them right apart although I didn't use any glue. A few questions:
Is 1x4 adequate thickness?
Is Poplar suitable for skeleton?
I'll try gluing tonight but curious if longer screws should be used?
Poplar is expensive!!!!

Thinking about ripping cheap Home Depot 2x4s framing studs to match the thickness of the foam insulation since the home Depot foam insulation isn't the same thickness as a 1x4. Any things to consider? i.e. I have heard that the pine is pretty soft and doesn't hold a pocket screw very well.

Thanks.

Don
Don Miller
Seattle
Trippinwithdon.com
Diemjoe
Teardrop Master
 
Posts: 191
Images: 2
Joined: Tue Jun 10, 2014 3:42 pm
Location: Seattle
Top

Re: Newbie Class - BASIC WALL ANATOMY

Postby noseoil » Mon Nov 24, 2014 4:37 pm

The skeletonized 3/4" plywood side frames on my build, plus the 1/8" interior wall panel (1/8" Baltic birch) weighs in at 25# each so far. That's with stain, 2 coats of urethane, but no hardware or wiring. If it was solid 3/4" plywood, it would weigh in at about 55#-60# per side. The skeletonized panel itself weighs in at 17# without the skin. With 1/8" plywood on both sides and foam insulation, it is still much lighter than a solid 3/4" panel. This sandwich construction is plenty strong, light and will be stronger than needed.

A solid core door works for an entry door on a house, but a hollow core door is much lighter and works well enough in the right application.

Weight is cost of materials, cost of fuel for towing and labor. With these sides, I figure I saved about 35#-40# on the build, have better insulation & sound properties, and have a better design with a lower center of gravity. For details, take a look at my build thread. Not done yet, just plugging along... tim
Build log: viewtopic.php?f=50&t=60248
The time you spend planning is more important than the time you spend building.........

137905
User avatar
noseoil
1000 Club
1000 Club
 
Posts: 1820
Images: 669
Joined: Sun Apr 27, 2014 8:46 am
Location: Raton, New Mexico, living the good life!
Top

Re: Newbie Class - BASIC WALL ANATOMY

Postby KCStudly » Mon Nov 24, 2014 5:19 pm

noseoil wrote:I figure I saved (weight) on the build, have better insulation & sound properties, and have a better design with a lower center of gravity.

Exactly! :thumbsup:

My walls (with the rough door, no hardware or window) at the rough finish stage (cedar sill and door frame, inner 5 mm skin in the cabin area but not in the galley yet... IIRC, but without the canvas skin, glue or paint yet) weight right at 45 lbs. My floor length is 9'-8" (so with the hatch bustle the wall is a little longer) and the wall is about 50 inches high at the crest of the profile curve.

I could easily handle them myself.
KC
My Build: The Poet Creek Express Hybrid Foamie

Poet Creek Or Bust
Engineering the TLAR way - "That Looks About Right"
TnTTT ORIGINAL 200A LANTERN CLUB = "The 200A Gang"
Green Lantern Corpsmen
User avatar
KCStudly
Donating Member
 
Posts: 9616
Images: 8169
Joined: Mon Feb 06, 2012 10:18 pm
Location: Southeastern CT, USA
Top

Re: Newbie Class - BASIC WALL ANATOMY

Postby tony.latham » Mon Nov 24, 2014 6:33 pm

Diemjoe wrote:So slightly off topic. I was doing some mockups this weekend to test my Skeleton. I pocket drilled 4 pieces of 1x4 poplar into a square to test it. Per Kregs screw length table I used 1.25 inch screws. I was able to pull them right apart although I didn't use any glue. A few questions:
Is 1x4 adequate thickness?
Is Poplar suitable for skeleton?
I'll try gluing tonight but curious if longer screws should be used?
Poplar is expensive!!!!

Thinking about ripping cheap Home Depot 2x4s framing studs to match the thickness of the foam insulation since the home Depot foam insulation isn't the same thickness as a 1x4. Any things to consider? i.e. I have heard that the pine is pretty soft and doesn't hold a pocket screw very well.

Thanks.

Don


1 x 4 is fine for the skeleton. I assume you are talking about nominal dimensions and thus it's really 3/4" x 3.5"? Don't be concerned that you were able to pull your framework apart. A skeleton –or sandwiched wall– has two layers glued to the sides of the skeleton that act as large gussets. Glue your exterior material on your mock skeleton and good luck getting it apart.

I've used 3/4" thick pine and 3/4" AC ply and 1/2" AC ply for the skeleton and they all work. The kreg screws in your skeleton are just to hold it together until you get it skinned. I dont' get why the construction industry can't figure out that the foam needs to be the same nominal thickness as wood or why 3/4" plywood isn't the same as 3/4" boards.

What I did with my plywood skeletons, that were a bit skinnier than my foam, was to sand the foam down with a random orbital sander and 60 grit sandpaper. It doesn't take much.
Image
T
User avatar
tony.latham
Gold Donating Member
 
Posts: 6912
Images: 17
Joined: Mon Jul 08, 2013 4:03 pm
Location: Middle of Idaho on the edge of nowhere
Top

Re: Newbie Class - BASIC WALL ANATOMY

Postby noseoil » Mon Nov 24, 2014 7:05 pm

"Diemjoe wrote:
So slightly off topic. I was doing some mockups this weekend to test my Skeleton. I pocket drilled 4 pieces of 1x4 poplar into a square to test it. Per Kregs screw length table I used 1.25 inch screws. I was able to pull them right apart although I didn't use any glue. A few questions:
Is 1x4 adequate thickness?
Is Poplar suitable for skeleton?
I'll try gluing tonight but curious if longer screws should be used?
Poplar is expensive!!!!"

That's why I'm not overly fond of Kreg screw construction in general. I see lots of examples where these screws are used and don't have the strength of a wood dowel. This is not bashing the screws or the system (or the poeple who use it), just saying that people don't understand the strength of materials and characteristics, so they use the setup improperly and it isn't as strong as other systems in some applications. Granted, in this example with the wood glue & skins it will be impossible to pull the frame apart, but I digress. The screws serve to align the parts until the glue has a chance to work. I just prefer dowels in my builds for most things (but I'm an old fart anyway).

Poplar is a very good wood for framing. It is light, easy to mill and plenty strong for frame & panel construction. It stains & finishes well also, but it just looks "ugly" with a natural finish unless color & grain selection are done carefully.

Poplar is CHEAP! If you're buying from the local Home Delay type of store, you're being ripped off. 4/4 is usually going for about $2.50 a board foot (1" x 1' x 1'), depending on where you live & who you buy from. It's much cheaper than ash, oak, walnut, birch or other hardwoods, also not as hard or tough or heavy. If you buy as "finished stock" from a local big box store, then you're paying for milling you may not need.
Build log: viewtopic.php?f=50&t=60248
The time you spend planning is more important than the time you spend building.........

137905
User avatar
noseoil
1000 Club
1000 Club
 
Posts: 1820
Images: 669
Joined: Sun Apr 27, 2014 8:46 am
Location: Raton, New Mexico, living the good life!
Top

Re: Newbie Class - BASIC WALL ANATOMY

Postby Diemjoe » Mon Nov 24, 2014 7:25 pm

Thank you for that info. I will continue my tests with poplar and see where I can get cheaper.
Don Miller
Seattle
Trippinwithdon.com
Diemjoe
Teardrop Master
 
Posts: 191
Images: 2
Joined: Tue Jun 10, 2014 3:42 pm
Location: Seattle
Top

Re: Newbie Class - BASIC WALL ANATOMY

Postby KCStudly » Mon Nov 24, 2014 7:32 pm

Also, I believe that the Kregg spec for 3/4 inch actual thickness is a 1-1/2 inch screw. For pine or poplar you should be using the coarse style... and IMO, you should be gluing every joint.

(Caveat: the only place I am not using glue is in my galley. I want the option to reconfigure in the future.)
KC
My Build: The Poet Creek Express Hybrid Foamie

Poet Creek Or Bust
Engineering the TLAR way - "That Looks About Right"
TnTTT ORIGINAL 200A LANTERN CLUB = "The 200A Gang"
Green Lantern Corpsmen
User avatar
KCStudly
Donating Member
 
Posts: 9616
Images: 8169
Joined: Mon Feb 06, 2012 10:18 pm
Location: Southeastern CT, USA
Top

Re: Newbie Class - BASIC WALL ANATOMY

Postby anon1 » Mon Nov 24, 2014 7:35 pm

And, in my opinion, you should be doing the coarse thread screws by hand into poplar, ply, or other soft woods and don't really tighten it down until the final assembly with glue. Even with a good clutch on a driver it is way too easy to strip the threads out.
anon1
Teardrop Advisor
 
Posts: 57
Joined: Tue Jan 28, 2014 4:38 pm
Top

Re: Newbie Class - BASIC WALL ANATOMY

Postby KCStudly » Mon Nov 24, 2014 8:35 pm

anon1 wrote:by hand

Yes, this.

I often times have my clutch set very low and go back with the Kregg driver bit stuck in my 6-in-1 tool (using the 1/4 inch nut driver feature) and do the final tightening by hand.
KC
My Build: The Poet Creek Express Hybrid Foamie

Poet Creek Or Bust
Engineering the TLAR way - "That Looks About Right"
TnTTT ORIGINAL 200A LANTERN CLUB = "The 200A Gang"
Green Lantern Corpsmen
User avatar
KCStudly
Donating Member
 
Posts: 9616
Images: 8169
Joined: Mon Feb 06, 2012 10:18 pm
Location: Southeastern CT, USA
Top

Re: Newbie Class - BASIC WALL ANATOMY

Postby Diemjoe » Mon Nov 24, 2014 8:45 pm

Thanks, I'll try that too.
Don Miller
Seattle
Trippinwithdon.com
Diemjoe
Teardrop Master
 
Posts: 191
Images: 2
Joined: Tue Jun 10, 2014 3:42 pm
Location: Seattle
Top

Re: Newbie Class - BASIC WALL ANATOMY

Postby aggie79 » Tue Nov 25, 2014 9:11 am

If I may please allow me to reset the deck:

(Tulip) Poplar is a hardwood, not a softwood; therefore, the fine thread screws should be used.

For 3/4" to 3/4" material, the screw length is 1-1/4".

The strength of the joints in sidewall "framing" doesn't matter if you are using plywood "skins" on both sides of the framing provided you glue the skins to the framing.

If you're building a foamie or if you are using aluminum exterior applied over the framing - with no ply underneath- the strength of the framing joinery becomes important.

Like KC pointed out, it is very easy to over torque screws in a pocket joint. I use a drill set at slow speed with the clutch at the lowest setting and "sneak up" the fastener when tightening.

If you have good plywood - I used Russian birch - the 3mm / ~1/8" can be bent to 6" radius with patience. I did this on the lower front radius of my teardrop. The 10" radius at the lower part of my hatch was no problem at all.
Tom (& Linda)
For build info on our former Silver Beatle teardrop:
Build Thread

93503
User avatar
aggie79
Super Duper Lifetime Member
 
Posts: 5405
Images: 686
Joined: Tue Aug 07, 2007 5:42 pm
Location: Watauga, Texas
Top

Re: Newbie Class - BASIC WALL ANATOMY

Postby Diemjoe » Tue Nov 25, 2014 10:16 am

Thanks, that is more good info. More structure testing coming over the TG weekend. I'll put this info into the mix. I'll have to check if I used coarse or fine thread screws.
Don Miller
Seattle
Trippinwithdon.com
Diemjoe
Teardrop Master
 
Posts: 191
Images: 2
Joined: Tue Jun 10, 2014 3:42 pm
Location: Seattle
Top

Re: Newbie Class - BASIC WALL ANATOMY

Postby anon1 » Tue Nov 25, 2014 10:24 am

Poplar is a deciduous tree and therefore classified as a hardwood species. However, the stuff that I can buy is not 'hard wood' by any stretch when comparing it to woods like oak.

The Kregg Jig company recommends a coarse threaded screw for poplar.

https://www.kregtool.com/store/c20/kreg ... s/#tab1705
anon1
Teardrop Advisor
 
Posts: 57
Joined: Tue Jan 28, 2014 4:38 pm
Top

PreviousNext

Return to Teardrop Construction Tips & Techniques

Who is online

Users browsing this forum: No registered users and 4 guests