Page 1 of 2
The Dreaded Hatch-idea

Posted:
Mon Aug 21, 2006 10:21 pmby Miriam C.
I have gotten over my dread of the Hatch but still have the physical issues. I am short, old and weak. I got this idea that instead of cutting away the hatch with my squiggly cutting I could make it inside out.
That is, temporarily screw the hatch side framing to the sides of the tear. Attach the spars with glue and blocking. When it is dry come back, remove the temp screws and put screws in the hatch framing and spars ends. Maybe even put the hinge and outter skin on.

Suggestion and critique greatly appreciated.
Aunti M
Posted:
Mon Aug 21, 2006 11:25 pmby tonyj
I see no problems with that idea. But make sure to put spacer blocks between the wall and frame. That way the hatch outer ribs won't bind on the walls. I am notorious for tight fits when you don't want them. I used 1/8 spacers and really should have used 1/4. Next week I will try to cut 1/8 of an inch off both hatch outside ribs.
I think building the hatch in place the way you want is a good idea. It also helps control some of the springback when you put the skin on.
Posted:
Tue Aug 22, 2006 12:22 amby asianflava
Don't forget to add a spacer (maybe 1/8" - 1/4" on each side) to the hatch frames. Otherwise your hatch will fit too tightly.
Posted:
Tue Aug 22, 2006 1:53 amby Gage
I never critique a woman. It's just not safe. 
Have a good day.

Posted:
Tue Aug 22, 2006 3:13 amby madjack
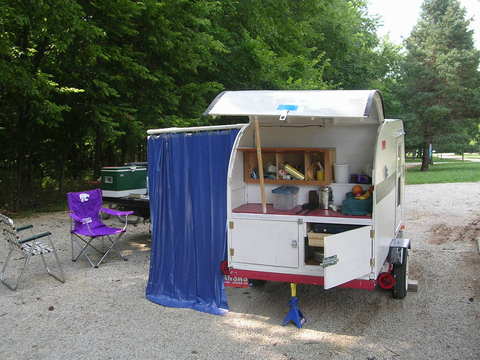
Auntie M...we did very close to that...we built the hatch frame...4 vertical spars plus top and bottom end pieces...we put a bead board panel in the inside center with screws into cleats...this stiffened/squared the whole hatch from the center out...we installed frame on tear with the Hurricane hinge(spacers in place of skin)...we blocked and locked the hatch frame in place then installed the outer skin(after removing hinge spacers)...left it to sit a couple of days and when we removed it...everything was perfect....removed center panel and ran wiring for tail and auxiliary lights and then replaced panel...there are a few pics in my Yahoo album(www button)
madjack

Posted:
Tue Aug 22, 2006 6:42 amby Miriam C.
Thank you guys.
Spacers!! Anyone know how much at the top or is that hinge dependent?
Gage~

I knew you were smart.
MJ~ looked at your album. Great idea for square. Are vertical spars better/stronger than horizontal? I know I need some vertical bracing because of the size.
Gotta get the coffee and get to sanding while it is cold. 67degrees out.
Aunti M
Posted:
Tue Aug 22, 2006 7:16 amby Loader
tonyj wrote: Next week I will try to cut 1/8 of an inch off both hatch outside ribs.
I had to do just that Tony, think I got lucky a little, but it worked. What I did was take off one outer rib, then cut the amount I needed off the spars from that one side, trimed the outer skin as required. Now the hatch sits nice, and no binding on the side walls.
Aunti M, I think I left about 1/4" at the top (Kuffle Plans), that was using the hurricane hinge. Opens and closes very smoothly.
Posted:
Tue Aug 22, 2006 8:11 amby oklahomajewel
Auntie... I had the same frustrating, intimidation with starting my hatch. I'm finally going to "just do it" and hope for the best! haha
Yes, the Kuffel plans say 1/4" space at top and bottom.
If you look at Tom Walizcek's Rimple , and maybe some others have done it too, he has two doors at the bottom of the galley, then a small hatch for the upper part of the galley. You'd have to look at the pic to see what I mean (I'll look for it ) I wonder if that would help with issues about lifting a heavy hatch, unless you're already planning on gas supports or whatever.
You go girl !!!!

Here's his pic:
Posted:
Tue Aug 22, 2006 8:14 amby Jim Marshall
Miriam, we did our hatch the way you are doing except we used the pocket hole screw system. We ran our spars vertically as we had read that the horizontal spars could cause some springback. We used 1/4 inch spacers and we screwed from the outside into the outer spars so we could leave the hatch in place until the aluminum was put on.
Posted:
Tue Aug 22, 2006 10:02 amby tonyj
M--I definitely agree with vertical ribs. It gives that curved hatch incredible strength and lessens the springback issue.
Loader wrote:tonyj wrote: Next week I will try to cut 1/8 of an inch off both hatch outside ribs.
I had to do just that Tony, think I got lucky a little, but it worked. What I did was take off one outer rib, then cut the amount I needed off the spars from that one side, trimed the outer skin as required. Now the hatch sits nice, and no binding on the side walls.
Loader--wish I could do that. Inner skin already glued and nailed on. It's not coming apart. I'm pulling out my circular saw and cutting guide. Wish me luck.
Posted:
Tue Aug 22, 2006 10:40 amby Miriam C.
Tony---Ouch
Thank you very much all. Every idea helps, and I mean that sincerely.
Julie my curves get in the way of a door idea. Honestly if I didn't like them so much this thing would go on a diet.

Definitely getting hatch lifts. I am leaning heavy toward doing a tailgate like Gern Blanstons (Texas Tears).
He was kind enough to send some real good pictures of the detail and his album is full of them.
Hopefully he won't mind my sharing.
My biggest fear with this is leaning forward and getting my hip with the angle.

Aunti M
Posted:
Tue Aug 22, 2006 1:31 pmby asianflava
Yes, you should have the vertical ribs run the full length of the hatch to prevent springback. You also need to make shure those ribs don't twist due to the plywood trying to straighten them out.
Devil and Details--
Posted:
Sun Sep 24, 2006 7:05 amby kayakrguy
Hi Folks,
I am thinking of doing the 'Inside out' way of building and would like to folow up this discussion with some questions.
First, for the hatch spars do you use the same size as the rest of the build?
I realize that the hinge and bottom spars are doubled up--just not clear if they are the same size as the rest of the spars.
Second, vertical ribs. I know I will have to trace the outline of my hatch curve on some ply to get a pattern for the vertical ribs. The question that got me symied is how do I get the correct angle for the cut that joins the vertical ribs to the hatch hinge spars? I know there should be a way to do that but my spatial visioning skills are nada, so any help you can offer would be appreciated.
Thanks everyone,
Jim
Posted:
Sun Sep 24, 2006 7:37 amby Ira
Jim, yep--it doesn't HAVE to be the same dimensions, but why not? For example, 1 by 2 for spars, 1 by 2s for the hatch members. It also doesn't have to be the same material, but again, why not?
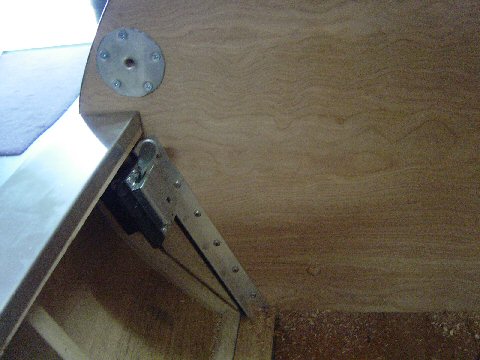
As far as "vertical" ribs go, you'll see that most of us don't use any. The sides of the hatch frame are simply ply, and many of us do two pieces laminated, to make it REALLY thick and strong so there's no springback when you add the skin.
And as far as that angle cut goes, usually, you at least double up that final roof spar, laminate two of them--I used FOUR pieces since it's supporting the weight of the hatch. It's on that lumber, the last laminated piece, where you need to cut at an angle. Maybe others here did it for the hatch spar too, but I didn't.
Mind you--this isn't coming from a hatch expert. Just how I did it.
Posted:
Sun Sep 24, 2006 10:49 amby madjack
Jim, my personal take is to use vertical spars...lessens springback issues...we used 3/4 ply to cut ours out of and they are tapered from 2.25"s at the top to 3"s at the bottom...we used 4 of them on a 4"er...the angle...on the last roof spar, we cut it so that the back side came straight down(plumb to the horizontal axis). So, when we cut the face of the hatch spars, it was also cut straight down (same plumb line)...remember that there will be a gap of 1/8th to 3/8th between the last roof spar and the top edge of the hatch depending on the type of hinge used.......
madjack