Page 1 of 2

Hatch Curve--Doable--Madjack--finally! some pics!

PostPosted: Sun Sep 10, 2006 1:00 pm
by kayakrguy
Hi Folks,

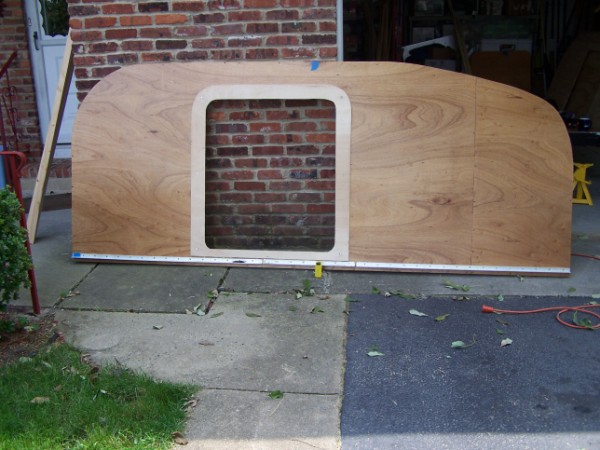
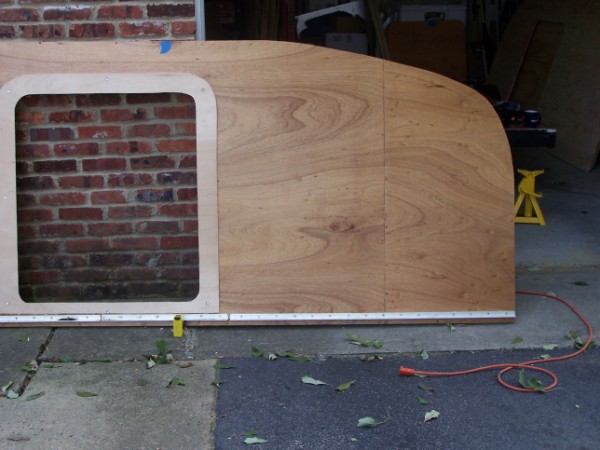
Would appreciate judgements about the curve on the hatch end of the walls. The config is part Boxster--front and Boxroy + Better Half's 'I like it' judgement of the curve

Does it look doable in terms of skinning curve etc?

These pictures are a direct result of the endless nagging of Madjack and others and I want to express my ummm....ahhhhhhh sincere appreciation<G> Really! <g>

Thanks, Jim


Image

Image

PostPosted: Sun Sep 10, 2006 1:16 pm
by stjohn
Hi guy I don't know what the radius of the curve is But we skined a 15" radius last hight w/ a single layer of 5.2 mm luan and it was pretty tough.if it were my tear my main concern would be spring back on the hatch after it is skin but since I have not skinned mine yet lets here what M.j. doug hodder and others have to say but I really like the look of the profile :thumbsup: :thumbsup:

Mike

PostPosted: Sun Sep 10, 2006 1:31 pm
by Sonetpro
Hi Jim,
It looks doable. Looks like if mine were turned upside down it would fit yours.
Image

PostPosted: Sun Sep 10, 2006 1:38 pm
by halfdome, Danny
I think you need to smooth out that back radius or you may get gaps before and after it. Wood does what it wants to do so you best bet is smooth lines. This is the foundation of your profile, I would stand back 10' and give it a good look :D Danny

PostPosted: Sun Sep 10, 2006 4:57 pm
by madjack
Jim, it's about time ;) :applause: :thumbsup: You will have problems with bending 1/4 ply with out a lotta hot water/steam...using one or the other of those will help tremendously with 1/8th as well...RE what Danny said...take a long straight edge and "roll" it around the edge of the hatch area...if you see any gaps under the straignt edge, it would help to sand these smooth...this sanding if need should be done with both sides clamped together, so they stay exactly the same...I would build the hatch using vertical ribs at least 2 r 3 inches wide and use at least 4 or better 5...this will help eliminate the dreaded "spring back" problem
madjack 8)
ps...Stil haven't gotten over to the shop.....but I will...promise

PostPosted: Sun Sep 10, 2006 5:38 pm
by halfdome, Danny
Jim, you could take a thin piece of flat molding (3/16" x 1" x 40") and make an arc by your back radius ( don't use a dowel) touching your roof line on one end and hatch line on the other end. Have someone draw a line along the edge of the molding. Trim to the line and you would have a smoother radius to alleviate any problems. Danny

PostPosted: Sun Sep 10, 2006 5:49 pm
by madjack
Danny, are you talking about doing something like this.....

Image

Jim, smoothing the angle like shown would certainly help with bending the ply around the radius...............
madjack 8)

PostPosted: Sun Sep 10, 2006 7:10 pm
by halfdome, Danny
madjack wrote:Danny, are you talking about doing something like this.....

Image

Jim, smoothing the angle like shown would certainly help with bending the ply around the radius...............
madjack 8)

Yes Madjack, smoothing it somewhat like your red line would be more appealing. In the woodturning association I belong to they talk about smooth transitions in shapes. Look at the shapes in nature and antique items. They make an appealing transition from one line to another. The human eye picks up on natural looking shapes and draws that person to that object. I’ve seen on this board some who layout their profile with a garden hose & they have the right idea. There are many opinions out there I'm sure, but if your trying to make that retro teardrop shape you need smooth lines. :) Danny

PostPosted: Sun Sep 10, 2006 7:27 pm
by doug hodder
I like the red line profile, see what it looks like if you begin the transition curve at the back of the first curve...it would take out that last flat spot...just 1 flowing curve from the back of the roof down...there'd be no problem getting ply to bend to that...Doug

PostPosted: Sun Sep 10, 2006 7:31 pm
by kayakrguy
Hi guys,

Ok, thanks for your advice and I WILL look at smoothing out the hatch lines. I did 'experimentally' bend a 1/8" Luan around the bend and it DID go, but boy the tension was tight! The interesting thing is that the profile, except for the 2 feet I added in the middle is almost exactly that of the Tiny Tears pattern...very minor modifications...

That leads to two additonal questions, one short one longer...


The short one: Look at the curve on the front of the build. Whaddya think about that? Doable?

Now, a question about the 1/8" plywood and the hatch--and for that matter the roof.

What will work in holding 1/8 ply down? If I use tightbond/gorilla glue will that hold the skin down without screws/nails? I would screw the 1/8 down while the glue dried but take them out when finished, epoxy holes etc.

If that would NOT work (or not work for long) how in the world do you screw down 1/8 inch ply and hide the screws--there is no room to truly counter sink anything. As to nailing...I don't have a nailer and if I did I think nails would simply go through the Luan?

So, advice about front curve, fastening roof/hatch appreciated,

Jim

PostPosted: Sun Sep 10, 2006 8:34 pm
by tonyj
Your front radius looks about like mine. Mine is 19 inches. Bending the 1/8 in luan on the short side was no problem. The wood creaked and groaned, but made the curve intact. Any tighter a radius and you will have to prepare yourself for some real fun.

I skinned mine with aluminum (over 2 layers of luan), so hiding screws wasn't an issue. But I went ahead and bought a crown molding staple gun and fastened with 1/4 by 3/4 staples.

PostPosted: Sun Sep 10, 2006 8:37 pm
by halfdome, Danny
Jim, Use 4 penny galvanized box nails to attach your luan skin with glue. They hold quite well and the heads can be peaned in to the plywood. You won’t need to remove them if you can sink them in far enough to use bondo. Your front curve looks OK but it is hard to really see with the brick grout line there. Can you stand your profile next to a dark simple background? :) Danny

PostPosted: Sun Sep 10, 2006 8:57 pm
by Laredo
Danny,
copy the photo into an image viewer and turn it into a color negative.

Much easier than having somebody move pieces, reshoot, etc., eh?

PostPosted: Sun Sep 10, 2006 9:53 pm
by madjack
Jim, I think your front should be just fine...very much a benroy look to it...as to applying/gluing the hatch skin on...you can screwit down and once the glue has set, remove the screws...it shouldn't go anywhere...Danny's suggestion will work quite well also...either one is fine...I did the red line with MS Paint>>>curves...you can tryit yourself and experiment with diferent start/stop points and amount of curve to see what you might like best....
madjack 8)
p.s. I promise to have that part# for you tomorrow

PostPosted: Sun Sep 10, 2006 10:00 pm
by Miriam C.
kayakrguy wrote:Hi guys,


The short one: Look at the curve on the front of the build. Whaddya think about that? Doable?

Now, a question about the 1/8" plywood and the hatch--and for that matter the roof.

What will work in holding 1/8 ply down? If I use tightbond/gorilla glue will that hold the skin down without screws/nails? I would screw the 1/8 down while the glue dried but take them out when finished, epoxy holes etc.

If that would NOT work (or not work for long) how in the world do you screw down 1/8 inch ply and hide the screws--there is no room to truly counter sink anything. As to nailing...I don't have a nailer and if I did I think nails would simply go through the Luan?

So, advice about front curve, fastening roof/hatch appreciated,

Jim


Jim,
I agree that the red line looks smoother. It has a softer line. I did my 12 radius with 1/8" birch using the 4' side across. I epoxied the bottom and used deck screws the rest is screwed (with #6 stainless steel screws.) into blocking that follows the profile, and glued with tight bond lll. I sure hope it holds.

I held everything in place with rachet down straps and boards between and some wedges placed in needed areas. I got the wood to agree by putting it in place for a day lightly held by the straps. It went right in, and right out and right back in with a new piece. If you are using the 8' lenghth just take it slow and pull it with constant presure. Maybe over a span of time.

You need to plan where your seams are going and cover them.
I'm using wood trim on mine.