Page 1 of 2
Can a ummmm rookie do aluminum siding?

Posted:
Sat Sep 23, 2006 8:49 amby kayakrguy
Hi Folks,
OK, I have gotten a bit crazier. I am THINKING (only!) about the possibility of doing aluminum instead of paint on the outside of the T
Now, I have NO real sheet working experience, except for a pair of metal shears, no real metal working tools, don't even know what a pop rivet is, etc. Realistically, safely and $$wise can a ROOKIE cover a T so that it won't leak etc. Just wanted to see what the experienced folks might say on this matter... I do have Plan A (at the moment) which is paint<g>
Jim
Posted:
Sat Sep 23, 2006 9:01 amby madjack
Jim, you have seen my albums...I won't say we had 0 skills with metals but they fell between there and minimal...it is another skill set to learn but that is part of the fun and satisfaction of building your own...we did most of our cuts with a set of air shears from HF, with which you can cut a pretty fine line...learning to anneal the trim is a little tricky but if you buy a sacrficial piece of trim to practice on, it can be picked up by time you finish playing with that piece of trim...so I say, if that is what you really want, then go for it
madjack

Posted:
Sat Sep 23, 2006 9:23 amby Sonetpro
Jim,
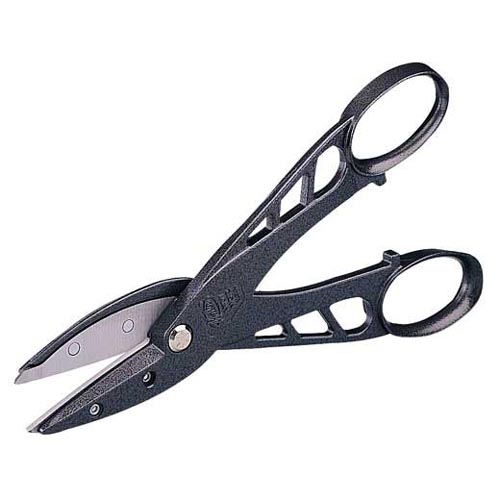
I didn't have any experience. I used these to cut it. they cut .40 like a pair of scissors.
http://www.lowes.com/lowes/lkn?action=p ... lpage=none
Posted:
Sat Sep 23, 2006 10:33 amby Hamcan
Jim
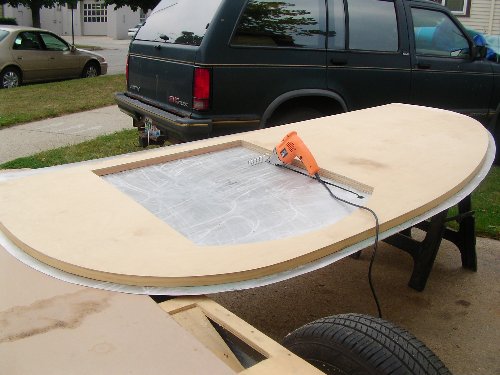
I had no experience at all with sheet aluminum and trim when I covered mine this summer. I bought the soft top edge trim to avoid having to learn annealling and jumped in. Had a difficult time fitting trim to the 16" radius curve on the roof front. Ruined the first pc. of trim. Cut a 3/4" pc. of plywood to a 16" radius and prebent the trim.
Used a laminate router with a flush cut bit to trim sheet alum. to final contour, when this came up in a previous thread lots of folks said it was a bad idea but it worked for me. Went slow, cleaned melted alum. from bit when necesary and taped alum. to avoid scratches.
My Tear is not a show piece by any means and all the little details aren't spot on but I have used it for 3, week long trips and it works!
So the answer to your question is yes, imho.
Regards, JG
Posted:
Sat Sep 23, 2006 2:42 pmby asianflava
I have a little bit of sheetmetal fabrication experience. I didn't use any of it when I skinned my trailer. All you need to know is how to cut the sheet and trim. Standard fabrication practices don't usually apply because all you are doing is gluing the skin on and covering up the ugly edges with trim.
Due to time constraints, I broke down and bought a HF horizontal band saw to cut the trim. After I worked out the kinks, I Love It!
I rough cut the sheetmetal with an El Cheapo HF shear, then I put it on the trailer and trimmed it down with a pair of snips. I'd recommend getting the whole set of shears, Left Right & Straight. You could probably do it with one pair of snips but having the set will save you some frustration. Cutting the openings for the door and vent was a little bit of a challenge. I ended up using a Dremel to start the cut then a jigsaw with a metal blade for the rest of the cut.
I do have to fab a vent for my roof but I'll probably have to farm it out. I could easily make it myself but I don't have any equipment to make it with. I'd need a jump shear, a bead roller and a box and pan brake to make it.
Posted:
Sun Sep 24, 2006 7:19 amby Tripmaker
Jim, I have never done the aluminum thing either but plan to. Everything I do on this project is new for me. See madjac's post here
http://tnttt.com/viewtopic.php?t=11355 for some excellent help on "floating" the AL rather than glueing. Like siding on a house it makes sense that it should be able to expand and contract with heat and cold.
HF has an "air nibbler" on sale for $20. Has anyone used one for cutting the AL? Looks like you could attach the AL and just follow the profile to cut.
Jim
Posted:
Sun Sep 24, 2006 7:37 amby BrwBier
I had never worked with sheet metal before but found it was not too hard. The most important thing I think is to have someone to help. Large sheets can get out of hand and overwhelming without someone on the other side. I don't have a compressor so I got the electric shears from Harbor Freight.
About $40 on sale and they work better than I ever thought.
Posted:
Mon Sep 25, 2006 9:37 amby rmcelroy
I also had zero metal working experience, and like others here went ahead and did it. The one part that made me the most nervous was the rivets for the hatch, actual rivets not pop rivets. After much surfing and talking to distributors I got rivets, aluminum washers and a hand setting tool. I got some scrap material and started learing how to set rivets-its not hard but when you havn't done it before you need to practice.
I couldn't be happier, if you like the look and want a trouble free skin for many years I would encourage you to take the plunge.
Mc
Posted:
Tue Oct 03, 2006 8:18 pmby AlStAubin
CHECK OUT THIS NEW SHEAR. TURBO SHEAR BY MALCO TOOLS
http://www.malcoproducts.com/ SELECT TURBOSHEAR FAMILY FROM NEW TOOLS. HAVNT TRIED IT YET.

Posted:
Tue Oct 03, 2006 8:20 pmby mikeschn
We need either a quick tutorial or a blow by blow picture essay of how to skin a teardrop in aluminum.
Is anyone willing to put such a thing together?
Mike...
Posted:
Tue Oct 03, 2006 9:03 pmby Podunkfla
I've got an air nibbler I use for body work. It's great for tight spots, but it really cuts kinda slow since it takes little bitty bites at a time. It also needs a pretty large compressor. I like the electric metal shears like pictured above much better. Still, A cheap saber saw with a fine tooth blade works just fine too. I put some masking tape on the sole plate so it doesn't scratch the aluminum. I cut the skin within a 1/4" of the plywood then use a cheap HF trim touter to finish it off with a trim bit & guide bearing.

PS: (Mike... I will do my best to take lots of pix when I skin my tear I'm workin on)
Posted:
Wed Oct 04, 2006 6:44 amby Tripmaker
Podunkfla wrote:I've got an air nibbler I use for body work. It's great for tight spots, but it really cuts kinda slow since it takes little bitty bites at a time. It also needs a pretty large compressor. I like the electric metal shears like pictured above much better. Still, A cheap saber saw with a fine tooth blade works just fine too. I put some masking tape on the sole plate so it doesn't scratch the aluminum. I cut the skin within a 1/4" of the plywood then use a cheap HF trim touter to finish it off with a trim bit & guide bearing.
PS: (Mike... I will do my best to take lots of pix when I skin my tear I'm workin on)
Thanks for the heads up before I went out to buy an air nibbler. Is the router bit anything special for metal or just an ordinary bit? Any safety issues with the router spinning off bits of AL at high speed?
Posted:
Wed Oct 04, 2006 7:01 amby Tripmaker
rmcelroy wrote:I also had zero metal working experience, and like others here went ahead and did it. The one part that made me the most nervous was the rivets for the hatch, actual rivets not pop rivets. After much surfing and talking to distributors I got rivets, aluminum washers and a hand setting tool. I got some scrap material and started learing how to set rivets-its not hard but when you havn't done it before you need to practice.
I couldn't be happier, if you like the look and want a trouble free skin for many years I would encourage you to take the plunge.
Mc
I have read several comments about the rivets for the hatch. Where exactly on the hatch are they used? Why can't screws or pop rivets be used? I'm a long ways from doing any skinning but trying to anticipate what I will need.
Posted:
Wed Oct 04, 2006 8:10 amby Steve_Cox
If you are going to use a router or laminate trimmer on aluminum it's been mentioned more than a few times that you should use a router speed controller to slow the router down. It helps with the meltdown problem. Also been mentioned here in the past that the aluminum chips are quite a hazard and hard to deal with. Other nice thing about having a router speed controller is you can use it on other tools too! This Grizzly Tool controller is rated at 20 amps and sells for about $30.

Posted:
Wed Oct 04, 2006 10:28 amby madjack
Tripmaker wrote:]
I have read several comments about the rivets for the hatch. Where exactly on the hatch are they used? Why can't screws or pop rivets be used? I'm a long ways from doing any skinning but trying to anticipate what I will need.
...rivets are used along the side edges of the hatch for attaching the trim...ya can't use screws, 'cause there is not enough "meat" to hold 'em and pop rivets will either stickup above the trim and be unsightly or below it and cause interference with the seal....we did use pop rivets on the Alligator Tear....from the bottom up but we used insert molding which allowed the protruding portion of the pop rivet to be hidden by the insert...
madjack