Page 1 of 4

How do you make curved, outer trim?

PostPosted: Sun Jun 01, 2008 3:10 pm
by WarPony
We are currently building a Widget and want to hide the side seams with some trimwork like 48Rob did on his Cabin Car.....
Image

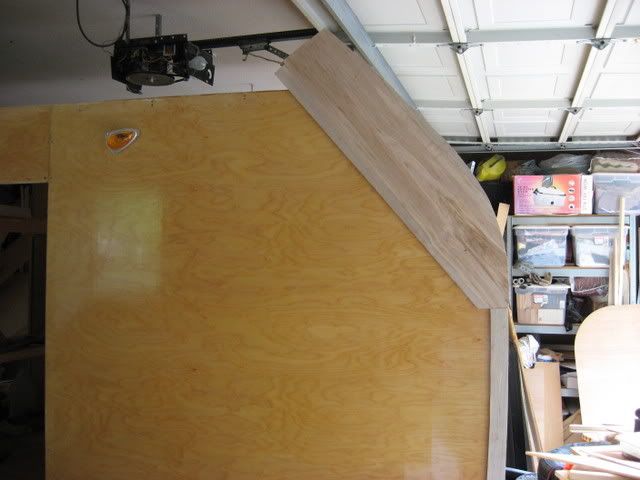
How do you guys make the curves with straight wood? By that I mean, what is the technique for joining the wood pieces and cutting the curves to match the profile? I want to use 1/2" thick pieces for the trim and bond the framework to the walls after the walls actually go up.

Am I looking for troubles by doing it this way or should we bond them to the walls and then set them up as a unit?

Jeff

PostPosted: Sun Jun 01, 2008 4:07 pm
by Miriam C.
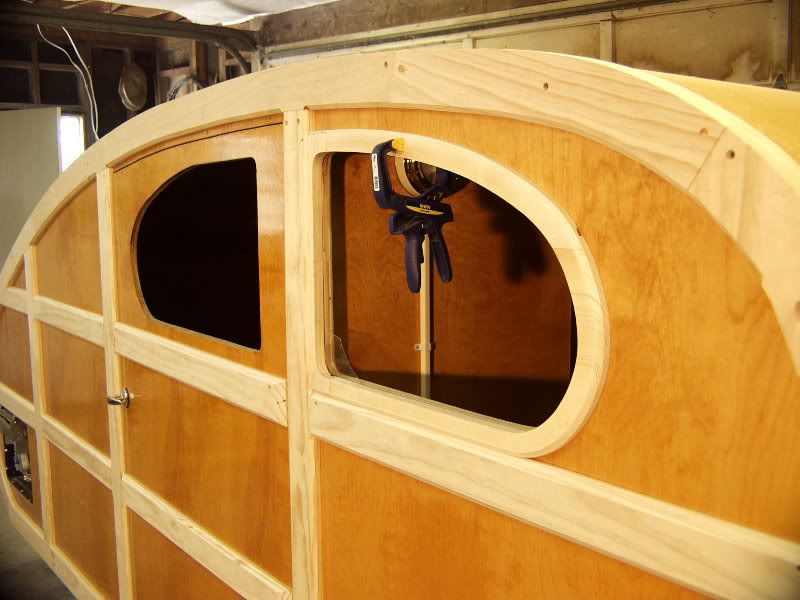
8) You can bond the trim to the side first. Certainly you can use the sides to make the pattern first. If I ever do it again that is what I am doing.

This is how I did it:
Image

I traced the curve and cut it with a jig saw. Making the cuts or making a pattern would have been easier.

PostPosted: Sun Jun 01, 2008 7:15 pm
by IndyTom
What Auntie M said. Start out with wide boards and then fit them together so you can get the most trim out of them. I saw Rob's cabin car up close at the Brown County gathering a couple of weeks ago. It is even more impressive in person. I am sure that Rob will chime in, but that is how he cut the trim for the CC.

Another option that I have thought about is using 3/4 in baltic birch plywood. You could get lots of trim out of a single sheet. And since there are no voids in BB plywood, it would give a nice smooth edge that could be finished any way you like.

Tom

PostPosted: Mon Jun 02, 2008 12:23 am
by Roly Nelson
Hi Jeff, having had a little experience with curved trim on the outside of my woody, I can tell you how I did it. I have a solid pine member inside where the sides meet the roof. It serves 2 purposes, one is to fasten the roof and walls to a solid structural member and the other is to give the roof cross members a solid connection, with long screws.

I glued and nailed my roof and sides to this pine inside piece. Then, using somewhat clear pine boards, (3/4" x 11 1/2") I held them in place and simply scribed the arc right off of the curved roof edge. After cutting the arc with my band saw, I used an adjustable tri-square to scribe the inner or lower arc, following the previously cut curved edge. Once it was cut, and other adjoining curved members were made, I overlapped them and determined where I would make the joints. All of my joints are simply glued and butted without using fancy joint connectors, like splines or dowel pins. These pieces were then glued and screwed to the teardrop, with the screws later covered with recessed wooden plugs.

Since my tear walls are only 3/16" thick, every trim member is backed up with a matching interior pine member to accept the screws. The curved trim on the roof is a different story, since it is laminated out of 3 thin strips, glued, screwed and plugged in place last. So far, after almost 6 years, it seems to be holding up fine, however it never sits out in the weather and gets a fresh coat of varnish every Spring. That's my story and I'm sticking to it. Good luck on your trim efforts and if I haven't made myself clear, let me know.
Roly :applause:

PostPosted: Mon Jun 02, 2008 5:55 pm
by WarPony
Roly, I'm having trouble wrapping my head around your technique. Do you have a pic of before and after? Hell, even "after" pics would do. I just don't remember seeing anyone ever going into great detail about how to do this.

Jeff

PostPosted: Mon Jun 02, 2008 6:41 pm
by Dee Bee
I took a simple approach
Image
Image
Image
Visit my Hatch page at http://www.nfdc.net/home/cbdb/images/Teardrop%20PopRivTrim.jpg

Dee Bee

PostPosted: Tue Jun 03, 2008 7:58 am
by benzu
You could use one of these!! ;) :lol:

Image

Jeff,

Thought you would like my idea of the router, hope you can figure it out with out using one, check out my album I have some new pics of my trailer with the epoxy and doors.


Have a great day,

Mike

PostPosted: Tue Jun 03, 2008 8:29 am
by bobhenry
I know the radii I used to cut chubbys profile and intend to use the same measurments to cut the trim. I will mount the router to some 1/8 luan and attach it to a long 1x2 handle. I will measure from the cutter down the handle to the proper length for each radius and cut the outside profile.
By shortening the pivot point by the depth of the trim ( lets use 2") you can make the inside cut. The come out machine grade no nicks no bobbles and its fairly quick. I used this method when I cut the trim for eggbert and it works PROVIDED YOU used a combination of circular radii for the sides.

PostPosted: Sun Jul 06, 2008 9:01 pm
by Constrictor
If you want to make a long one piece curved wood trim, you have to laminate pieces of thin wood. you have to make a male or female template and clamp thin pieces of wood with glue between and it will hold its shape when the clamps are off. The thinness of the wood is determined by how tight the radius is, the tighter the raduis the thinner the wood needs to be to bend. I would say around 3/32 to 1/8" thick and as many of those pieces as it takes to make the thickness you want. Also will help to wet the wood down real good to bend it. this is alot more work than the other way but well worth it in my opinion.

PostPosted: Mon Jul 07, 2008 2:06 am
by Roly Nelson
If you check my construction website at the botttom of the page, you will get a better idea what I am talking about. Good luck, and PM me if you have any more questions. I am here to help.
Roly 8)

PostPosted: Mon Jul 07, 2008 7:09 am
by WarPony
Yes, that is what I was looking for, that edging that goes around the outside wall not the roof. I was also looking for the techniques used in doing this but after I see how some have done it I have a game plan on how I'm going to attack that part of the build. I'll post some pics when I get to that phase.

Image

Jeff

PostPosted: Mon Jul 07, 2008 12:27 pm
by Sparksalot
I'm getting sorta close to this step myself. The outer edge looks pretty straightforward. How to do the inner edge is main question I have.


WarPony wrote:Yes, that is what I was looking for, that edging that goes around the outside wall not the roof. I was also looking for the techniques used in doing this but after I see how some have done it I have a game plan on how I'm going to attack that part of the build. I'll post some pics when I get to that phase.

Image

Jeff

PostPosted: Tue Jul 08, 2008 5:02 am
by 48Rob
The outer edge uses the side profile as a template.

Screw the pieces on, then trace, cut, and sand.

Then sand some more till the profile is perfect...being just a little off here with getting a smooth flowing curve will be VERY visible...no matter how well you can convince yourself that "no one will notice".

Once perfect, a pair of dividers can be used to set the width of the trim, using the perfect top edge of the trim as the template.
Another reason to take extra care in getting the top edge perfect.

If you don't join the pieces used to form the trim, pay mind to which direction the angle of the joints take.
When it rains, the water should be able to get away easily.
Horizontal joints are bad...

The last important bit is to be sure to seal ALL sides of the trim.
Water WILL get behind the trim, no matter how well you think you have the edges caulked, and ruin the finish.

The side profile should be varnished/sealed with several coats.
The trim piece should be varnished/sealed with several coats, except for the face where it will be screwed on.
Screw the pices on, then remove the pieces one at a time.
Apply a dab of sealant/caulk around the backside of the screw hole, and inject a little in the screwhole itself, then re screw the piece to the body.

Once all is dry, you can plug the screw holes, or leave them as is.
Then apply stain and varnish to the face of the trim pieces.

A bit more work than just screwing the pieces on and giving the exposed parts a coat of varnish, but it will prevent moisture from getting behind/under the varnish and lifting it/turning the wood black.

Rob


picture

PostPosted: Tue Jul 08, 2008 6:41 am
by bobhenry
I have not built it yet but I have the idea to mount the router to a piece of plywood. On the underside mount 2 plastic guides be it wheels or pins 4 to 6 inches apart. The wheels would follow the contour and the router will be mounted 1/2 way between them and offset so that it will plow a predetermined width. A rolling jig of sorts. A few passes and the cut should be crisp and match the top profile.

PostPosted: Tue Jul 08, 2008 12:24 pm
by Sparksalot
The 2 pins idea is one I've had as well. I'm new to the router world so don't know if this is a common thing or not. Perhaps a router table can be set up in this way?