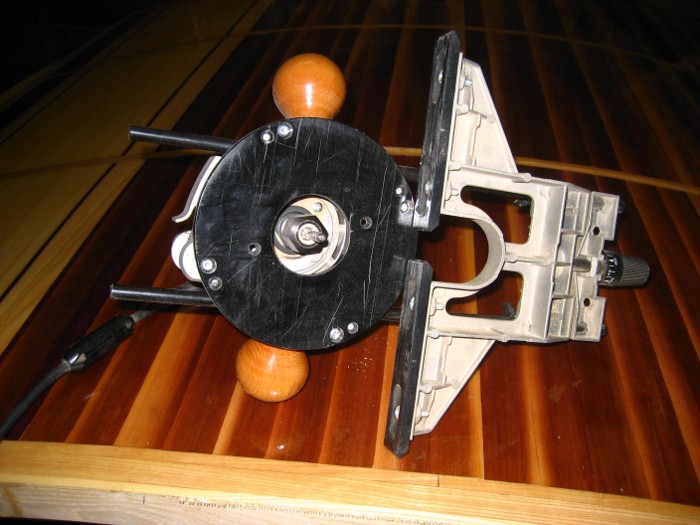
How do you make curved, outer trim?

Anything to do with mechanical, construction etc

Postby Senior Ninja » Sun Feb 15, 2009 2:15 pm

Hi Wannabefree,
That's a clever setup and a it's gunna be a beautiful TD.
Keep up the good work.
Steve
8)
Building the TD was the best thing I ever made.
Senior Ninja
Donating Member
 
Posts: 608
Joined: Fri Apr 28, 2006 4:16 pm
Location: Bakersfield, Kahlifornia

Postby WarPony » Sat Mar 14, 2009 1:51 pm

Juneaudave wrote:Image


Well, I've been working on the outer trim now for over a month and the router fence was a COMPLETE disaster!!!!!!! I used the router to cut the outside curve, chipped a couple of pieces pretty bad but no big deal, I made new ones.

When I tried to use the fence, all hell broke loose. I couldn't keep the fence against the roofline AND keep the router baseplate against the trim. A tilt of the router either way and the damage was done that couldn't be fixed without making all new pieces. Here's what I decided were the problems with this situation:

1) The trim was only 1 3/4" wide, making it VERY hard to keep the baseplate flat.
2) The camper is about 6' 9" tall, I'm 5' 2" tall. It's impossible for me to make one pass around the trim without climbing on a step ladder.

I tried stopping mid-cut but either tilted the router when I hit the shutoff switch or the spiral bit grabbed as the motor slowed and made these nice slanted gouges in the trim. I even had a major boo boo and routered a nice 1/4" hole right through the outer wall.......... :x

"That's it!!", I said to my girlfriend, "I'm taking this whole thing to a storage unit and get it the f**k out of my sight!!!!". My spirt was broken at this point and wanted no part of finishing this project. Well, HER cooler head prevailed and talked me down off the ledge.

Well, I went to HD and bought new wood and started over but made some changes like making the trim 2 1/2" wide this time and canning the router fence. Instead of routering out the inside curve, I used a T-square to trace a line 2 1/2" from the outside curve then cut each piece of the trim with a jigsaw and then sand it down to the line I'd drawn.

It's not perfect like I wanted but looks pretty good. I like the wider trim also. I've got some before and after pics but haven't loaded them yet.

P.S. Don't flip your router upside down and use the router fence like a router table fence. The piece of wood you are trying to trim may re-arrange your face. Just a tip from your Uncle Jeff.

Jeff
ImageImage

Still a million dollars away from being a millionaire!!
User avatar
WarPony
Donating Member
 
Posts: 2089
Images: 289
Joined: Tue Sep 14, 2004 12:10 pm
Location: Kansas, Topeka

Postby 2bits » Sat Mar 14, 2009 2:01 pm

I'm glad you finally got it done! Yes keep the big picture in mind, and persevere!
Thomas

Image
User avatar
2bits
2bit Member
 
Posts: 5130
Images: 8
Joined: Thu Dec 27, 2007 6:04 pm
Location: Lake Tawakoni, TX
Top

Postby kennyrayandersen » Sun Mar 15, 2009 8:41 am

I'm terribly sorry that I didn't see this thread before. You are lucky to tell the tale on this one! What you did was similar to running across-cut on the tablesaw while using the fence to get the cut length correct. The wood gets trapped between the fence and the blade and, as you've noticed, all hell breaks loose. I did something nearly as whacked myself with a 1/4 inch router bit and actually bent the shaft -- that'll make and interesting sound (at 25,000 rpm, you really can't get to the off switch fast enough!).

There are 3 good ways to do this:
1) steam and bend (already talked about)
2) bandsaw and sand
3) Pre-cut slightly oversize and then flush trim.

or, a combination of 2 and 3 -- 2 on the interior curves and 3 on the exterior curves.

They make a router bit with a bearing on the bottom that will follow the contour of the tear and net flush the trim wood. Make the exterior +1/8 inch and then trim flush. I would biscuit the pieces together, but you can butt join them as well, though over time you might get a bit of creep? I've used this technique many times while building loudspeaker cabinets. The inside of the trim piece isn't as critical and can be done with a bandsaw. The beauty of this method is that you can be off a little side-to-side and it still gets trimmed flush with the tear exterior contour. I would follow that up with either a 1/8 or 1/4 inch round-over bit which will give it more durability as the sharp edge will be prone to chipping.

Note: that a 1/2 in shank router bit should be used as it will really cut down on the chatter and splintering. Also, lay out the wood so that you are not trying to 'lift' the grain which will cause tear-out.
Last edited by kennyrayandersen on Wed Mar 18, 2009 3:37 am, edited 1 time in total.
User avatar
kennyrayandersen
1000 Club
1000 Club
 
Posts: 1750
Images: 38
Joined: Sun Apr 29, 2007 10:27 pm
Location: TX
Top

Postby wannabefree » Tue Mar 17, 2009 11:42 pm

I thought I should give an update on my steambending experience. In short, it is acceptable, but I had higher hopes. I have gaps where I don't want them and resorted to desperate measures: Famowood. Fortunately it is where it mostly won't show.

I would do it again though, and will on the hatch. What will I do different?

1) build a real form. Using the trailer as a form made it difficult to clamp and forced me to work with narrower strips than I would have liked. I don't think it saved me any time, either.

2) make the side molding wider and plane it to width. Silly me, I thought I could line the strips up well enough that I wouldn't have to plane off much thickness. I know better than that. Well, I should know...

Otherwise, the pressure cooker made an acceptable steam kettle, but I will use a hotter burner to keep the steam nice and hot. I refilled that pot about 8 times. Having another pot on the second burner kept the steam nearly uninterrupted, but I was asking a lot of that little Coleman.
In anything at all, perfection is finally attained not when there is no longer anything to add, but when there is no longer anything to take away.
-- Antoine de Saint-Exupery
User avatar
wannabefree
The 300 Club
 
Posts: 380
Images: 82
Joined: Fri Jul 11, 2008 11:00 pm
Location: Phoenix
Top

Postby cdfnchico » Wed Mar 18, 2009 1:57 am

WarPony wrote:Well, I've been working on the outer trim now for over a month and the router fence was a COMPLETE disaster!!!!!!!


Wow..I feel your pain, we also just spent weeks trying to rout the inner edge and finally brokedown and deliverd it, top edge done, to our friend the cabinet maker...who got'er done for us! Can't wait to see it on!
Cathy
Build thread - Just Chillin'
http://www.tnttt.com/viewtopic.php?t=25151

Image
User avatar
cdfnchico
Donating Member
 
Posts: 371
Images: 140
Joined: Mon Jul 14, 2008 9:40 pm
Location: Chico, CA
Top

Postby WarPony » Sun Mar 22, 2009 1:02 pm

Well, here is the fruits of my labor for the past 4-5 weeks:

Here is the trim boards cut and screwed to the walls before I used the router to trim the outer curve.
Image
Image

Here's the trim after much jig sawing and sanding.
Image
Image

I'm not sure if I'm done or not on this side. I'm going to trim out that small AC window but there seems to be alot of empty space. Do you guys think I need to add a vertical piece to kind of fill it in?
Image

I don't know if I'm going to stain or paint the trim. Anna likes the way it looks now but I was planning on painting it a dark brown. Any comments/suggestions on that subject?

Jeff
ImageImage

Still a million dollars away from being a millionaire!!
User avatar
WarPony
Donating Member
 
Posts: 2089
Images: 289
Joined: Tue Sep 14, 2004 12:10 pm
Location: Kansas, Topeka
Top

Postby Dean in Eureka, CA » Sun Mar 22, 2009 1:40 pm

That's looking good Jeff! :thumbsup:
I'm not there yet... Working on wiring and brushing the clear finish on my ceiling today. (Two things I don't like)
When I get to making my trim, I'm gonna take this 1/4" masonite I have and make templates. Then I'll cut the trim pieces out about 1/16" oversize, screw the template to the back side and use a flush cut bearing bit to cut my curved pieces. I take great care in making the template and it's easier to fair into shape, because it's only 1/4" thick. The payoff for me is that I get both sides of the trailer done from one set of templates.
I know I'm a bit late sharing my method, but maybe someone else will find it usefull. :thinking:
User avatar
Dean in Eureka, CA
The Fogcrawler
 
Posts: 4997
Images: 69
Joined: Thu May 11, 2006 8:44 pm
Top

Postby 2bits » Sun Mar 22, 2009 1:54 pm

I'm not sure about the extra trim, I think it might need something though, here's a couple of quick renderings to give you an idea though!

Image

I like this one myself:
Image

Personally I really like the trim light, but here is it darker, sorry I don't have Photoshop anymore, so I rednecked it :)
Image

No matter what is looks great! ! I think the trim worked our beautifully!

for me, I am still leaning to using a full 4x8 sheet of 1/4 or 1/2" plywood and cutting one continuous piece from it, round it off on both sides and that would cover the whole side all the way back to the hatch and wheel well. It will be a challenge for me though since I already have the aluminum trim around the top, so a laminate router but is not gonna fly (hindsight).
Last edited by 2bits on Sun Mar 22, 2009 2:03 pm, edited 1 time in total.
Thomas

Image
User avatar
2bits
2bit Member
 
Posts: 5130
Images: 8
Joined: Thu Dec 27, 2007 6:04 pm
Location: Lake Tawakoni, TX
Top

Postby WarPony » Sun Mar 22, 2009 2:01 pm

Thomas, can you frame that little door in and put a vertical rib in the middle of that door? Not going totally through it but just joining the top and bottom of the door.

Good work, redneck or not!!!

Jeff
ImageImage

Still a million dollars away from being a millionaire!!
User avatar
WarPony
Donating Member
 
Posts: 2089
Images: 289
Joined: Tue Sep 14, 2004 12:10 pm
Location: Kansas, Topeka
Top

Postby packerz4 » Sun Mar 22, 2009 2:16 pm

wow. that looks SUPER AWESOME!!!

:thumbsup: :applause:
~ Go Packers! ~
www.2bagalot.com
User avatar
packerz4
Donating Member
 
Posts: 605
Images: 53
Joined: Mon Mar 19, 2007 7:57 pm
Location: Elcho, WI
Top

Postby 2bits » Sun Mar 22, 2009 2:20 pm

WarPony wrote:Thomas, can you frame that little door in and put a vertical rib in the middle of that door? Not going totally through it but just joining the top and bottom of the door.

Good work, redneck or not!!!

Jeff


Ahh I get it... I think you got a winner there! :thumbsup:

Image
Thomas

Image
User avatar
2bits
2bit Member
 
Posts: 5130
Images: 8
Joined: Thu Dec 27, 2007 6:04 pm
Location: Lake Tawakoni, TX
Top

Postby WarPony » Sun Mar 22, 2009 2:30 pm

2bits wrote:
WarPony wrote:Image


Just what I wanted, Thomas!! Hmm, I'll have to mull that look over. I'm leaning toward the very first pic you did.

Thanks, bud!!

Jeff
ImageImage

Still a million dollars away from being a millionaire!!
User avatar
WarPony
Donating Member
 
Posts: 2089
Images: 289
Joined: Tue Sep 14, 2004 12:10 pm
Location: Kansas, Topeka
Top

Postby Juneaudave » Sun Mar 22, 2009 3:18 pm

Jeff...that really looks outstanding!!! Sorry I got you off on the wrong track with the router guide :oops: ...but you sure have it figured out now!!!
... :applause: :applause:
User avatar
Juneaudave
Super Duper Lifetime Member
 
Posts: 3237
Images: 380
Joined: Sun Jul 03, 2005 12:11 pm
Location: Juneau, Alaska
Top

Postby Mark72 » Sun Mar 22, 2009 5:17 pm

lookin' good Jeff! I'm glad your back on track. I really like the widget design also. But I can't just keep following you around building what you are building! :lol:
ImageImage
User avatar
Mark72
Donating Member
 
Posts: 998
Images: 127
Joined: Sun Dec 10, 2006 5:35 pm
Location: Indiana-Fredericksburg
Top

PreviousNext

Return to Teardrop Construction Tips & Techniques

Who is online

Users browsing this forum: No registered users and 36 guests