Air conditioner installation in top shelves in rear interior

Anything to do with mechanical, construction etc

Air conditioner installation in top shelves in rear interior

Postby songsparrow » Tue Sep 02, 2008 5:03 pm

Yet another air conditioning thread! But I swear that I think I've read all of the other a/c threads that I could find and I didn't see this answered!

Has anyone installed their air conditioner in the top interior shelves at the rear of the tear (backing up to the galley)? Here's what I was thinking of doing (I hope I can describe it clearly):

Divide the shelf/cupboards into three sections. The two outside sections would remain regular cupboards with doors. The middle section of the shelf would house the air conditioner unit. Thus, the middle section would be about 4" wider than the air conditioner, to provide clearance for air flow into the side vents. The side vents would pull in cool air from the interior of the tear to send out through the condenser, thus removing some of the cool air in the tear and making the a/c work a little longer to remove humidity - like in Miriam's setup (seen in the thread at http://tnttt.com/viewto ... highlight=)

Therefore, the only thing that would need to be vented is the warm air that has come out the rear of the unit. This is my first question - how best to vent this warm air? I have thought of two options, and have questions about both:

(1) Vent the hot air out the top of the tear (hot air rises, so I assume the force of the condenser fan would be sufficient to push the air out). In this case, I would box in the rear of the a/c, keeping the rear of the unit a couple of inches from the rear wall of the cupboard, then place a vent above this area. If I did this, what type of vent opening could I use on the exterior of the tear so that water would not get into the tear when it rains or when pulling the tear?

(2) Vent the hot air out through the galley. In this case, I would back the rear of the a/c up against a vent in the galley wall above the countertop. What types of vents could I use in the galley walls or hatch to let the hot air escape (I'd prefer not to leave the galley open at night or during heavy rains)? Another question for anyone whose a/c vents into the galley - how hot does your galley get? I had planned to store my cooler chest in the galley, and my concern with this setup is that the heat from the a/c would warm the cooler too much.

Also, with either setup, the condensation would need to be addressed. Any ideas of how best to drain the water?

If anyone has done a setup like this this, do you have any pictures?

I know that Camp-Inn installs their a/cs in this area, but they have that really sophisticated looking vent on the top of the tear, and it looks like they must both vent fresh air to the side vents and hot air out of the rear of the unit. I'm hoping for a slightly simpler setup.

Thanks for any ideas!

ETA: Poking around the Inside Cabinet Design thread, I see that asianflava and Rickxr2 have a/cs mounted in just this spot, so I'm going to check and see if there are any more details about their installations.
songsparrow
Teardrop Inspector
 
Posts: 12
Joined: Mon Aug 25, 2008 3:48 pm

Postby Miriam C. » Tue Sep 02, 2008 5:48 pm

:oops: 
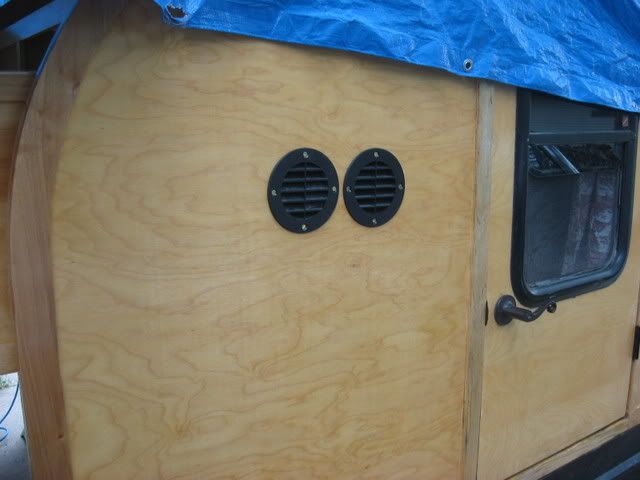
see I got busy and left out the new pictures. I have holes and vent pipe to the bottom of the TD but also put holes in the outside and in the galley to let Not cold air in.

They problem is you really need to get the hot air out fast. Air Conditioners get really hot :thumbsup:

I also have some bubble insulation along the walls to keep the heat from getting to anything else. I have pictures of this but photo bucket won't up load them right now.

The old way worked but this is better. Now mine is bigger too :lol: 8) Takes more efficient. There are actually 2 pipes going down and a register on the galley side for left intake.
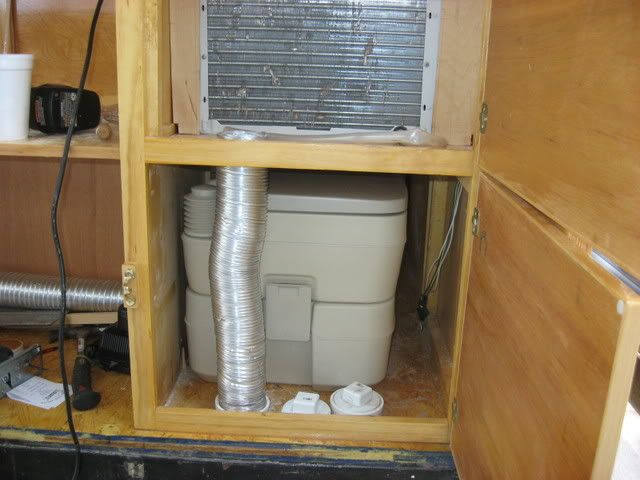
Image cooling.

Image

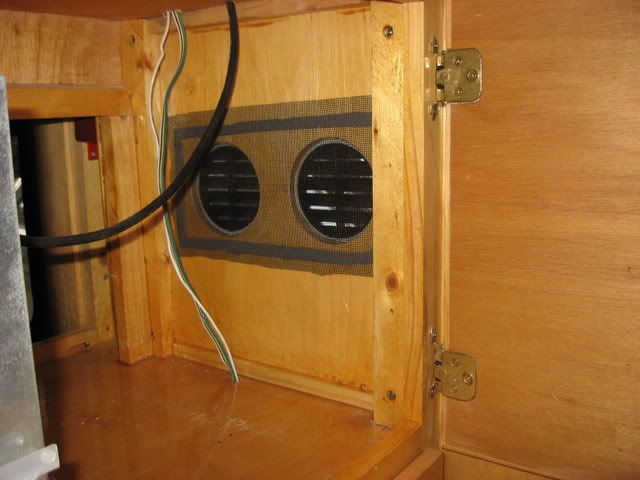
The left vent is a third exhaust and the other is a intake.

Image
“Forgiveness means giving up all hope for a better past.â€
User avatar
Miriam C.
our Aunti M
 
Posts: 19675
Images: 148
Joined: Wed Feb 15, 2006 3:14 pm
Location: Southwest MO

Postby songsparrow » Tue Sep 02, 2008 6:23 pm

Miriam, do you have any photos of your new setup from the interior? I'm just curious what it looks like.

I took a look at Rickxr2's album, and I see that he vents his through a hatch in the roof that opens up. That is ingenious and would definitely provide plenty of ventilation to the unit! But I'd be concerned about using it in the rain.
songsparrow
Teardrop Inspector
 
Posts: 12
Joined: Mon Aug 25, 2008 3:48 pm
Top

Re: Air conditioner installation in top shelves in rear inte

Postby TPMcGinty » Wed Sep 03, 2008 11:28 am

I know that Camp Inn mounts their air conditioners on the top shelf with the exhaust facing back towards the galley. Somehow they vent the exhaust to the outside without it going in the galley. I wish I had taken some photos.
Tim

Image
User avatar
TPMcGinty
Gold Donating Member
 
Posts: 1558
Images: 146
Joined: Sat Nov 10, 2007 7:16 pm
Location: Saint Michael, MN
Top

Postby Woody » Wed Sep 03, 2008 2:04 pm

With the restriction of duct work you will have to add some form of exhuast fan setup to get rid of the heat so the unit will run efficently. Plus seal the side cooling air intakes on the side of the unit from the hot exhaust in the rear so they don't mix. Bascically cool air in hot air out. I would not rely soley on the fan in the back of the unit to push the air (hot exhaust) from the back of the unit by itself. It is not designed to push air through restricted ductwork setups. This will cause it to build up heat and then the unit will shutdown and eventually damage the unit itself. I have installed a fan to assist the movement of exhaust air to the outside and it has worked very well for almost 5 years. Another plus is to use the fan for ventilating or exchange the air in the cabin by allowing some cabin air to circulate to the cooling air intake on the side of the unit via vent from the cabin through the galley bulkhead. The addition of cabin air allows the unit to run longer and cool and dehumidify the air also. Essentially by dilution of cabin air with fresh air from a slightly open window. The A/C unit is fooled into thinking it is cooling a larger volume of space since the thermostat is dectecting some warm air so it runs longer, A short cycling A/C unit will cool the air in the cabin but not dehumidify it at all. Leaving the cabin cool but damp. This setup also takes the place of a roof vent the source of the dreaded roof leak due to the additional roof penetration. Plus the fan can be wired separtely from the A/C so the fan runs by itself when A/C is not needed to exchange cabin air like a roof vent setup. The other advantage is in some camping situations it is not always a good idea to leave your galley hatch open for the A/C to breathe correctly. In late night bad weather situations to unwanted animal vistors at night in the galley area.

Camp Inn A/C vents the hot exhaust air through a bump out vent in the roof in front of the galley hatch hinge. It seems to work well also. Never heard of a complaint about that setup either. I have seen plenty of them over the years at gatherings. Great product and flawless workmanship there :thumbsup:
Woody
The Tear Jerker's, Florida Chapter Director
E-mail: [email protected]
Tear jerker chapter site http://www.tearjerkers.net/forums/
Check the SE section for gathering information
Tear Jerkers new site http://www.tearjerkers.net/forums/
Enjoying life in 12 ounce increments is what it's about
User avatar
Woody
2000 Club
2000 Club
 
Posts: 2006
Images: 26
Joined: Tue Jun 15, 2004 11:07 pm
Location: Ft. Lauderdale, Florida
Top

Postby songsparrow » Thu Sep 04, 2008 12:32 pm

Woody, Thanks for your reply - I have given it a lot of thought to make sure I understand it correctly (I think!) and I have a couple of questions. I apologize if I'm being kind of dense - I've never dealt with any of this before, so it's a steep learning curve.

First, you mentioned that

This setup also takes the place of a roof vent the source of the dreaded roof leak due to the additional roof penetration. Plus the fan can be wired separtely from the A/C so the fan runs by itself when A/C is not needed to exchange cabin air like a roof vent setup.


This sounds like a big bonus to me, but I can't quite visualize how it would work. If I understand correctly, I'd have vents to allow cabin air into the sides of the a/c unit, and a secondary fan to help expell the hot air from the rear of the unit out through the floor of the tear. If the a/c unit is running I can see that it would pull air from the cabin through the sides of the unit and out the rear of the unit which would then be blown out of the tear. But how will this work if the a/c unit isn't running - then there's no fan to pull the air from the cabin through the a/c unit. Or does the secondary fan alone generate enough of a draw to pull the air from the tear through the condenser?

Other questions:
What type of secondary fan do you use?
And what type of ductwork?
Is there a limit to how long the ductwork can be (which would affect how high in the tear you could mount the a/c)?
How do you have the seondary fan wired - is there a separate on/off switch?
Does the secondary fan run only on ac power, or can it also run on dc (so that it could be used for ventilation even if you don't have access to shore power for the a/c)?
songsparrow
Teardrop Inspector
 
Posts: 12
Joined: Mon Aug 25, 2008 3:48 pm
Top

Postby Woody » Fri Sep 05, 2008 1:33 am

Yes the secondary fan will pull air through the condenser. I played around with various setups with this configuration for a while before settling for this one. The main idea was to lower the exhaust tempeture at the back of the unit operating so the unit would not overheat and shutdown. I used a digital thermometer to monitor the exhaust heat generated at the back of the unit when I figured out that the condenser fan in the back of the unit itself just did not have the power to push the air through the restriction of smaller or narrow exhaust ductwork (4 or 6 inch ductwork) to save space. I used an off the shelf 6 inch 80 CFM 120 AC bathroom exhaust fan I had laying around my shop as an experiment in the beginning and stayed with it (It was free). It could be done with a 80 CFM 12 VDC fan as long as it could handle the heat from the A/C. I also found that it was easier to pull air through the condenser than push it through. I tried the secondary fan on the cooling air side it wasn't as effective to push the air through the unit. The rear fan in the A/C unit seemed to disrupt the secondary fan cooling air flow being introduced from the side cooling air intakes on the side of the A/C unit. It also messed up the cabin air exchange I was trying to attain with the system design in the first place. Which was to make the 5200 btu A/C unit run longer to cool and dehumidify the cabin air insteade of short cycling and leaving the cabin cool but damp inside. This could only be attained by tricking the A/C to think it was cooling a larger volume of space by allowing the introduction some fresh outside air in to the cabin to fool the thermostat on unit. I also wired the secondary fan on it's own switch so when A/C is not needed I can still circulate outside fresh air throughout the cabin via slightly opened window, then to a vent hole from the cabin (galley bulkhead) into the cooling air intake space for the unit, out the condenser, into the secodary fan intake and out the exhaust opening from the trailer. When the A/C unit is running or not the secondary fan will keep the moving with a window slightly opened. I have used this system setup for almost 5 years with good results and so far no problems.The type of ductwork really depends on the room you have for it in your build. The shorter the ductwork run the better in my opinion for optinum air flow. I guess the location for mounting the A/C unit is a personal preference. I prefer to mount it in the lower galley cabinet so I have a shorter condensate drain line and exhaust ductwork and gain some deeper counterspace. The one thing you have to design in your build is to make sure that the unit has a little downward pitch to the rear of the unit for good condensate drainage. Also make sure that when leveling the trailer itself you make sure that the unit will drain good. I hope this makes sense. I know a few people that have used my setup and they have had good results also. I would also consider an A/C unit with a digital thermostat with a remote verses the mechanical style thermostats. Thats just because I am lazy. Actually the digital style thermostats once set to a specific cooling temp it will stay there no matter what the outside ambient air does over a course of the day or night verses a mechanical one which requires sometimes constant adjustment as ambient temps vary. I hope this makes sense
Woody
The Tear Jerker's, Florida Chapter Director
E-mail: [email protected]
Tear jerker chapter site http://www.tearjerkers.net/forums/
Check the SE section for gathering information
Tear Jerkers new site http://www.tearjerkers.net/forums/
Enjoying life in 12 ounce increments is what it's about
User avatar
Woody
2000 Club
2000 Club
 
Posts: 2006
Images: 26
Joined: Tue Jun 15, 2004 11:07 pm
Location: Ft. Lauderdale, Florida
Top

Postby asianflava » Fri Sep 05, 2008 3:50 am

What you are talking about sounds a bit familiar. Just your regular run of the mill 5000btu air conditioner.
Image

Here is the ducting, there is a ramp that directs the hot air up and out the top. The cool air comes in from behind the ramp (in the galley) then around it's sides.
Image

The skateboard ramp. The side panels are removable incase I need to get behind the unit, or to remove the unit.
Image

The whole thing sits in a tray that I epoxied to make water proof. Not shown in this pic are 2 drains in the 2 rear corners.
Image

Cool air intake in the galley, the black vent on the top shelf.
Image

Hot air exhaust out the top. I still have to make another rain deflector for the vent, it just has tape on it in this pic. I made one (the triangular thing in the background) but I wasn't happy with the fit. I never got around to putting the vortex generators on now they are lost.
Image

I've used this setup on multiple 100+ days with the galley closed without a problem. I don't have the bottom of my hatch sealed for this reason.
User avatar
asianflava
8000 Club
8000 Club
 
Posts: 8412
Images: 45
Joined: Mon Aug 02, 2004 5:11 am
Location: CO, Longmont
Top

Re:

Postby Gunguy05 » Sun Jun 15, 2014 7:44 am

asianflava wrote:What you are talking about sounds a bit familiar. Just your regular run of the mill 5000btu air conditioner.
Image

Here is the ducting, there is a ramp that directs the hot air up and out the top. The cool air comes in from behind the ramp (in the galley) then around it's sides.
Image

The skateboard ramp. The side panels are removable incase I need to get behind the unit, or to remove the unit.
Image

The whole thing sits in a tray that I epoxied to make water proof. Not shown in this pic are 2 drains in the 2 rear corners.
Image

Cool air intake in the galley, the black vent on the top shelf.
Image

Hot air exhaust out the top. I still have to make another rain deflector for the vent, it just has tape on it in this pic. I made one (the triangular thing in the background) but I wasn't happy with the fit. I never got around to putting the vortex generators on now they are lost.
Image

I've used this setup on multiple 100+ days with the galley closed without a problem. I don't have the bottom of my hatch sealed for this reason.


I know the post is old, BUT I would love to see this setup as it sounds like what I trying to do.. any chance you could update the links or email the missing pics to me?

Brian
Brian


Checkout my buildThe Regal Eagle Bow front for 4
Image
Also my teardrop updates from blog on Dad Rambles
User avatar
Gunguy05
The 300 Club
 
Posts: 385
Images: 6
Joined: Mon Dec 02, 2013 4:45 pm
Location: South GA
Top

Re: Air conditioner installation in top shelves in rear inte

Postby citylights » Sun Jun 15, 2014 10:06 am

I see lots of complicated solutions, so I though I would offer a simple one. Put the air conditioner on the teardrop shelf on 100 lb drawer slides. Put a hatch In the side of the teardrop. When you want to use the AC, open the hatch, slide the AC out to operating position (with all the rear vents outside like they were designed to be used!).

I did the same thing, but my AC is in the front of the teardrop. I made a big wall wart hatch because it is in the front curved surface, but with more space inside and on a flat sidewall, you could use a standard flush mount RV hatch.

Image

Image

Image
User avatar
citylights
500 Club
 
Posts: 591
Images: 1
Joined: Sun May 12, 2013 12:27 pm
Location: Las Vegas, Nevada
Top

Re: Air conditioner installation in top shelves in rear inte

Postby flboy » Sun Jun 15, 2014 11:55 am

Sometimes simple is best, especially if you ever need to replace or fix.
Don (Flboy)

YouTube Video of Finished 6x12 Trailer:
https://youtu.be/6_-8cVdWUIA
YouTube Video of 7*18 with 2ft V-nose Trailer:
https://youtu.be/MUcMM86LA2g
User avatar
flboy
Gold Donating Member
 
Posts: 4218
Images: 378
Joined: Tue May 15, 2012 6:13 pm
Top

Re: Re:

Postby working on it » Sun Jun 15, 2014 12:30 pm

Gunguy05 wrote:
asianflava wrote:What you are talking about sounds a bit familiar. Just your regular run of the mill 5000btu air conditioner.Image
Here is the ducting, there is a ramp that directs the hot air up and out the top. The cool air comes in from behind the ramp (in the galley) then around it's sides.
Image
The skateboard ramp. The side panels are removable incase I need to get behind the unit, or to remove the unit.
Image
The whole thing sits in a tray that I epoxied to make water proof. Not shown in this pic are 2 drains in the 2 rear corners.
Image
Cool air intake in the galley, the black vent on the top shelf.
Image
Hot air exhaust out the top. I still have to make another rain deflector for the vent, it just has tape on it in this pic. I made one (the triangular thing in the background) but I wasn't happy with the fit. I never got around to putting the vortex generators on now they are lost.
Image
I've used this setup on multiple 100+ days with the galley closed without a problem. I don't have the bottom of my hatch sealed for this reason.

I know the post is old, BUT I would love to see this setup as it sounds like what I trying to do.. any chance you could update the links or email the missing pics to me?
Brian
I built mine a bit differently than others, and had quite the experience doing so. Not simple, but that's the way I roll. Here's links to my threads (many more details listed in my gallery): http://www.tnttt.com/viewtopic.php?f=50&t=56667&hilit=exhaust+ducting and http://www.tnttt.com/viewtopic.php?f=21&t=54945&hilit=exhaust I decided on a rear-mounted a/c unit, made to run with the hatch closed, with no action needed to set up (just turn it on); built with sideways ducting and peripheral systems for making it work (vents, duct fans, chassis cooling fan, etc...) due to the short 4x8 trailer, leaving only 20" depth in the rear. I left the ducting exposed for two reasons: I like the look of functional hardware, and I don't need the extra weight a cover would add. Others may want to hide their work. I had problems making it cool properly, because I initially under-estimated the exhaust requirements, but when finally sorted out, it cools perfectly.
airconditioner hi-mounted on rear bulkhead.jpg
airconditioner hi-mounted on rear bulkhead.jpg (108.4 KiB) Viewed 1477 times
rear exhaust plan.jpg
rear exhaust plan.jpg (119.91 KiB) Viewed 1477 times
airconditioner exhaust venting outlet.jpg
airconditioner exhaust venting outlet.jpg (112.19 KiB) Viewed 1477 times
2013 HHRv "squareback/squaredrop", rugged, 4x8 TTT, 2225 lbs
  • *3500 lb Dexter EZ-Lube braked axle, 3000 lb.springs, active-progressive bumpstop suspension
  • *27 x 8.5-14LT AT tires (x 3) *Weight Distribution system for single-beam tongue
  • *100% LED's & GFCI outlets, 3x fans, AM/FM/CD/Aux. *A/C & heat, Optima AGM, inverter & charger(s)
  • *extended-run, on-board, 2500w generator *Coleman dual-fuel stove & lantern, Ikea grill, vintage skillet
  • *zinc/stainless front & side racks *98"L x 6" diameter rod & reel carrier tube on roof
173193172890148599
User avatar
working on it
2000 Club
2000 Club
 
Posts: 2178
Images: 457
Joined: Tue Oct 04, 2011 9:05 pm
Location: DFW Texas
Top


Return to Teardrop Construction Tips & Techniques

Who is online

Users browsing this forum: No registered users and 3 guests