Frame to Floor to Walls

Anything to do with mechanical, construction etc

Postby Esteban » Mon Dec 08, 2008 4:17 pm

Your floor frame will be exposed to the elements so if I were you I'd use a rot resistant wood. Well sealed popular should be fine. Don't see a need for oak which is heavier, $$ and more prone to warping if it got wet.
Steve - SLO, CA
Esteban
Donating Member
 
Posts: 1684
Images: 15
Joined: Fri Jul 28, 2006 4:39 pm
Location: California, San Luis Obispo

Postby crazycyclist » Tue Dec 09, 2008 1:45 am

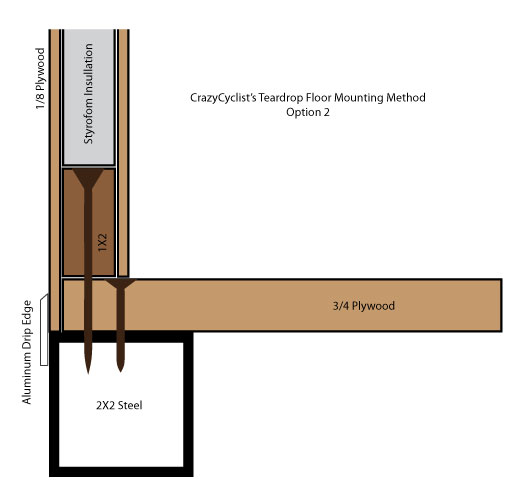
I've just read this thread on frames or no frames and I'm rethinking my strategy and considering screwing the plywood directly to the frame. The one concern that I have is with on off-road trailer, I want the 2x2 steel to be water tight. Screwing into it would create holes. I don't want moisture inside the tubing to rust.

Am I being overly worried and/or is there a way to prevent the moisture. I also don't want the screws working their way out with vibration.

I also want to be very sure the bottom is water tight so that if it gets really wet while fording a stream I don't have to worry about moisture getting in. I'm concerned about sealing the corners.

Another question would be about moisture being trapped between the plywood and the steel. Would it be more likely to cause problems with plywood (i.e. delamination) than with regular wood?

Here's option 2:
Image
Mel
Orlando, FL
www.melwade.com/teardrop
“The illiterate of the 21st century will not be those who cannot read and write, but those who cannot learn, unlearn, and relearn.” -Alvin Toffler
User avatar
crazycyclist
Teardrop Advisor
 
Posts: 66
Images: 24
Joined: Mon Jul 21, 2008 7:37 pm
Location: Orlando, FL

Postby greekspeedoman » Tue Dec 09, 2008 1:48 pm

You could epoxy the edges of the plywood (where it would rest on the frame). I did that to both the wall and the floor of my build. That way things are really sealed up before I made my joints. Then I sealed the joints with some UV stable caulking (where ever light may find it) and external use caulking on the rest of the joints.

As far as the screws backing out: I think if you applied some glue to them as you drove them in, the wood and glue combo would keep them from backing out of the frame. You could also go with Loc Tite or something too.

Holes in the frame? I don't think that is impossible. You could do a dry fit and then pull it apart and put caulk on each hole (or a bead...hmmm). Then reassemble it while the caulk has not cured. You could caulk the joints between the floor and the frame and the wall and the frame before you installed the aluminum drip molding. Undercoat the joints -if desired- but probably not necessary at that point.

Interesting Idea.
User avatar
greekspeedoman
Donating Member
 
Posts: 312
Images: 12
Joined: Fri Jul 11, 2008 9:35 am
Location: Coeur d'Alene, ID
Top

Postby Esteban » Tue Dec 09, 2008 10:53 pm

Mel, Don't see why you'd need to tap screws into the tube frame to attach the floor. Instead bolt or screw the floor to each of the corner gussets and to the C channel cross pieces inside the 2 x 2 tube frame. In addition you might weld on tabs to the inside middle of the front and back of the 2 x2 frame to bolt or screw through.

Over doing it, I epoxied the exposed bottom side of the floor, then used Henry's roofing tar on top of the epoxy, to seal it well.

Question, what are you going to use over the outside plywood walls to seal them? Aluminum, Filon, epoxy, fiberglass, paint, a clear finish, etc.?
Steve - SLO, CA
Esteban
Donating Member
 
Posts: 1684
Images: 15
Joined: Fri Jul 28, 2006 4:39 pm
Location: California, San Luis Obispo
Top

Postby crazycyclist » Wed Dec 10, 2008 1:00 am

So Steve, you are suggesting something like this?
Image

With this, I'm concerned about securing the walls to the bed. There's only 1/2 inch of plywood for the screws to grip into... Is that enough? :thinking:

I'm planning on using epoxy and marine paint on the outside walls of the trailer.
Mel
Orlando, FL
www.melwade.com/teardrop
“The illiterate of the 21st century will not be those who cannot read and write, but those who cannot learn, unlearn, and relearn.” -Alvin Toffler
User avatar
crazycyclist
Teardrop Advisor
 
Posts: 66
Images: 24
Joined: Mon Jul 21, 2008 7:37 pm
Location: Orlando, FL
Top

Postby Esteban » Wed Dec 10, 2008 2:12 am

Mel wrote:With this, I'm concerned about securing the walls to the bed. There's only 1/2 inch of plywood for the screws to grip into... Is that enough?


Mel, I have to be careful not to offer ideas over my pay scale...I'm building my first one...a newbie builder on teardrop time.

Your new 2a design looks better to me. It's similar to how my floor is bolted to the trailer frame. The big difference is that I have a 1-3/8" thick sandwich floor with countersunk bolt heads in the floor. I filled the countersink holes with epoxy to help secure the bolt heads and level them with the floor (probably overkill).

It may be iffy for a screw or bolt to securely attach a 1/2" plywood floor like your your newest 2a design. Probably a bolt head and washer above the plywood would hold, if you don't mind a protruding bolt head. (I would).

Sometime ago someone mentioned using elevator bolts that have a wide flat head. They might work well enough with good quality 1/2" plywood.

Or you might go back to your earlier idea of using a wood frame under the plywood floor to have more wood to screw or bolt through.

Here are some Floor-Wall Attachment illustrations:

Image

You've written that you want your side walls to be entirely above the frame. Three Top Mount methods are shown in the above illustration. madjack uses aluminum angle as a cleat similar to the most leftward Top Mount method shown above. Maybe he can offer more information. Or you might drive screws at an angle from the outside through the wall into the floor, fill any holes with epoxy, and cover them with the aluminum trim you show at the transition from wall to trailer frame.

My walls will (soon) be attached most similar to the Side Mounted...Dado Joint (Frederick) method in the above illustration.

HTH :D
Steve - SLO, CA
Esteban
Donating Member
 
Posts: 1684
Images: 15
Joined: Fri Jul 28, 2006 4:39 pm
Location: California, San Luis Obispo
Top

Postby grant whipp » Wed Dec 10, 2008 4:11 am

Hiya, Mel!

I don't usually get involved in these types of discussions, but I gotta tell you, your Option 2a is awfully close to the way I build my trailers ... except that I run my screws through the plywood and into the bottom of the walls. I build my bodies separate from the frame, and actually install the floor when the shell is upside down:
Image

I also through-bolt the body to the frame through the (3/4") plywood floor and into corner bracket/gussets similar to what you've drawn in your frame diagram ... and I use Elevator Bolts ... never putting a fastener into the main frame, anywhere.

Before I roll the body back upright, I give the bottom a good coating of asphalt sealant and let it soak in and set for about three days. (If you think you might need to move the body around on the frame sometime after you've put it in place, I'd suggest that you take some black enamel spray paint and paint the floor bottom where it will rest on the frame members, thereby sealing the asphalt paint for a little while to give you a little wiggle room ... for a while. Once you bolt that body down, though, you'll have a great, water-tight, almost glue-like seal between the frame and the floor.)

Since you plan on doing some serious off-roading with this thing, I'd suggest going back and putting corner brackets/mounting tabs on the ends of every cross member of the frame and plan on putting a mounting bolt in each one.

Just some more food for thought ... :thinking: ...!

Good Luck on your build, and as always ...

CHEERS!

Grant
Celebrating Retirement after over 32 Years of Building, Promoting, Supporting, Supplying, Living the Lifestyle, and Loving Teardrop Trailers!
"Life Moves a Little Slower When You're On Teardrop Time"
The nature of Life, itself, is change ... "Those who matter, don't mind, and those who mind, don't matter."
Image
User avatar
grant whipp
Teardrop Manufacturer
 
Posts: 1815
Images: 117
Joined: Sun Jan 16, 2005 2:00 pm
Location: Jefferson State ('tween CA & OR!)
Top

Postby crazycyclist » Thu Dec 11, 2008 1:45 am

Great ideas. Thanks. Here's my latest thoughts. The disadvantage of this is that I'm just building a frame above the plywood instead of below...

Image

Hmmm... Choices, choices... :thinking:
Mel
Orlando, FL
www.melwade.com/teardrop
“The illiterate of the 21st century will not be those who cannot read and write, but those who cannot learn, unlearn, and relearn.” -Alvin Toffler
User avatar
crazycyclist
Teardrop Advisor
 
Posts: 66
Images: 24
Joined: Mon Jul 21, 2008 7:37 pm
Location: Orlando, FL
Top

Postby crazycyclist » Mon Dec 15, 2008 4:16 am

I think I've come full circle with some great modifications inspired by the discussion here. I've come back to a variation of my original design. :?

Image

I'll be using elevator bolts to secure to floor to the steel frame. I'll be putting glue on the screws to help ensure they do not reverse themselves with vibrations.

I hope this discussion helps others...
Mel
Orlando, FL
www.melwade.com/teardrop
“The illiterate of the 21st century will not be those who cannot read and write, but those who cannot learn, unlearn, and relearn.” -Alvin Toffler
User avatar
crazycyclist
Teardrop Advisor
 
Posts: 66
Images: 24
Joined: Mon Jul 21, 2008 7:37 pm
Location: Orlando, FL
Top

Postby planovet » Mon Dec 15, 2008 10:26 am

Looks good! :applause:
ImageMark (& Cindi)
Visit our website: Little Swiss Teardrop

I was wondering why the water balloon was getting bigger... and then it hit me.

ImageImageImageImage
User avatar
planovet
The Cat Man
 
Posts: 5583
Images: 3
Joined: Tue Nov 27, 2007 4:48 pm
Location: Plano, Texas
Top

Postby Esteban » Mon Dec 15, 2008 4:42 pm

Mel, looks good. I have a suggestion for a minor change. As drawn your inside plywood is inset below the 1/2" plywood floor. My suggestion is to increase the 1 x 2 (nominal dimension) at the bottom of your wall to one with an actual vertical dimension of 2", or greater...so there's enough wood to attach the inner plywood to it. This is to allow the plywood inside the cabin to rest on top of the floor, not inset into it.

I imagine you'll bolt the floor assembly to the trailer frame first. Then you'll attach your wall assembly to the floor.
Steve - SLO, CA
Esteban
Donating Member
 
Posts: 1684
Images: 15
Joined: Fri Jul 28, 2006 4:39 pm
Location: California, San Luis Obispo
Top

Postby jride200 » Mon Mar 01, 2010 9:19 pm

grant whipp wrote:Hiya, Mel!

I don't usually get involved in these types of discussions, but I gotta tell you, your Option 2a is awfully close to the way I build my trailers ... except that I run my screws through the plywood and into the bottom of the walls. I build my bodies separate from the frame, and actually install the floor when the shell is upside down:
Image

I also through-bolt the body to the frame through the (3/4") plywood floor and into corner bracket/gussets similar to what you've drawn in your frame diagram ... and I use Elevator Bolts ... never putting a fastener into the main frame, anywhere.


Just a few follow-up questions, directed specifically to Mr. Whipp ...

I've read about your preferences towards sandwich constructed walls. Am I correct in assuming, then, that you are running screws though the 3/4" flooring and into the 1/2-3/4" plywood core of your walls? How when building them upside down like this do you hold everything square prior to attaching the floor? Are you using fixtures, etc? I previously only considered building in a bottom/frame-up manner, believing that the frame would give some structure to the assembly. And finally, are you applying foam insulation beneath your floor, in between the steel frame members? Your thoughts? Jason
jride200
Teardrop Inspector
 
Posts: 15
Images: 8
Joined: Wed Oct 07, 2009 12:41 am
Top

Postby grant whipp » Sun Mar 07, 2010 1:25 am

jride200 wrote:... Just a few follow-up questions, directed specifically to Mr. Whipp ...

I've read about your preferences towards sandwich constructed walls. Am I correct in assuming, then, that you are running screws though the 3/4" flooring and into the 1/2-3/4" plywood core of your walls?


Hi, Jason!

Sorry for the delay in responding to your inquiry, here, but I've been on vacation since 2/27 (actually, still am!).

Yes, you are correct ... I run the screws through the 3/4" plywood floor and into the bottom of the walls. Although, while I may start out with 1/2", 5/8", or 3/4" ply for the walls, by the time I add the 1/8" or 1/4" interior paneling, the thickness is (when the floor is attached) closer to 5/8" to 1". After the floor is attached and the "skirts" installed (along with some other construction), I add the final layer of 1/4" luan over the sides.

... How when building them upside down like this do you hold everything square prior to attaching the floor? Are you using fixtures, etc?


My galley cabinets and front overhead cabinets are sub-assemblies that are attached/fastened to the walls prior to turning the cabin upside down. They are, of course, square, and by making very careful measurements during the cabinet-to-wall assembly (and using a carpenter's square and several diagonal measurements), the unit turns out fairly true. The floor actually assures the final squareness. BTW, I also install most of my roof cross-members before rolling the assembly upside down.

... And finally, are you applying foam insulation beneath your floor, in between the steel frame members? Your thoughts? Jason


I do NOT add insulation beneath my floor. In my opinion, it is a waste of time, materials, and $$$ ... the mattress inside your trailer is all the insulation you'll ever need down there (if it is something more substantial than an air mattress, that is) ... again, IMHO, backed by more years in the business than I care to count!

I've said it many times before ... there is no ONE "right way" to build a teardrop, but there are lots of wrong ways! My methods are based on a lifetime of building boats, airplanes, cars, and RVs, with semi-production in mind. Every method is applicable to home construction, but maybe not necessarily desirable to everyone. I just offer them as food for thought.

Good luck on your project, and as always ...

CHEERS!

Grant
Celebrating Retirement after over 32 Years of Building, Promoting, Supporting, Supplying, Living the Lifestyle, and Loving Teardrop Trailers!
"Life Moves a Little Slower When You're On Teardrop Time"
The nature of Life, itself, is change ... "Those who matter, don't mind, and those who mind, don't matter."
Image
User avatar
grant whipp
Teardrop Manufacturer
 
Posts: 1815
Images: 117
Joined: Sun Jan 16, 2005 2:00 pm
Location: Jefferson State ('tween CA & OR!)
Top

Postby aggie79 » Sun Mar 07, 2010 9:30 am

Jason,

I am building my teardrop similar to Grant's method, but started with the floor first. This picture shows the first wall being attached to the floor. You can see the jig I built out of a piece of mdf to keep the wall square. My walls are glued and screwed into the floor.

Image

I then attached the face frame for my front bulkhead cabinet, and the frames for my rear bulkhead. I also used a small jig made from scrap plywood to keep things squared up so I could add the second sidewall.

Image

Good luck, Tom
Tom (& Linda)
For build info on our former Silver Beatle teardrop:
Build Thread

93503
User avatar
aggie79
Super Duper Lifetime Member
 
Posts: 5405
Images: 686
Joined: Tue Aug 07, 2007 5:42 pm
Location: Watauga, Texas
Top

Postby jride200 » Mon Mar 15, 2010 7:38 pm

Thanks fellas, for the additional clarification. I appreciate your thoughts, as I continue to work out all the preliminary design design in my [too] little head!
jride200
Teardrop Inspector
 
Posts: 15
Images: 8
Joined: Wed Oct 07, 2009 12:41 am
Top

PreviousNext

Return to Teardrop Construction Tips & Techniques

Who is online

Users browsing this forum: No registered users and 16 guests