godskid wrote:I was hoping you would chime in (I read somewhere that you are an engineer). What about the idea of mounting it FLAT side up, so that no weight is on the trailer? My trailer is already built, and I can't add more support (nor even be positive about where the studs are) so I liked the concept of "if leg breaks, the table just dis-engages from the trailer instead of ripping the side off the trailer". I have a Physics background, tho not engineering, and I like the idea for the safety to the trailer wall.
Comment?
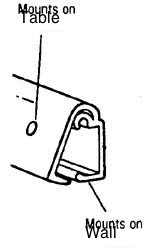
Yeah, OK. You could do it that way if you put the small inside track on the table and then mount the big one on trailer side with the bulb at the bottom. A bit unorthodox, but it would work. Now, keep in mind that all of these tables will have a support leg. So the moment at the trailer is not high (unless the support leg is removed, or at a severe angle). It does make the table awkward, IMO, to install as you have to start with the table down low, insert it, and then lift up to get it where you want it and then somehow get the leg in place (from the side?). It’s more natural to drop the table in from above and lower it until the leg inserts into the leg receptacle [of some kind]. You may also be able to slide the table in laterally, but I’ve never had one of these hinges in my hot little hands so I don’t know whether the tolerances are loose enough to allow that. If you could do that you could slide the table into the bracket and the leg into its receptacle at the same time, which wouldn’t be so bad.
What you do have, regardless (you could mount it six ways to Sunday), is an outward load in the case that you have an angled leg coming back toward the tear. The only way to eliminate that load is to have a leg that is vertical. Of course, in that case it’ would be more easily kick out from under the table and you’d be right back where you started from. This outward load also causes a moment at the root, but generally it shouldn’t be so big unless a camper of large stature sits on it or something.
There is also something else that may not be known, so I’ll bring it up and that’s what do you do if you want to install something into your teardrop after your sandwich-tear is already built? What we do in the biz is drill a hole through the (outer or inner depending on which one you want) skin (in the case of a teardrop this would be either fiberglass, aluminum, or a plywood skin), insert the short end of an Allen wrench (OK, we have a really expensive tool that looks just like an Allen wrench), hook your drill to it, and spin it to grind out a bunch of the foam (a cylinder’s width as deep as you need.). You can then install an insert (threaded internal bolt-like thing) or a through bolt. A low-cost home alternative would be to drill out a ½ inch hole from the inside most of the way – chuck up a ½ inch router bit into you drill and flush it to the Aluminum (or other facesheet material) to the outside and then epoxy a ½ inch hardwood dowel in the hole. Afterward, you can mount whatever you want and it will be quite robust. Anyway, there could be several versions to this concept and it can be done without messing up the exterior of you tear.


 )
)


 Mark (& Cindi)