Page 3 of 6

Posted:
Mon Feb 15, 2010 6:43 pmby misterW
What kind of glue were you using when you were making those oversized pieces?
Posted:
Mon Feb 15, 2010 8:41 pmby mikeschn
Like MJ, I also used a biscuit joiner. I put lots of biscuits in, and since I had lightening holes in the side, I drove a screw through a clearance hole on one side, into the mating piece to clamp the pieces together. Once it dried, I could take the screws out if I wanted to. If the plywood bulged from the screws, the screws would definitely come out.

Mike...
Posted:
Mon Feb 15, 2010 9:25 pmby afreegreek
using modern adhesives, a scarf joint ratio of 6 to 1 is considered as strong as the material itself. that can be in solid wood or plywood. this means.. if you cut a strip of any width and scarf it together then load it until it fails, it is as likely to break somewhere other than the joint as it is to break at the joint. this also hold true for tongue and groove, a spline or a finger joint. the 6 to 1 ratio does not have to be one continuous surface, it can be many surfaces as in a finger joint. for 3/4" ply, this means 4-1/2" of glue surface. therefore a spline that extends 2 inches into one side is the same as a scarf (give or take). the fact is, you don't need anywhere near the full strength of 3/ 4" ply to make a box because once built it will never be loaded in such a way that it can deflect enough to break. joints glued properly don't just break. you need to load that joint until it deflects enough to stress the joint enough to overload the glue surface, which is quite a bit. if you have a structure that prevent deflection (like a box) you will not be able to break it unless you point load it buy smashing it with a sledge hammer for example.. in the real world, a spline 1/2" deep or a lamello every 6 to 8 inches in tons more than you need.
Posted:
Wed Feb 17, 2010 6:32 pmby Rigsby

Thanks for the thread, I think i will use one of these ideas when i get round to building the floor on number 2, as sheets of ply larger than 8 x 4 are expensive
how about this...
Posted:
Sun Jul 18, 2010 1:31 pmby Roy
This is an older thread but I didn't think I should start a new one since my question is on building a larger walls.
I am wanting 5 x 10 ft 1/4" plywood. Could I put two 5 x 5 ft 1/8" sheets end to end, paste another 5 x5 ft 1/8" sheet on top, centered across the seem, then cut another 5 x5 ft 1/8" sheet in half and paste each cut piece to the ends? The end result would be a 1/4" thickness 5 x 10 ft with a single seam down the middle on one side, and 2 seams on the other (2.5 ft from each side). The pieces would be baltic birch as it is available in a local wood hobby store. Would it work?
One more idea, I know someone who makes custom wood jigsaw puzzles out of 1/4 ply. If he cut me some big puzzle pieces (20 or so) out of 1/8" ply that could be put together to make a 5 x 10 ft sheet, could I paste it to two 5 x 5 ft 1/8" pieces and have this as a wall? It would look really cool I think. Any problems this would create? I mean... talk about seems, there would be plenty. I imagine I would need to treat the completed puzzle with epoxy and maybe fiberglass ala Steve Frederick.
Re: how about this...
Posted:
Wed Aug 11, 2010 10:58 amby fm-usa
Roy wrote:I know someone who makes custom wood jigsaw puzzles out of 1/4 ply. If he cut me some big puzzle pieces (20 or so) out of 1/8" ply that could be put together to make a 5 x 10 ft sheet, could I paste it to two 5 x 5 ft 1/8" pieces and have this as a wall?
A puzzle teardrop.

Now
THAT would look great if you were to stain every other puzzle piece and let it show on the outside.
Kids might ask if you have to assemble it every time you use it.

Posted:
Sun Jul 03, 2011 7:46 pmby willyswagon
Here is an interesting discusstion on butt jointing plywood with fiberglass and the joint being stronger than the plywood:
http://www.instantboats.com/gbj/index.html
This discussion is for 1/4 inch plywood which might be nice for some of the top covering layers as well as sides.
Posted:
Sat Sep 24, 2011 1:15 pmby Jpageau
a very much appreciated tid bit of info. thanks!!
Re: Stretching your plywood...just 1 technique
Posted:
Sat Oct 08, 2011 7:24 amby Imanoone2u
Try this clever device.
http://www.ozziejigs.com.au/
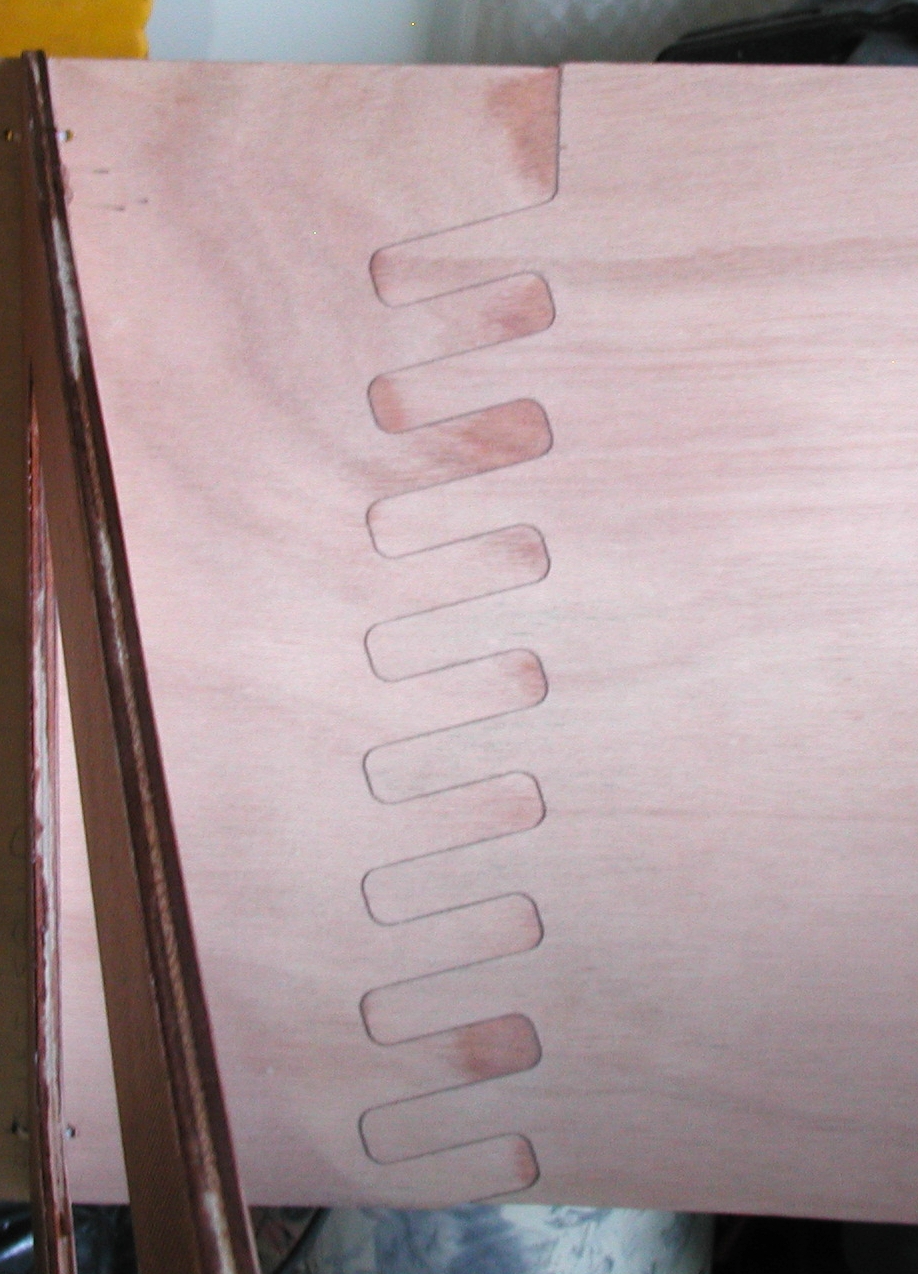
doug hodder wrote:Recently there have been a number of people asking where to get larger sheets of ply. They can be difficult and almost always are very expensive to get. I know that the experienced woodworkers here know this technique, but I thought it would be a handy thing for some of the newer builders to see. If someone would like to document scarfing ply, that would be great. There are several ways to stretch your plywood, here's one method.
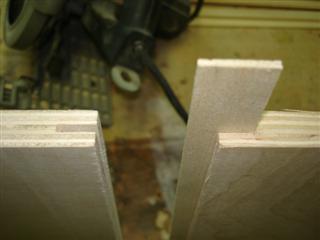
This technique uses a router and if you don't have a router....well, you're going to need one anyway as it's a real versatile tool. Pick up a 3 wing cutter. Shown is an 1/8" one but they are also available in 1/4". It will cut a 1/2" slot into the edge of the ply. The 1/4" one will cut a 9/16 wide slot.
Adjust the cutter so that it is approximately cutting in the middle of the ply. I mark the side that I rout from so if it's not dead on, the sides will mate up fine anyway. Rout all the slots for the matching pieces.
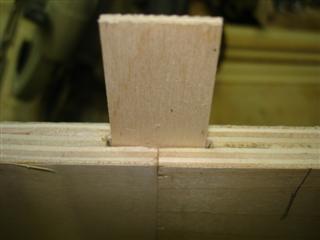
I cut splines out of baltic birch ply. It's a true 1/8" ply so it's a dead on match to fit the slots. I rip them just a hair under 1", if there is any crud in the slot or they are too wide, the ply will want to sort of kink at the joint. A little narrower takes care of any of that. Baltic birch is also stronger than a lot of the cheap plys available when using small pieces.
Glue it all up, make sure to butter the sides of the spline really well and the edges on the ply sides. Weight and clamp, watch too much end pressure with a clamp however. I use epoxy as it gives me more working time, however Titebond works well also.
It's a real easy/quick way to make up whatever size sheets you want. For a woodie...I use a lesser substrate, then laminate up the nice thin veneer ply over it, making sure that the joints don't fall on top of each other. I've done this on 5 trailers so far and it works great for me. I made some 6'4" x 11' ply this evening. Doug
Posted:
Sat Oct 08, 2011 8:07 amby Larry C
willyswagon wrote:Here is an interesting discusstion on butt jointing plywood with fiberglass and the joint being stronger than the plywood:
http://www.instantboats.com/gbj/index.htmlThis discussion is for 1/4 inch plywood which might be nice for some of the top covering layers as well as sides.
Many years ago on the kayak building forum there was a lengthy discussion of scarf vs butt joint (with fiberglass tape applied both side). Apparently someone did some scientific testing, and proved the butt joint was actually superior up to 1/2" thick, at which point the scarf becomes better. I will see if I can find the info.
There are multiple ways to join plywood, and they all should work for a teardrop. If you don't have the tools available, a simple butt joint may just be the answer.
Larry C
Posted:
Tue Feb 07, 2012 6:53 pmby bobsmyuncle
As I've been poking around the site, I wondered how you would join plywood edges. In addition to all the above, it would be dead easy with a rabbeting router bit to do a half-lap, glued together. When you hit dead center of a piece of ply, you'll automatically have parallel grain direction. To hit dead center, take a piece of scrap and route from both sides until you get slightly less than a whisper of wood left between them.
Posted:
Tue Feb 07, 2012 7:00 pmby mikeschn
Does anyone know how to cut a puzzle joint?
Mike...
Posted:
Tue Feb 07, 2012 7:28 pmby Larry C
mikeschn wrote:Does anyone know how to cut a puzzle joint?
Mike...
Mike,
I think it's only done with a CNC router, but I recall a jig for a hand held router I have seen somewhere. But I might just be dreaming about that!
Larry C
Posted:
Tue Feb 07, 2012 7:34 pmby Larry C
Posted:
Tue Feb 07, 2012 7:44 pmby mikeschn
So did you find a jig to do a 4' edge of plywood. Hmmmm, thinking about it, I might need an 8' jig...
Mike...