Hatch Trim Looks Awfull

Anything to do with mechanical, construction etc

Hatch Trim Looks Awfull

Postby bdosborn » Sat Jun 04, 2005 10:06 pm

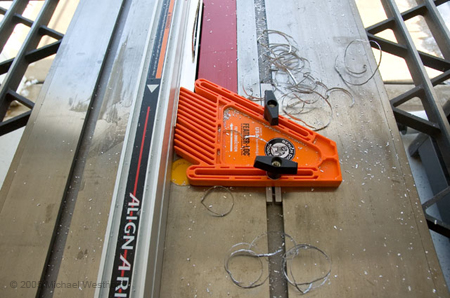
I annealed 1" aluminum angle for the hatch today and bent it to the hatch radius using a jig. It looks terrible. How can I get all the bends and waves out of the legs? I beat the crap out of it but can't get it looking any better. Any tips anyone?
Bruce
2009 6.5'X11' TTT - Boxcar
All it takes is a speck of faith and a few kilowatts of sweat and grace.
Image
Boxcar Build
aVANger Build
User avatar
bdosborn
Donating Member
 
Posts: 5508
Images: 777
Joined: Wed May 05, 2004 11:10 pm
Location: CO, Littleton

Postby Guest » Sat Jun 04, 2005 10:21 pm

Bruce,
I've seen some guys rip down the leg of the angle that shows the ellipse and have good results...
Guest
 

Postby doug hodder » Sat Jun 04, 2005 10:45 pm

I'm not sure how you went about it, but what I've done in situations like this is to make a dolly out of something like maple or oak that you can use between the mallet and the material. If you are beating directly on the material, that's a problem. It'll show all the hammer dents and sudden bends. A wooden jig will allow the hammer blows to spread across the material you are wanting to bend, and will not show the hammer marks. Just my suggestion, I'm sure others have done something different.... Doug Hodder 8)
doug hodder
*Snoop Dougie Doug
 
Posts: 12625
Images: 562
Joined: Tue Dec 14, 2004 11:20 pm
Top

Postby beverlyt » Sun Jun 05, 2005 2:12 am

Bruce,
Ours looks pretty terrible too! We went with some aluminum locally that was pretty thick and wide to work with. Never could get it looking real great.... we were just glad we managed to someone get it to bend the curve of the hatch!

Had I cared enough, (and I don't).... we probably would have tried to find some nice soft aluminum angle and tried again.

Bev
User avatar
beverlyt
500 Club
 
Posts: 955
Images: 20
Joined: Sat Apr 17, 2004 4:50 am
Location: Grand Haven, Michigan
Top

Postby Michael W » Sun Jun 05, 2005 7:10 am

One inch is tough to bend without the bucklesm even when anneled. I first tried 3/4 inch and got some ripples, so I decided to trim one edge down to 1/2". This worked well, but was a very tricky step. Here is a photo of how I trimmed one leg with the table saw. Image

A word about safety: This is dangerous and care must be taken. Don't attempt this without using a feather board. A zero clearance insert would be helpful. Also, you will need a face shield, gloves and long sleeves as you will ge blasted with hot chips. Hearing protection is also advised, as it is loud.
User avatar
Michael W
Teardrop Master
 
Posts: 138
Images: 34
Joined: Wed Jun 01, 2005 10:09 am
Location: SE Michigan
Top

Postby toypusher » Sun Jun 05, 2005 8:47 am

Bruce,

You could get some new stuff from someplace like RW Johnson that is soft and bendable. I don't know if he has 1" or not for sure.
http://www.teardroptrailers.net/

Or the teardrop fixit shop, or one of the other teardrop specialty shops.

Kerry
User avatar
toypusher
Site Admin
 
Posts: 43040
Images: 324
Joined: Fri Jan 28, 2005 12:21 pm
Location: York, PA Area
Top

Postby McTeardrops » Sun Jun 05, 2005 8:49 am

Bruce

Sounds like your trim looks pretty much like mine. My plan is coarse paper in the belt sander! I'm now in the "It may not be pretty, but it'll get me to Minden" phase of my build, so I'll bed it in silicon seal and replace it in July.
Lenny

[email protected]
I've reached the stage, in life, where my foam has more memory than I do!
User avatar
McTeardrops
The 300 Club
 
Posts: 340
Joined: Sun Aug 01, 2004 12:08 pm
Location: Texarkana Texas
Top

Postby Georgeandpat » Mon Jun 06, 2005 2:18 pm

Bruce, I squeeze it between some hard scrap and heavy duty clamps and this took some of the larger ripples away. It's not as perfect as I would like but acceptable (most people probably wouldn't notice). George.
http://img.photobucket.com/albums/v422/ ... /tear4.jpg
User avatar
Georgeandpat
Teardrop Master
 
Posts: 185
Images: 12
Joined: Fri Jan 21, 2005 1:00 pm
Location: Los Angeles, CA
Top

Postby jimslc » Mon Jun 06, 2005 6:47 pm

I had a real hard time with this also. What I ended up doing was making a form to bend around, identical to the profile of the sides that I could clamp one end to and bend towards the other. The real breakthrough came when I realized you could anneal more than once. So I'd anneal, bend a little, then anneal again, bend again, etc. My third and fourth tries turned out okay. They fit perfectly, still have some ripples, but no kinks. Good enough for me.
-Jim
jimslc
Teardrop Inspector
 
Posts: 5
Joined: Thu Oct 07, 2004 5:57 pm
Top

Postby bdosborn » Mon Jun 06, 2005 7:29 pm

Thanks for the tips everyone. Cutting down a leg isn't an option since it wouldn't cover the gap between the hatch and the sides. I think I'm in the "it'll do till Minden mode" for now. Where'd all the time go?:shock: I'll revisit this thread in a month.
Bruce
2009 6.5'X11' TTT - Boxcar
All it takes is a speck of faith and a few kilowatts of sweat and grace.
Image
Boxcar Build
aVANger Build
User avatar
bdosborn
Donating Member
 
Posts: 5508
Images: 777
Joined: Wed May 05, 2004 11:10 pm
Location: CO, Littleton
Top


Return to Teardrop Construction Tips & Techniques

Who is online

Users browsing this forum: Google [Bot] and 6 guests