Newbie Class - BASIC WALL ANATOMY

Anything to do with mechanical, construction etc

Newbie Class - BASIC WALL ANATOMY

Postby jmorganix » Mon Mar 10, 2014 7:10 am

OK, I've been reading and find a plethora of methods people have used to construct walls. Some use single 3/4 sheet, some use the sheet as a skeleton and Luan over on the in and outsides... Some do stick building.

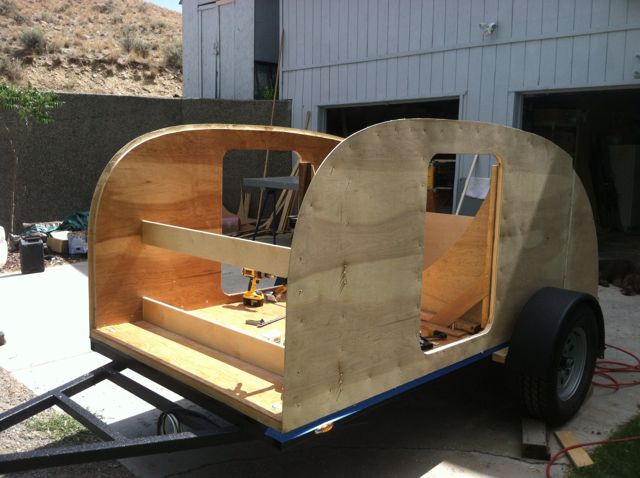
Seems to me that the strongest system would be the 3/4 wall with cutouts for lightness and for the location of insulation. Upon that, 1/8 Luan for the skin. I am looking to varnish so a wood outer works for me. :roll:

I like the idea of a rabbet attachment to the frame, with 3/8 carriage bolts through the 3/4 sheet and frame. The skin would cover the bolt heads. IDEA... :thinking: Couldn't you also use biscuits at the bottom to join the floor to the 3/4 sheet? All gluing would be with polyurethane glue.

3/4" x 4" Roof spars could be cut into the sheet so they are flush, but also gusseted to the sides to prevent or lessen any kind of racking. :shock:

At the "line" between the cabin and galley, I would think a stout overbuild of the roof and sidewall thickness (maybe a 2x4 "hoop" glued and screwed) would be in order to, 1. strengthen the shell overall and 2. Provide a solid platform for hinging and the load the rear hatch makes upon the shell when opened. ALSO, I like the idea of vertical spars for the rear hatch versus horizontal to prevent luan movement or delamination from the frame that moves so often.

NOW, HERE'S THE BIG QUESTION. . .

How much lighter would the durn thang be if a 3/4x4" "stud wall" with luan skin be versus the plywood with cutouts? Would the overall strength be compromised to the point of bad idea?

AFTERTHOUGHT QUESTION. . . Does the pink foam insulation get glued to the walls and if so, do you expect this adds to the strength question?

Stay Tuned... I got a million questions!

-Jenn
User avatar
jmorganix
Teardrop Inspector
 
Posts: 15
Joined: Mon Mar 03, 2014 4:33 am
Location: Milwaukee

Re: Newbie Class - BASIC WALL ANATOMY

Postby citylights » Mon Mar 10, 2014 8:14 am

jmorganix wrote:
3/4" x 4" Roof spars could be cut into the sheet so they are flush, but also gusseted to the sides to prevent or lessen any kind of racking. :shock:

(maybe a 2x4 "hoop" glued and screwed)

NOW, HERE'S THE BIG QUESTION. . .

How much lighter would the durn thang be if a 3/4x4" "stud wall" with luan skin be versus the plywood with cutouts? Would the overall strength be compromised to the point of bad idea?

AFTERTHOUGHT QUESTION. . . Does the pink foam insulation get glued to the walls and if so, do you expect this adds to the strength question?

-Jenn


Whoa! All wood stick in the teardrop should be no larger than 2x2 and most use 1x2.

A framed wall, with 1/8 inch thick skins, 1x2 studs, and foam insulation would be typically lighter than the plywood with cut outs. But it depends on how much material you remove from the plywood. Both are considered light weight construction. I would pick based on which you are more comfortable working with.

Yes, the foam insulation is glued in. Yes it adds a surprising amount of strength. The torsion box or "sandwich" construction is very strong.
User avatar
citylights
500 Club
 
Posts: 591
Images: 1
Joined: Sun May 12, 2013 12:27 pm
Location: Las Vegas, Nevada

Re: Newbie Class - BASIC WALL ANATOMY

Postby Oldragbaggers » Mon Mar 10, 2014 8:54 am

It's not that much lighter, depending on how generous you are with your cutouts. I used a 3/4" plywood cookie cutter frame, filled the voids with insulation and skinned inside and out with 1/8" marine okoume ply and one layer of 6 oz. fiberglass cloth on the exterior (If you have no plans for fiberglass this will cut down the weight some). I could have made the insulation spaces larger and would have saved a bit more, but I knew that, once I had the interior skins on, hitting the solid areas to attach my shelves and such might be tricky and I wanted to have a bigger target, so I was generous with myself and left wider areas of solid wood for my attachments.

When I first skeletonized the 3/4" ply I lifted it and thought, wow, that's nice, it's so much lighter I can move it by myself now. By the time I had the wall completed I was yelling for my husband again every time I needed to move it. I don't have the figures in front of me, but I think I saved a total over all of about 25-30 pounds. And that was before I put my factory doors in, which weighed significantly more than the wood cutout they replaced. Not really a substantial weight savings for the amount of work and extra $$$ in materials it cost me.

What IS significant though is the difference it made in condensation on the inside of the trailer during the fall camping months. I noticed a LOT of condensation on the insides of the walls in the morning in areas where there was solid walls, and no condensation whatsoever in those areas where there was insulation. Had I known how much difference it would have made in that regard I would have tried harder to make my insulation spaces larger. This may not be as important in drier climates, but here in the humid Northeast is was a big benefit.

Image

Image

Image

Image

As you have no doubt already discovered by reading this forum, there is no one "right" way. There are many methods and most all of them can work to make a perfectly good teardrop. Some will be better suited than others for different climates, seasons used, and personal camping styles and needs, but most any of them will get you off the ground and a solid dry roof over your head. Some will definitely be more expensive and time intensive than others. I could have cut my project down by months and hundreds of dollars by going with solid 3/4" walls, and as I said, the weight savings in my experience wasn't that drastic. Unless you're hauling with a very small car and need to keep the weight minimal, a cooler full of ice weighs as much as what I figured I saved.

As for the glue question, my whole wall is put together with epoxy, the insulation is glued in with epoxy and the skins are on with epoxy. It is, in effect, one solid piece and I would imagine is about as strong as a wall of this particular construction type can possibly be.

Best of luck with whatever you decide to do.
Life is sooooo good.........
Sail...camp....bike...repeat
Becky

Build Journal http://www.tnttt.com/viewtopic.php?f=50&t=45917
Visit our blog at http://www.oldragbaggers.com
Image Image
User avatar
Oldragbaggers
Gold Donating Member
 
Posts: 1842
Images: 331
Joined: Mon Aug 01, 2011 9:22 pm
Location: Essex, MD
Top

Re: Newbie Class - BASIC WALL ANATOMY

Postby angib » Mon Mar 10, 2014 9:21 am

citylights wrote:Whoa! All wood stick in the teardrop should be no larger than 2x2 and most use 1x2.

Structurally, 1x1 is quite enough and anything more is excessive, except as roof spars. Though 1x2 is easier to 'hit' through a covering sheet of ply. Ripping three 1x1s from a 1x4 would allow the 1x1s to be cut to exactly the thickness of any foam, which would be an advantage.

Oldragbaggers wrote:When I first skeletonized the 3/4" ply I lifted it and thought, wow, that's nice, it's so much lighter I can move it by myself now. By the time I had the wall completed I was yelling for my husband again every time I needed to move it.

Well, you didn't 'skeletonize' it very much - you've got 3/4x4, or even 3/4x6, in most places. That's the problem with the cookie-cutter method - if all the pieces are narrowed down to only the size they need to be (less than 1"), the skeleton would be quite fragile and difficult to build from.
User avatar
angib
5000 Club
5000 Club
 
Posts: 5783
Images: 231
Joined: Fri Apr 30, 2004 2:04 pm
Location: (Olde) England
Top

Re: Newbie Class - BASIC WALL ANATOMY

Postby Oldragbaggers » Mon Mar 10, 2014 9:54 am

angib wrote:Well, you didn't 'skeletonize' it very much - you've got 3/4x4, or even 3/4x6, in most places. That's the problem with the cookie-cutter method - if all the pieces are narrowed down to only the size they need to be (less than 1"), the skeleton would be quite fragile and difficult to build from.


In some areas it is less than than, but you are correct, I could have skeletonized it more than I did. Again, that was due mostly to my lack of experience and confidence that once I had the interior skins on I would be able to locate and hit the solid wood areas with my attachments.
Life is sooooo good.........
Sail...camp....bike...repeat
Becky

Build Journal http://www.tnttt.com/viewtopic.php?f=50&t=45917
Visit our blog at http://www.oldragbaggers.com
Image Image
User avatar
Oldragbaggers
Gold Donating Member
 
Posts: 1842
Images: 331
Joined: Mon Aug 01, 2011 9:22 pm
Location: Essex, MD
Top

Re: Newbie Class - BASIC WALL ANATOMY

Postby jmorganix » Mon Mar 10, 2014 8:07 pm

OK... here's my first sketch... I draw in Adobe Illustrator.

Hit me with what you think!

Jenn

510trailer.jpg
510trailer.jpg (86.37 KiB) Viewed 1681 times
User avatar
jmorganix
Teardrop Inspector
 
Posts: 15
Joined: Mon Mar 03, 2014 4:33 am
Location: Milwaukee
Top

Re: Newbie Class - BASIC WALL ANATOMY

Postby rowerwet » Mon Mar 10, 2014 8:36 pm

Oldragbaggers wrote:
angib wrote:Well, you didn't 'skeletonize' it very much - you've got 3/4x4, or even 3/4x6, in most places. That's the problem with the cookie-cutter method - if all the pieces are narrowed down to only the size they need to be (less than 1"), the skeleton would be quite fragile and difficult to build from.


In some areas it is less than than, but you are correct, I could have skeletonized it more than I did. Again, that was due mostly to my lack of experience and confidence that once I had the interior skins on I would be able to locate and hit the solid wood areas with my attachments.

you would also have to glue the skeleton to another sheet of plywood before trying to fill the voids or stand it up 3/4" plywood doesn't have much strength left when it is shaved down to 1" wide vertical and horizontal members.
I did 1x2" lumber with the 1" ( really 3/4") being the thickness. the 2" width gave me an easy target to hit to attach walls, shelves, etc.
User avatar
rowerwet
Gold Donating Member
 
Posts: 2075
Images: 521
Joined: Mon Apr 20, 2009 12:52 am
Location: Merrimack River Valley
Top

Re: Newbie Class - BASIC WALL ANATOMY

Postby tony.latham » Mon Mar 10, 2014 8:54 pm

And then there's the sandwiched method where you leave a ledge, install the ceiling and add the spars on top of the ceiling... works slick, ala Steve Fredrick's Teardrop Shop Manual.
Image

Tony
User avatar
tony.latham
Gold Donating Member
 
Posts: 6900
Images: 17
Joined: Mon Jul 08, 2013 4:03 pm
Location: Middle of Idaho on the edge of nowhere
Top

Re: Newbie Class - BASIC WALL ANATOMY

Postby citylights » Mon Mar 10, 2014 9:32 pm

jmorganix wrote:OK... here's my first sketch... I draw in Adobe Illustrator.
Hit me with what you think!


Your door looks a little far forward. The trick is... You don't want to have to scoot forward or back much when you get in. Sit and swing only. The will make sense when you get in and out several hundred times building it!

Other than that, check your interior space against the standard bed sizes and give yourself an inch all around for space to make the bed easier. Mine is a tight fit and I have to wrestle with the mattress to make the Bed.

Also, how will you access your storage well? Mine is accessed through the doors, by pulling up the bed. You would have to pull you bed out to get to the well?
User avatar
citylights
500 Club
 
Posts: 591
Images: 1
Joined: Sun May 12, 2013 12:27 pm
Location: Las Vegas, Nevada
Top

Re: Newbie Class - BASIC WALL ANATOMY

Postby jmorganix » Mon Mar 10, 2014 9:56 pm

I set the door based on wanting to see out of it... But what you say makes sense... I'll move it. The storage should be accesable buy lifting the mattress. I intend it for deep storage not every day stuff. What I really need ate kitchen ideas.

The big grey rectangle is a std double mattress.
User avatar
jmorganix
Teardrop Inspector
 
Posts: 15
Joined: Mon Mar 03, 2014 4:33 am
Location: Milwaukee
Top

Re: Newbie Class - BASIC WALL ANATOMY

Postby citylights » Mon Mar 10, 2014 11:25 pm

jmorganix wrote:What I really need ate kitchen ideas.


Kitchen = Galley

And you can find lots of ideas in the pictures in this link. Cheers!

http://s134.photobucket.com/user/ams-texas/slideshow/Galley%20Gallery/?albumview=slideshow
User avatar
citylights
500 Club
 
Posts: 591
Images: 1
Joined: Sun May 12, 2013 12:27 pm
Location: Las Vegas, Nevada
Top

Re: Newbie Class - BASIC WALL ANATOMY

Postby jmorganix » Fri Mar 14, 2014 2:39 pm

I had another wall cross section idea...

I plan on 4 seasons teardroppin... Insulation matters. How about if I do an outer wall of 3/8 birch, 2x2 (1x2 laminates) studs with 2 inches of insulation... luan on the inside... all glued and screwed.

J
User avatar
jmorganix
Teardrop Inspector
 
Posts: 15
Joined: Mon Mar 03, 2014 4:33 am
Location: Milwaukee
Top

Re: Newbie Class - BASIC WALL ANATOMY

Postby citylights » Fri Mar 14, 2014 4:42 pm

jmorganix wrote:I had another wall cross section idea...

I plan on 4 seasons teardroppin... Insulation matters. How about if I do an outer wall of 3/8 birch, 2x2 (1x2 laminates) studs with 2 inches of insulation... luan on the inside... all glued and screwed.

J


Those are some thick walls! The most I have read about is one inch thick insulation. Also same for under the tear.

Hopefully someone from the great white north will jump in and comment for you!
User avatar
citylights
500 Club
 
Posts: 591
Images: 1
Joined: Sun May 12, 2013 12:27 pm
Location: Las Vegas, Nevada
Top

Re: Newbie Class - BASIC WALL ANATOMY

Postby rowerwet » Fri Mar 14, 2014 7:21 pm

jmorganix wrote:I had another wall cross section idea...

I plan on 4 seasons teardroppin... Insulation matters. How about if I do an outer wall of 3/8 birch, 2x2 (1x2 laminates) studs with 2 inches of insulation... luan on the inside... all glued and screwed.

J

you don't need such a thick outer wall IMO, my inner and outer walls are 1/4" ply, with 1x2 frame "sticks" where I wanted to join things. Fully glued at all joints (screws are not needed once the glue is dry) you end up with an I-beam for each stick in the wall. I have 3/4" foil faced foam board in all my voids, plenty for what I camp in.
If I was doing it over again I would use 1/4" for the outer wall and 1/8" or just plain carpet for the inside wall.
3/8" ply is super over kill for a side wall, unless you are planning on some super heavy duty abuse of the side of the trailer. (super hard core off roading or rock crawling) there isn't much that could punch through a 1/4" sheet of good plywood in normal camping.
If you are looking for super insulated, check out the foamie section, little to no wood, so no worries about rot, a side wall of 2 or more inches of solid foam (super high R value with no wood to make a thermal "bridge" and wick away your heat) skinned on the outside with painted canvas (super strong, cheap and light) and on the inside with hull liner or some other type of carpeting (keeps the condensation from running and dripping when sleeping in cold weather) to add another layer of insulation and protect the foam. all proven construction methods, and night and day lighter than the "built like a tank" ideas most people apply to their first tear.
remember, R 1 is one inch of solid wood the basis for measurement in insulation. the less wood and more foam you can have in the wall, the better it keeps the heat on the side you want it. Houses need all that solid wood to support snow, wind, rain, and stuff loads. a tear has to stand up to 80 mph and support, at most, the weight of a small boat. any boater can tell you, car topping over 100 lbs is deadly to the back.
User avatar
rowerwet
Gold Donating Member
 
Posts: 2075
Images: 521
Joined: Mon Apr 20, 2009 12:52 am
Location: Merrimack River Valley
Top

Re: Newbie Class - BASIC WALL ANATOMY

Postby Nobody » Sat Mar 15, 2014 11:55 am

jmorganix wrote:I had another wall cross section idea...

I plan on 4 seasons teardroppin... Insulation matters. How about if I do an outer wall of 3/8 birch, 2x2 (1x2 laminates) studs with 2 inches of insulation... luan on the inside... all glued and screwed.

J


I understand that it gets much colder in Wisconsin than I'm used to but, I've camped in my TD in Illinois, in near zero weather & slept perfectly comfortable in a zero degree sleeping bag, on 5 1/2" of memory foam & 'egg crate' mattress/pad, no heat except a tiny 12vdc 'defroster/heater' used for approx 10-15min morning & evening to 'knock the chill off for dressing/undressing.

My 5' wide X 114" long TD was built with (nominal) 1 1/8" wall construction (1/4" oak ply interior, 1x2 [actually 3/4" thick] framework, 3/4" foam [blue/pink board], & 1/8" luan outer skin) behind the .040" aluminum. The floor is 1/2" CDX ply on 1 1/2" X 1 1/2" frame, with 3/4" foam in the frame voids. Top (& front) is 1/8" luan ceiling, 1 1/2" X 1 1/2" spars with 2 layers of 3/4" foam, 1/8" luan outer skin, under .040" aluminum skin. Neither the bulkhead between cabin & galley, nor the galley hatch is insulated. Doors duplicate the wall construction, & except for the uninsulated windows (& their aluminum frames) I've never experienced any condensation. Same for hot, muggy summer nights in the deep south. We seldom use the Pet Cool air conditioner; the fantastic vent fan with door windows open slightly provides such a wonderfully cooling breeze through the TD that we often need to turn the fan off sometime in the 'wee hours' to keep from getting cooler than we want. My opinion is more insulation or thicker wall construction is not needed, even it extreme cold, unless you have food/drink items inside that must be kept from freezing, & even then you'll need supplemental heat of some kind... If you're planning to spend considerable time inside the cabin, not sleeping, I'd recommend arranging for some kind of heat source & forget the extra insulation/wall thickness.
Harvey -

- - - - - - - - - - - - - - - -

Doing the right thing ain't always easy but, . . . it's always right!
User avatar
Nobody
1000 Club
1000 Club
 
Posts: 1196
Images: 342
Joined: Wed Jan 25, 2006 1:09 pm
Location: Benton, Arkansas
Top

Next

Return to Teardrop Construction Tips & Techniques

Who is online

Users browsing this forum: No registered users and 15 guests