Page 1 of 2
Star Wheel Hatch Prop

Posted:
Fri Dec 09, 2005 3:39 pmby JohnF
SOS ! Mayday ! Help !!
I am going nuts (a short trip) trying to figure out how to mount the Austin Hardward star wheel hatch support units. ( longest ones they had) Can someone give me some fairly detailed suggestions...
My problem seems to be finding a mounting location so that the hatch can fold down without the arm jamming against the ledge of the cabinetry.
Also it sure seems the mounting flanges are backwards from what would work best on my Cubby.
I hesitate to drill the mounts off and try to put them back on in reverse, or perhaps even bend them radically for best fit..
I don't think I should try to re-invent the whele here because there has got to be lots of you fellows who have already figured this all out.
Would really appreciate suggestions.
John at Salida, CO
Posted:
Fri Dec 09, 2005 5:46 pmby goldcoop
John-
I feel your pain brother!
I tried a pair AND never could get 'em to work right!
They are in my barn collecting dust!
I went to gas struts, still a little tricky to get worked out, but work fine now!
I'm looking forward to see what find of answers we get!
Cheers,
Coop
Re: Star Wheel Hatch Prop
Posted:
Fri Dec 09, 2005 6:10 pmby angib
JohnF wrote:My problem seems to be finding a mounting location so that the hatch can fold down without the arm jamming against the ledge of the cabinetry.
Sorry, I don't see a way around that one - if you move the hatch prop enough that it doesn't hit the cabinetry, it may alter the geometry so much that your hatch will either open a foot and stop, or lift all the way round till it hits the roof!
I can't remember who it was who showed a photo of their galley, where they had put some 2" wide cut-outs maybe 4-6" deep in the ends of their galley shelf so that the hatch props could move into those cut-outs when the hatch was down. Maybe they'll read this and say where their photos can be seen.
Andrew
Posted:
Fri Dec 09, 2005 11:17 pmby BrwBier
I don't know if this would be stealing someones idea, but the best hatch support I've seen (the only one I've seen) is on the Camp-Inn. An automatic wood support. Works great every time and easy to use.
Brwbier
Posted:
Fri Dec 09, 2005 11:35 pmby Kevin A
John,
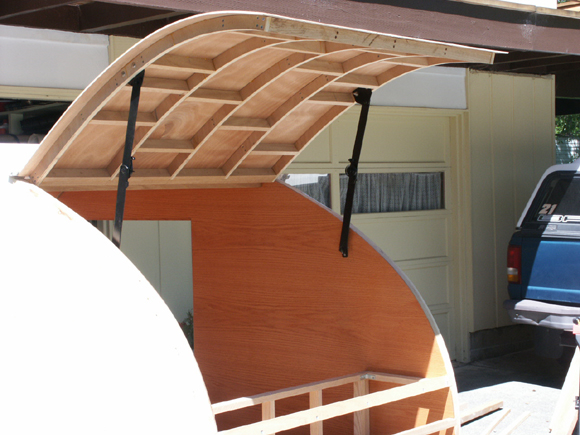
I'm not familiar with the star wheel hatch supports, do you have a link to a website for them? Here's a shot of my hatch supports after cleaning, repainting and installation. they are the original supports that came with my trailer.
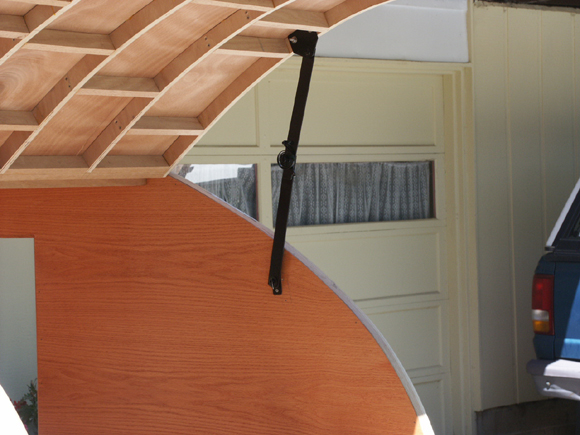
They have pivots in the center and at each end, they lock over center to keep the hatch open.
Posted:
Fri Dec 09, 2005 11:59 pmby TonyCooper
I think another possible idea is to have an elbow extension similar to the one pictured above that has a small gas strut centered on the joint to push the elbow open and hold the hatch up. You would not want the joint to fully extend as getting it to close would then be a problem.
Someone would need to work out the geometry, but I think this idea has merit and at first blush seems to use smaller hardware and possibly less space. There would be three points of connection to the teardrop. The side wall for the elbow bracket, the hatch connection of the elbow bracket, and the sidewall connection for the small gas strut.
Disclaimer: I have not given this a great deal of thought... it popped into my head when I saw Kevin A's setup.
Posted:
Sat Dec 10, 2005 12:33 amby Kevin A
TonyCooper wrote:I think another possible idea is to have an elbow extension similar to the one pictured above that has a small gas strut centered on the joint to push the elbow open and hold the hatch up. You would not want the joint to fully extend as getting it to close would then be a problem.
Someone would need to work out the geometry, but I think this idea has merit and at first blush seems to use smaller hardware and possibly less space. There would be three points of connection to the teardrop. The side wall for the elbow bracket, the hatch connection of the elbow bracket, and the sidewall connection for the small gas strut.
Disclaimer: I have not given this a great deal of thought... it popped into my head when I saw Kevin A's setup.
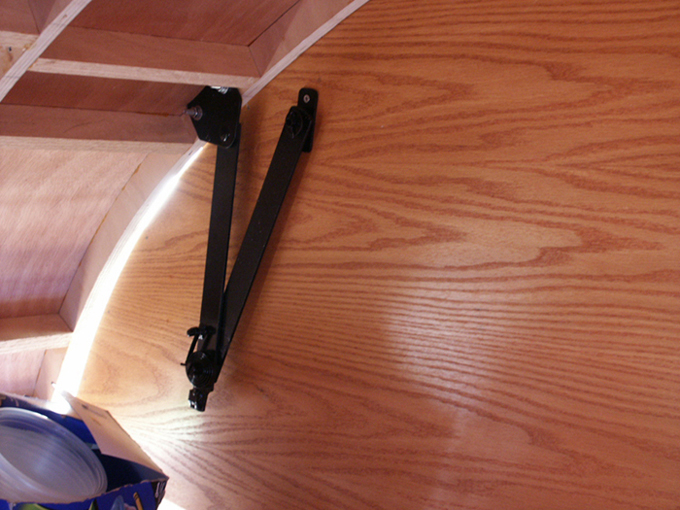
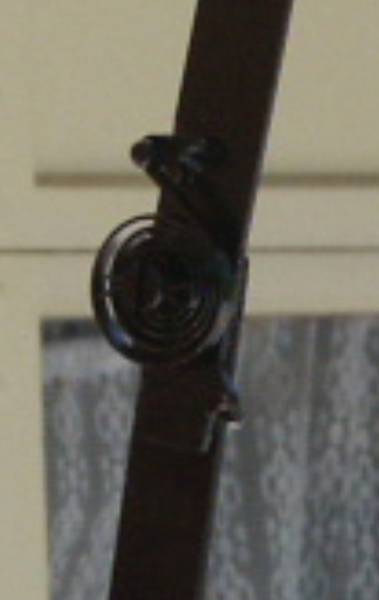
Actually my hatch supports don't require any additional support to keep the hatch open, there is a coiled spring in the center of the support that helps keep the support locked in the open position. I'll have to post a more detailed close up shot of the center of the support so you'll have a better idea of how it all works. I really like the design as it not only holds the hatch open, it also prevents wind from blowing the hatch open any farther.
Ok, here's a zoomed in shot of the hatch support spring, I'll try to get a better one posted this weekend.
Posted:
Sat Dec 10, 2005 5:46 amby Arne
That is by far the simplist method I've seen so far.. no mind bending calculations, and I like that one end does not have to be fairly close to the hinge as it does with a gas strut or star wheel....
My hatch is very heavy (lack of forethought) so went with broom handles....
Posted:
Sat Dec 10, 2005 5:54 amby angib
Kevin,
Those lock-up struts are simple and great for series production, but they have some practical difficulties for the one-off builder. The two mounting points come close together when the hatch is down and that makes them very sensitive to their position. Move one mount 1/4" nearer or further away from the hatch hinge and the knuckle (where the spring is) moves up or down by many times as much - and possibly out through the hatch skin!
A very similar problem afflicts the folding door on the Wild Goose trailer - on the geometry in the original plans, the folded door goes through the floor!
It would seem a good idea with all hatches to fit or trial-fit the hatch supports (of any type) before the hatch skin is put on, so that their operation can be seen as the hatch goes down.
Andrew
Posted:
Sat Dec 10, 2005 9:00 amby Denny Unfried
angib wrote:It would seem a good idea with all hatches to fit or trial-fit the hatch supports (of any type) before the hatch skin is put on, so that their operation can be seen as the hatch goes down.
Andrew
Great idea Andrew.
I didn't install my bottom bulkhead until after the hatch props were positioned. I also straightened one end of the props so as to fit close to the side wall. It's kind of tricky but can be done without any damage.
Denny

Posted:
Sat Dec 10, 2005 1:51 pmby doug hodder
John....I had a similar situation with my tear....only trying to use the gas shocks....no clearance....got 2 mohogany sticks now....I think you may find that by the time you find a place that they will work in, you may not have the height you want on the hatch....just what I found....gas shocks may also have the same problem in your application...maybe a good thing for new builders to think of before hand...although I think a lot of us don't realize that issue until we're in the thick of it....it sounds like a number of us have run into the same problem....Denny seems to be thinking ahead however....Doug
Posted:
Sat Dec 10, 2005 2:50 pmby randy chesnutt
i followed uncle denny instuction when i put mine in and it worked out great.one thing i like is when the hatch is open the props have a hole that you can put a safety pin in just in case
Re: Star Wheel Hatch Prop
Posted:
Sat Dec 10, 2005 8:09 pmby bdosborn
JohnF wrote:SOS ! Mayday ! Help !!
I hesitate to drill the mounts off and try to put them back on in reverse, or perhaps even bend them radically for best fit..
I drilled them off. The ones that come with the strut were way to big and oriented wrong to fit where I wanted them to go. I got some mounts at camping world for gas struts that fit just right. I also postioned the struts before I skinned the hatch so I could watch where everything would line up.
Bruce
Posted:
Sun Dec 11, 2005 1:12 amby TonyCooper
doug hodder wrote:John....I had a similar situation with my tear....only trying to use the gas shocks....no clearance....got 2 mohogany sticks now....I think you may find that by the time you find a place that they will work in, you may not have the height you want on the hatch....just what I found....gas shocks may also have the same problem in your application...maybe a good thing for new builders to think of before hand...although I think a lot of us don't realize that issue until we're in the thick of it....it sounds like a number of us have run into the same problem....Denny seems to be thinking ahead however....Doug
I found the same to be true, not enough height... I didn't like having to locate the hatch strut points so close to the hinge. Moved them to what I considered an acceptable distance and promptly bonked my head on the hatch!!
Yikes!!
Off came the gas struts... in went the aluminum rods... Up went the hatch height...
We are happy campers now.
Posted:
Sun Dec 11, 2005 1:19 pmby Kevin A
angib wrote:Kevin,
Those lock-up struts are simple and great for series production, but they have some practical difficulties for the one-off builder. The two mounting points come close together when the hatch is down and that makes them very sensitive to their position. Move one mount 1/4" nearer or further away from the hatch hinge and the knuckle (where the spring is) moves up or down by many times as much - and possibly out through the hatch skin!
A very similar problem afflicts the folding door on the Wild Goose trailer - on the geometry in the original plans, the folded door goes through the floor!
It would seem a good idea with all hatches to fit or trial-fit the hatch supports (of any type) before the hatch skin is put on, so that their operation can be seen as the hatch goes down.
Andrew
Andrew,
I'll admit, I'm not quite sure what you mean about the location of the mounting points. I did have a bit of difficulty getting the two supports in alignment with each other. I had to relocate the wall (lower) mount on one side to get them both to lock in the open position at the same time, this also aligned them in the same position when closed. Here's a few more photos of them in the open, half way & nearly closed positions.