Galley Hatch Screw Up!

Anything to do with mechanical, construction etc

Galley Hatch Screw Up!

Postby RunnerDuck » Sat Sep 17, 2016 12:53 pm

:x I'm really upset and after you hear my sad story I'm sure you'll understand. Hopefully this will help someone else avoid the same mistake.

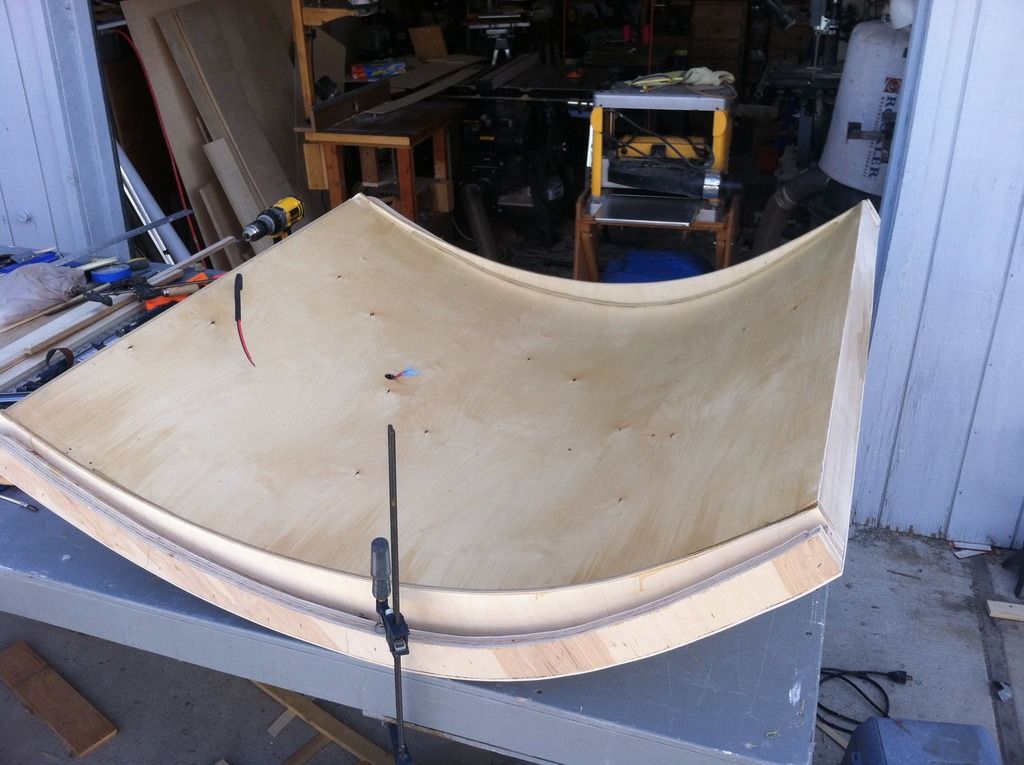
I made my galley hatch with great perfection and it fits perfectly on my TD. It looks beautiful inside and something to be really proud of.

Here's the hatch on my TD. You'll notice the two strips of plywood running top to bottom to help stabilize for handling until I get the outer skin on.

Hatch.jpg
Hatch.jpg (194.26 KiB) Viewed 1391 times


I removed the plywood strips, set the hatch up on my saw horses, glued, clamped and nailed the plywood outer skin. It went on great and should be as perfect as the rest of it.

Hatch Clamp.jpg
Hatch Clamp.jpg (244.34 KiB) Viewed 1391 times


After the glue had dried overnight I removed the clamps and placed it onto the TD. WTF, something wasn't right, it felt like it was hitting on something.

After examining everything possible thing I determined that it was so warped that it just wouldn't close. It's a little over a half inch away from the TD on the bottom left corner. :cry:

In an attempt to "de-warp_ it I've placed a spacer between the hatch and TD on the right side and clamped it down as much as possible on the left in hopes of pulling it in.

Hatch Fix.jpg
Hatch Fix.jpg (229.68 KiB) Viewed 1391 times


I let it set over night and I feel I may have made some improvement but still off. I added a thicker spacer to the right side and clamped it down again.

My big concern now is if I get it pulled back into shape will it hold over time or is it slowly going to creep back to where it was. I do plan to use draw clamps in each corner to hold it down when not in use so maybe, if I can get it straightened out, that will keep its memory from coming back.

I guess I'll find out as time goes by.

So the lesson learned: When you go to clamp the outer skin on the galley hatch make sure that it is sitting dead flat before gluing, clamping and nailing!

Lesson learned the hard way.

Thanks for listening,
User avatar
RunnerDuck
Teardrop Master
 
Posts: 167
Joined: Sat Aug 22, 2015 4:26 am
Location: Coupeville, Whidbey Island, Washington

Re: Galley Hatch Screw Up!

Postby halfdome, Danny » Sat Sep 17, 2016 1:27 pm

Sorry to hear of your warped situation. ;)
If it were me I'd toss it and start over again as I have once in the past.
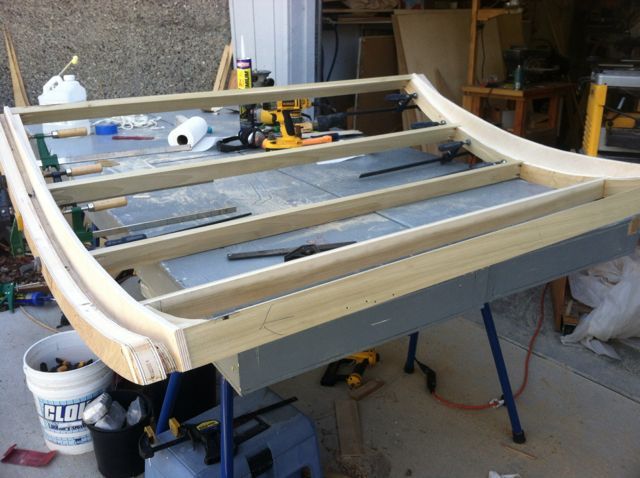
Here's a photo on how I make my hatch lids.
The 1/2" ribs are 6" apart.
The blocking between ribs is structural and also a place to mount paper towel holder, lights, etc.
The blocking in each corner really adds to the stability of the lid.
Hope this helps, :D Danny

Image
ImageImage
"Conditions are never just right. People who delay action until all factors are favorable do nothing". William Feather
Don't accept "It's Good Enough" build to the best of your abilities.
Image
Teardroppers Of Oregon & WashingtonImage
User avatar
halfdome, Danny
*Happy Camper
 
Posts: 5883
Images: 252
Joined: Sun Aug 14, 2005 11:02 pm
Location: Washington , Pew-al-up

Re: Galley Hatch Screw Up!

Postby ae6black » Sat Sep 17, 2016 1:53 pm

I made a warped one work. I am still planning on taking it off and starting over. Most people won't know about it unless you tell them. The problem is you will and every time you look at it, it will bother you. My advice from my own experience, do it now or do it later. Your are still going to redo it.

Art
User avatar
ae6black
Silver Donating Member
 
Posts: 342
Images: 19
Joined: Sat Jul 19, 2014 4:13 am
Location: Western Pennsylvania
Top

Re: Galley Hatch Screw Up!

Postby tony.latham » Sat Sep 17, 2016 6:05 pm

Kenny:

How thick is that plywood???

Tony
User avatar
tony.latham
Gold Donating Member
 
Posts: 6899
Images: 17
Joined: Mon Jul 08, 2013 4:03 pm
Location: Middle of Idaho on the edge of nowhere
Top

Re: Galley Hatch Screw Up!

Postby RunnerDuck » Sat Sep 17, 2016 6:23 pm

tony.latham wrote:Kenny:

How thick is that plywood???

Tony


1/8".

My wife just suggested, "Why don't you peel it off and put a new sheet on?"

Easier said than done but it certainly has me thinking about it. I probably have sixty to a hundred nails in it around the edges and cross beams. I also used Loctite PL Industrial Adhesive all the way around and cross pieces.

I'm sure it would be a mess but possibly doable. I think it would be easier than rebuilding the whole thing especially the sides with the interlocking feature which fit perfect before the warp.

Thoughts?
User avatar
RunnerDuck
Teardrop Master
 
Posts: 167
Joined: Sat Aug 22, 2015 4:26 am
Location: Coupeville, Whidbey Island, Washington
Top

Re: Galley Hatch Screw Up!

Postby Alan_H » Sat Sep 17, 2016 7:45 pm

Sorry to hear of this, but thanks for sharing that lesson with the forum.

I'm in the boat of do it now, or you'll regret it later.
Alan_H
Lifetime member
 
Posts: 245
Images: 17
Joined: Mon Dec 02, 2013 4:44 pm
Top

Re: Galley Hatch Screw Up!

Postby tony.latham » Sat Sep 17, 2016 10:51 pm

K:

Do you think this is spring back? That looks like the same 1/8" BB I use and there isn't much spring to it. Or do you think it was glued up with the hatch sitting spread-legged so to speak? If that's the case, it may be worthwhile to attempt to reskin.

I build with just two end ribs also but add a 4" tapered gusset (ala Steve Fredrick's method). Three hatches and they all fit with zero spring back. The downside is it cuts into the counter depth.

Image

Image

A rough problem. :thumbdown:

Tony
User avatar
tony.latham
Gold Donating Member
 
Posts: 6899
Images: 17
Joined: Mon Jul 08, 2013 4:03 pm
Location: Middle of Idaho on the edge of nowhere
Top

Re: Galley Hatch Screw Up!

Postby noseoil » Sun Sep 18, 2016 7:53 am

Kenney, peel it & set the skin with the hatch in place. There's really no other way to be sure it will sit properly to seal, unless you make a jig to act as a form when adding the skin. Even though I had more ribs, I still didn't trust having it sit on the bench when putting on the outside skin. Any slight movement will cause a bad seal.

Image

I did mine in 2 sections, due to the "oversize" condition of my frame (the one I found was 60 1/2" wide, unfortunately). I used shims to locate the hatch inside the opening & keep it in place, then pre-cut the material to fit. It works, but takes a bit more time this way.
Image

Chin up buddy! If this is the worst thing you've done, a short trip to the moaning chair is in order, then start again.

P.S. Don't cut the hatch side hinge too short (see top-left corner for my solution to a hinge which is cut wrong)!
Build log: viewtopic.php?f=50&t=60248
The time you spend planning is more important than the time you spend building.........

137905
User avatar
noseoil
1000 Club
1000 Club
 
Posts: 1820
Images: 669
Joined: Sun Apr 27, 2014 8:46 am
Location: Raton, New Mexico, living the good life!
Top

Re: Galley Hatch Screw Up!

Postby RunnerDuck » Sun Sep 18, 2016 8:30 am

tony.latham wrote:K:

Do you think this is spring back? That looks like the same 1/8" BB I use and there isn't much spring to it. Or do you think it was glued up with the hatch sitting spread-legged so to speak? If that's the case, it may be worthwhile to attempt to reskin.

I build with just two end ribs also but add a 4" tapered gusset (ala Steve Fredrick's method). Three hatches and they all fit with zero spring back. The downside is it cuts into the counter depth.

A rough problem. :thumbdown:

Tony


Thanks Tony but I built it exactly like yours with tapered gussets and all. I don't think it's "spring back", something changed when I took the temporary sheeting off and glued down the real deal sitting on the saw horses. I guess I'll find out more once I get the skin peeled off but certainly not looking forward to doing that, sounds like a big project but still better than making a new one.

Ken
User avatar
RunnerDuck
Teardrop Master
 
Posts: 167
Joined: Sat Aug 22, 2015 4:26 am
Location: Coupeville, Whidbey Island, Washington
Top

Re: Galley Hatch Screw Up!

Postby RunnerDuck » Sun Sep 18, 2016 8:37 am

noseoil wrote:Kenney, peel it & set the skin with the hatch in place. There's really no other way to be sure it will sit properly to seal, unless you make a jig to act as a form when adding the skin. Even though I had more ribs, I still didn't trust having it sit on the bench when putting on the outside skin. Any slight movement will cause a bad seal.


Thanks noseoil, but I don't see a way to clamp the skin to the frame with the hatch sitting in place. How would you do that?

I do like your idea of two pieces though. Once I get the old skin off :? I think I'll add a temporary piece of plywood like I had before to one half, held on with screws, then remove it, glue, nail and clamp it and then check it for fit, it should be perfect. Then I'll skin the other side.

Before I do that though I'm going to add corner blocking like you did.

Thanks for the ideas, I'm regaining my confidence.

Ken
User avatar
RunnerDuck
Teardrop Master
 
Posts: 167
Joined: Sat Aug 22, 2015 4:26 am
Location: Coupeville, Whidbey Island, Washington
Top

Re: Galley Hatch Screw Up!

Postby aggie79 » Sun Sep 18, 2016 9:30 am

RunnerDuck wrote:
noseoil wrote:Kenney, peel it & set the skin with the hatch in place. There's really no other way to be sure it will sit properly to seal, unless you make a jig to act as a form when adding the skin. Even though I had more ribs, I still didn't trust having it sit on the bench when putting on the outside skin. Any slight movement will cause a bad seal.


Thanks noseoil, but I don't see a way to clamp the skin to the frame with the hatch sitting in place. How would you do that?

Ken


I'm a fan of skinning the hatch in place.

Image

If you are not building a woody, you can use screws and scrap plywood as "cauls" to clamp the skin.

Image

Image
Tom (& Linda)
For build info on our former Silver Beatle teardrop:
Build Thread

93503
User avatar
aggie79
Super Duper Lifetime Member
 
Posts: 5405
Images: 686
Joined: Tue Aug 07, 2007 5:42 pm
Location: Watauga, Texas
Top

Re: Galley Hatch Screw Up!

Postby tony.latham » Sun Sep 18, 2016 10:52 am

Kenny:

Photo your struggles on this endeavor.

We'll all feel your pain! :oops:

Tony
User avatar
tony.latham
Gold Donating Member
 
Posts: 6899
Images: 17
Joined: Mon Jul 08, 2013 4:03 pm
Location: Middle of Idaho on the edge of nowhere
Top

Re: Galley Hatch Screw Up!

Postby RunnerDuck » Sun Sep 18, 2016 7:06 pm

tony.latham wrote:Kenny:

Photo your struggles on this endeavor.

We'll all feel your pain! :oops:

Tony


Alright then!

First of all, here's the problem. Note the gap difference from side to side.

Hatch Fix.jpg
Hatch Fix.jpg (187.49 KiB) Viewed 1098 times


First step was to mark out the edges of the hatch frame so I didn't cut into or through them.

Hatch Fix 1.jpg
Hatch Fix 1.jpg (160.21 KiB) Viewed 1098 times


Next I started cutting out all the plywood in between the frame using my multitool. I cut inspection holes ever so often to make sure I wasn't running into anything.

Hatch Fix 2.jpg
Hatch Fix 2.jpg (110.72 KiB) Viewed 1098 times


To be continued!
User avatar
RunnerDuck
Teardrop Master
 
Posts: 167
Joined: Sat Aug 22, 2015 4:26 am
Location: Coupeville, Whidbey Island, Washington
Top

Re: Galley Hatch Screw Up!

Postby RunnerDuck » Sun Sep 18, 2016 7:09 pm

Here is the hatch with all the plywood cut out between the frame.

Hatch Fix 3.jpg
Hatch Fix 3.jpg (149.36 KiB) Viewed 1096 times


Then I started working my way around all the glued plywood with a hammer and chisel.

Hatch Fix 4.jpg
Hatch Fix 4.jpg (307.93 KiB) Viewed 1096 times


It made a pretty good mess and it wasn't pretty but I got it all off.

Hatch Fix 5.jpg
Hatch Fix 5.jpg (120.75 KiB) Viewed 1096 times


To be continued!
User avatar
RunnerDuck
Teardrop Master
 
Posts: 167
Joined: Sat Aug 22, 2015 4:26 am
Location: Coupeville, Whidbey Island, Washington
Top

Re: Galley Hatch Screw Up!

Postby RunnerDuck » Sun Sep 18, 2016 7:14 pm

With a big pair of wire cutters I removed nails for the next hour!

Hatch Fix 6.jpg
Hatch Fix 6.jpg (205.55 KiB) Viewed 1095 times


Finally I found the right tool to clean up the glue and wood scraps still stuck to the frame, a "Paint Scraper", it seems to work pretty good.

Hatch Fix 7.jpg
Hatch Fix 7.jpg (132.55 KiB) Viewed 1095 times


I'll sand with some 60 grit sandpaper when I get most of the glue off but that's not going to happen today. Removing the plywood took me all day and I'm bushed! :wine:

I've got an appointment off island tomorrow so won't get any more done until Wednesday.

Stay tuned!
User avatar
RunnerDuck
Teardrop Master
 
Posts: 167
Joined: Sat Aug 22, 2015 4:26 am
Location: Coupeville, Whidbey Island, Washington
Top

Next

Return to Teardrop Construction Tips & Techniques

Who is online

Users browsing this forum: No registered users and 17 guests