I used 14 thats right 14 pieces 3/4 thick doubled up with 2x2's between them with a 2x2 piece at the top and a solid 2x2 at the bottom.
No spring back just heavier made than it shoulda been.

Teardrops n Tiny Travel Trailersor t n ttt for short (tnttt.com) |
![]() by Hardin Valley Magic » Fri Feb 10, 2006 7:06 pm
by Hardin Valley Magic » Fri Feb 10, 2006 7:06 pm

![]() by mikeschn » Fri Feb 10, 2006 7:21 pm
by mikeschn » Fri Feb 10, 2006 7:21 pm

![]() by madjack » Fri Feb 10, 2006 7:28 pm
by madjack » Fri Feb 10, 2006 7:28 pm
mikeschn wrote:HVM,
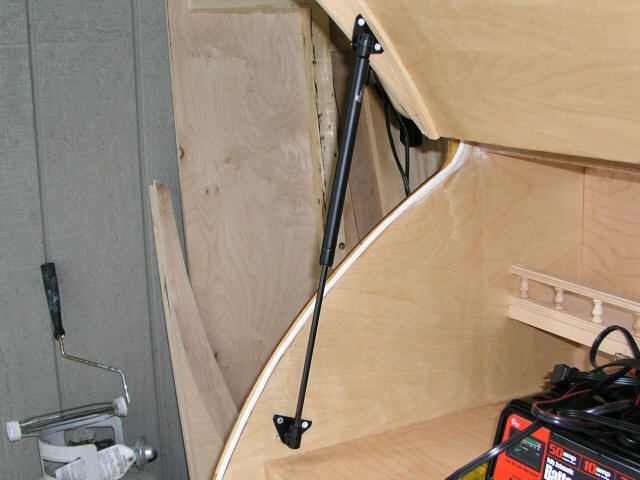
That's a hatch after Dean's own heart... What better to go with an over built trailer than an overbuilt hatch... Sorry guys, I couldn't resist...
It may be heavy, but it's certainly not going to flex. But you'll need heavy duty hatch supports. I would definitely consider gas shocks, so you don't rupture a disc every time you try to open it.
Mike...
 ........................................

![]() by Hardin Valley Magic » Fri Feb 10, 2006 7:29 pm
by Hardin Valley Magic » Fri Feb 10, 2006 7:29 pm
![]() by Boodro » Fri Feb 10, 2006 8:51 pm
by Boodro » Fri Feb 10, 2006 8:51 pm


![]() by s4son » Fri Feb 10, 2006 9:21 pm
by s4son » Fri Feb 10, 2006 9:21 pm
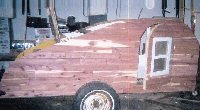
Hardin Valley Magic wrote:O.k. Dean here it is over build of the week.
I used 14 thats right 14 pieces 3/4 thick doubled up with 2x2's between them with a 2x2 piece at the top and a solid 2x2 at the bottom.
No spring back just heavier made than it shoulda been.


![]() by Jim Marshall » Fri Feb 10, 2006 10:27 pm
by Jim Marshall » Fri Feb 10, 2006 10:27 pm
![]() by Hardin Valley Magic » Fri Feb 10, 2006 11:00 pm
by Hardin Valley Magic » Fri Feb 10, 2006 11:00 pm

![]() by Jim Marshall » Fri Feb 10, 2006 11:05 pm
by Jim Marshall » Fri Feb 10, 2006 11:05 pm
 I have looked at the Generic Benroy plans a bunch of times but just forgot. I really do appreciate you posting the link.
![]() by Hardin Valley Magic » Fri Feb 10, 2006 11:09 pm
by Hardin Valley Magic » Fri Feb 10, 2006 11:09 pm
![]() by Gage » Fri Feb 10, 2006 11:14 pm
by Gage » Fri Feb 10, 2006 11:14 pm
Yep that's what happens when there is nothing to hold the shape. The ply is always going to want to straighten out.JohnF wrote:I built my Cubby's hatch with horizontal spars and thought I had it perfectly fitted to the frame...but I now have spring back. <snip>.
Spring back is only common with those who don't listen and insist on building thier hatches with only horizontal spars. The way I built my (but not rule) 5'wide and 4'high hatch with a constant curve in it, was basicly the frame work in the tear. Then I took it to the work bench (after applying about 5 or 6 screws to hold the exterior skin to the frame) and applied all the remaining screws. That first skin was only a temp skin that was on the tear for two years. The current skin is glued with some alum twist nails. When it was finished on the work bench, I took and just placed it where it should go and it fit perfectly just laying in place. So easly a hatch can be built with no problems or spring back.JohnF again wrote:Since spring back seems so darn common there must be some generally agreed-to method of getting out of a bad situation.
What do you recommend?


![]() by Guest » Fri Feb 10, 2006 11:15 pm
by Guest » Fri Feb 10, 2006 11:15 pm
Hardin Valley Magic wrote:O.k. Dean here it is over build of the week.
I used 14 thats right 14 pieces 3/4 thick doubled up with 2x2's between them with a 2x2 piece at the top and a solid 2x2 at the bottom.
No spring back just heavier made than it shoulda been.


![]() by Gage » Fri Feb 10, 2006 11:38 pm
by Gage » Fri Feb 10, 2006 11:38 pm
Dean in Eureka, CA wrote: <snip>
Jim,
I don't know if there is a set rule on clearance from sidewall to rib...
I'm still debating that one myself... I wanna put some snaps on the sides of the outer ribs, so I can snap on side wall flaps when the hatch is open, but I need to think about the strike lengths on the latch too. I might run a dado and have the snaps reccessed, so I don't need to have as much clearance... Just haven't made up my mind on that one yet. I just know that putting them on the side of the rib would be a good place, because they wouldn't show when the hatch is closed.
![]() by Jim Marshall » Sat Feb 11, 2006 12:06 am
by Jim Marshall » Sat Feb 11, 2006 12:06 am
![]() by Gage » Sat Feb 11, 2006 12:34 am
by Gage » Sat Feb 11, 2006 12:34 am
Jim Marshall wrote:Thanks fellows, I really do appreciate your input. I just want to do it right the first time so I won't have to do it over.
Return to Teardrop Construction Tips & Techniques
Users browsing this forum: No registered users and 27 guests