Laminated SIPs?

Anything to do with mechanical, construction etc

Postby madjack » Sun Mar 19, 2006 12:13 am

angib wrote:
madjack wrote:I like the vacum baggin idea...we have a cheap shop vac but also have a Dyson...wonder how much suction that Dyson will pull

No need to wonder about that, madjack - chances are, that Dyson will have broken down before you get that far along...... :cry:

Andrew


...maybe so but after 2 years it is still the most impressive vacuum cleaner I have ever come across, including Hovers, Rainbows and a few other well regarded ones here in the states......
madjack 8)
...I have come to believe that, conflict resolution, through violence, is never acceptable.....................mj
User avatar
madjack
Site Admin
 
Posts: 15128
Images: 177
Joined: Thu Dec 02, 2004 5:27 pm
Location: Central Louisiana

More SIP experiments

Postby captainsam » Sun Mar 19, 2006 1:44 pm

Well I just couldn't wait to get a good clamping set up before I made a 1' X 4' panel using the OwensCorning 2' Pink XPS and Gorilla glue. By the way, I have determined that Gorilla Glue and Ashland IsoGrip are basically the same stuff. A one part water activated urethane adhesive. I suspect IsoGrip is a lot cheaper and probably easier to apply (Gorilla ia pretty thick and comes in comsumer size squeeze bottles) Anyway, I built a test panel and just sat some objects on it. Paint cans, a pancake compressor, a bag of salt, ect. It was definately too little despite a fairly good "looking" result.

Image

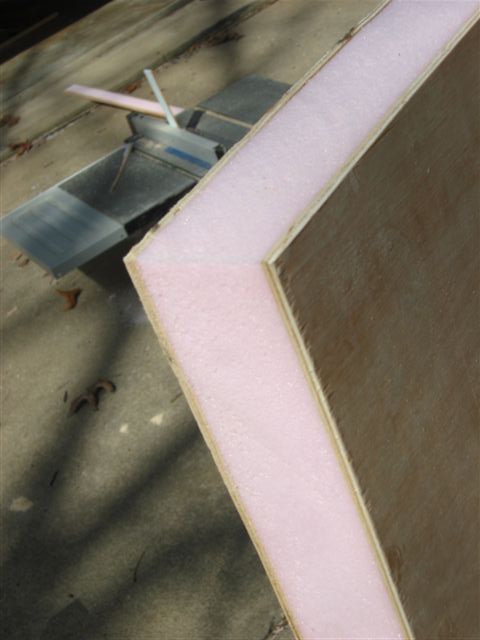
Along one edge though, there were a few gaps between the foam and panel. I knew my clamping was not sufficient because the panels kept sliding during the early cure. Still this item gave me a good idea of the weight of a completed 2-1/2" panel. It weighed 5 lbs so a 4' X 8' would weigh 40 lbs. That is an R-11 panel with awesone strength. Despite my poor bond the panel can span almost 4 feet and support me with little noticable give. I definately need an even pressure of 4-5 psi to get a reliable bondline.

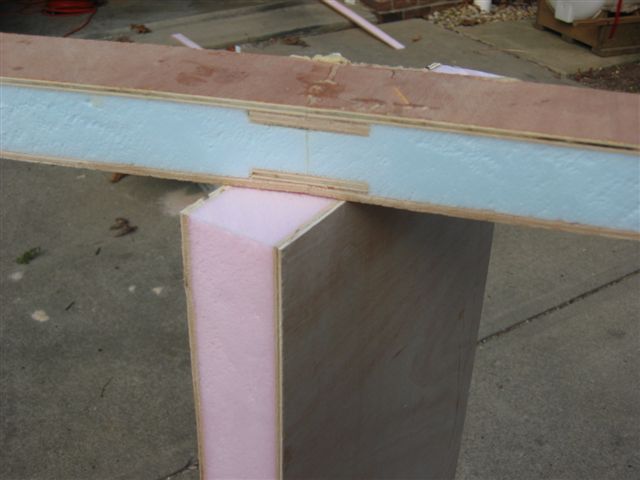
I also decided to cut my first smaller sample in half and try to butt splice it to see how it would fair. I cut a slot in the foam with my table saw just under the luan facing. I did this on both sides of the panels. Then I cut two luan splice pieces to fit in the slots spanning the butt joint. I put gorilla glue in the slots, wetted the luan pieces, put it all together and clamped. The result is below:

Image

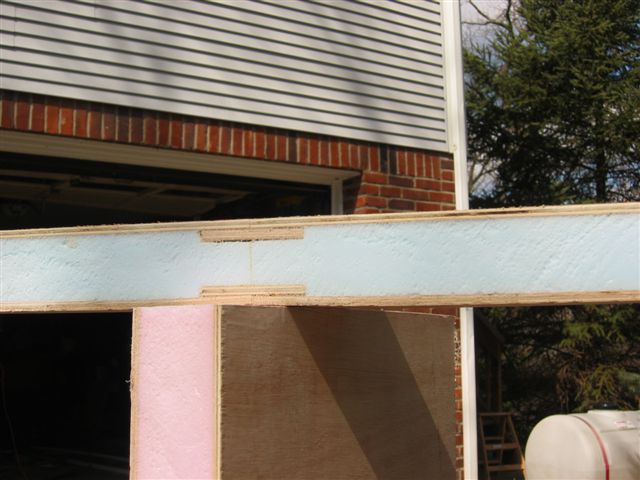
Now a couple things. I just wagged this. The width and depth of the slot were cut by eyeballing so it was a tiny bit wider than the luan splice plate. I think a snug fit would be better. I also did not carefully match the spline width to the depth of the slot. It could be better, but it still the butted piece will support me standing on it like it would before the piece was cut. This seems to be an excellent way to splice 4X8 panels together to make bigger panels and no real thermal break is created. I guess that's why the build SIP homes this way.

Image

Back to work tomorrow flying all week. I'll pick this up next weekend if I have time. I think I have a better idea for a home made panel press than a pool or a vacuum bagging system. I need to figure a bit so I'll put my trip to good use.
User avatar
captainsam
Teardrop Builder
 
Posts: 33
Images: 20
Joined: Sat Mar 04, 2006 4:16 pm
Location: Pittsburgh, PA

Bravo Captain

Postby Guy » Sun Mar 19, 2006 1:49 pm

Dear Sam,

Truly superb work and experimentation. The topic of using SIPs had been around for a long time and you have just taken it far ahead of anyone else. Advancing the art and science of teardrops is what this group is all about. You have advanced to the head of the line. Thank you.
Regards,

Guy
Keep on living, laughing, learning and loving.
Image
User avatar
Guy
1000 Club
1000 Club
 
Posts: 1521
Images: 44
Joined: Thu Nov 25, 2004 5:53 pm
Top

Re: Bravo Captain

Postby captainsam » Sun Mar 19, 2006 2:20 pm

Guy wrote:Dear Sam,

Truly superb work and experimentation. The topic of using SIPs had been around for a long time and you have just taken it far ahead of anyone else. Advancing the art and science of teardrops is what this group is all about. You have advanced to the head of the line. Thank you.


Guy

Kind words but I have to also thank you for your input which is helping me along. I have been in love with SIPs since I first saw a home built with them. It is only natural to try to adapt this technology toward my dream of building a true all-weather camper.

Sam

Image
User avatar
captainsam
Teardrop Builder
 
Posts: 33
Images: 20
Joined: Sat Mar 04, 2006 4:16 pm
Location: Pittsburgh, PA
Top

You also hit on the other benefit

Postby Guy » Sun Mar 19, 2006 5:24 pm

Dear Sam,

You also hit on the other benefit, regarding the thermal breaks. Last year I tried to explain this but really did not do it justice.

BTW, last year Andrew posted a really elegant way of anchoring into SIPs that he had used in yacht building. Search Andrew and Yacht.
Regards,

Guy
Keep on living, laughing, learning and loving.
Image
User avatar
Guy
1000 Club
1000 Club
 
Posts: 1521
Images: 44
Joined: Thu Nov 25, 2004 5:53 pm
Top

Postby alaska teardrop » Mon Mar 20, 2006 5:37 pm

    Captain Sam,
    Wondering if you have tried or would consider experimenting bonding aluminum on one side of the panel?
    Guess my reason for asking, is that one might possibly roll the whole panel using evenly applied heat on the aluminum side.
    :? Fred
Last edited by alaska teardrop on Mon Apr 03, 2006 9:09 pm, edited 2 times in total.
Northern Lite Traveler design: viewtopic.php?f=27&t=51991
Minimalist torsion axle frame: viewtopic.php?f=35&t=12220
Alaska Teardrop photo gallery: http://tnttt.com/gallery/album.php?album_id=2014
Glampette photo gallery; gallery/album.php?album_id=2983&sk=t&sd=d&st=0
User avatar
alaska teardrop
Platinum Donating Member
 
Posts: 1112
Images: 177
Joined: Wed Aug 24, 2005 1:41 pm
Location: Greenville, Michigan
Top

Postby ARKPAT » Thu Mar 23, 2006 4:45 am

:thinking:
This is what I was looking at doing for a while. I have gained some knowledge with the posts above and will experment also along the same lines.
:hammer:
:sweaty:
:fan:

I get with MadJack at Bever Bend about this Idea in nine days with maybe some samples> :designing: :scratchthinking:
:thumbsup: Pat
Life is to short always eat dessert first.
User avatar
ARKPAT
1000 Club
1000 Club
 
Posts: 1549
Images: 77
Joined: Tue Dec 13, 2005 4:45 am
Location: Arkansas
Top

Postby GPW » Thu Mar 23, 2006 8:09 am

Having a great deal of experience bending foam in this shape ...a bender can be constructed to actually bend sheets of 1" or even 2" blu-foam ... and as a bonus , the heat (190deg. ) causes it not only to stay in that position , but heat harden... stiffens it up pretty good .... something us old guys really appreciate in any form ...hahahahaha anybody interested ??? I'll post a link of the small scale (1/4") operations , just enlarge the principle ... http://www.foamfly.com/gallery/album58
Last edited by GPW on Thu Mar 23, 2006 8:17 am, edited 2 times in total.
There’s no place like Foam !
User avatar
GPW
Gold Donating Member
 
Posts: 14911
Images: 546
Joined: Thu Feb 09, 2006 7:58 pm
Location: New Orleans
Top

Postby madjack » Thu Mar 23, 2006 8:13 am

G...definitely, we be interested :yes: so post away................................................. 8)
...I have come to believe that, conflict resolution, through violence, is never acceptable.....................mj
User avatar
madjack
Site Admin
 
Posts: 15128
Images: 177
Joined: Thu Dec 02, 2004 5:27 pm
Location: Central Louisiana
Top

Postby GPW » Thu Mar 23, 2006 8:26 am

Bending jig made out of perhaps 6' lengths of 6 or 8" PVC installed on a scrap ply frame ...heating could be done with heat strip elements ...not too expensive .... why heck once you had bent the front/top/back panel in one piece , just slap on some sides(2" blu-Foam) ... stick on an outer skin and interior decorative panel , trim and you're done ... probably light enough to build and then place on the trailer , well a couple guys anyway ...

Got a friend whose been following my TD exploits , wants to make a dozen and work out a deal with a local U-Haul renter to rent for hunters / campers for like 4 day weekends.@$250.00 might work if we can make something like this ... cabs could be skinned foam too ... :thinking:

Sips , in a way !!!
There’s no place like Foam !
User avatar
GPW
Gold Donating Member
 
Posts: 14911
Images: 546
Joined: Thu Feb 09, 2006 7:58 pm
Location: New Orleans
Top

Postby Dewayne_Mellen » Thu Mar 23, 2006 6:19 pm

Instead of using additional weights or a vacuum to make additional force on the panels, what about using a couple of 1x boards that's screwed into each panel before they are glued? Is there a reason not to do it this way?

Do you have any idea on how much glue would be needed for a 4x8 panel?
Dewayne_Mellen
Teardrop Advisor
 
Posts: 78
Joined: Wed Feb 15, 2006 9:30 pm
Location: Redford MI
Top

Postby captainsam » Thu Mar 23, 2006 10:49 pm

Dewayne_Mellen wrote:Instead of using additional weights or a vacuum to make additional force on the panels, what about using a couple of 1x boards that's screwed into each panel before they are glued? Is there a reason not to do it this way?


Even if you could clamp the edges with a 5-7 psi pressure to hold the panel down, there is no way the center of the panel, two feet away, could be held down with a similar (if any) pressure. The luan bends so easily, I doubt the clamped pressure would extend much past a inch or so from the 1x.

Dewayne_Mellen wrote:Do you have any idea on how much glue would be needed for a 4x8 panel?


The Gorilla glue says 1/2 oz. per square foot of surface area. That's 32 oz. per two sided panel. Not cheap.
User avatar
captainsam
Teardrop Builder
 
Posts: 33
Images: 20
Joined: Sat Mar 04, 2006 4:16 pm
Location: Pittsburgh, PA
Top

Glue on Panels

Postby Guy » Fri Mar 24, 2006 12:22 am

Dear Sam,

Glad to have you back on the ground. A thought came to me as I was driving. Why don't you check with Ashland about ways to increase the work time with the glue so you have an easier time setting up the panel press you are devising. Maybe they have a spray applicator or some variation that will both lower the cost and improve the product. Those tech guys are very helpful and get off on those types of challenges. If you need 300 extra lbs of pressure let me know and I will drive over on one of my trips.
Regards,

Guy
Keep on living, laughing, learning and loving.
Image
User avatar
Guy
1000 Club
1000 Club
 
Posts: 1521
Images: 44
Joined: Thu Nov 25, 2004 5:53 pm
Top

Postby Mark Mckeeman » Fri Mar 24, 2006 9:52 am

OK,

Here’s a thought about how to vacuum bag a large panel. I have seen the vacuum bagging process up close in the composite aircraft part repair business but I am not particularly experienced in the area.

I would first build a flat surface table or frame large enough for the panel to fit on it with the table extending 3-4 inches extra all around. On the edges I would lay a wood framework around the circumference equivalent in thickness to the panel being built up. This dimension is not critical, as a frame of this design would allow panels of varying thicknesses to be manufactured (within reason). All the joints and fasteners must be sealed with glue, calking or sealing tape so that the frame is airtight. Now you drill a hole through the edge of the frame and glue and seal in a tube or hose that can be adapted to your vacuum.

The beauty of this is that there is nothing simpler in composites than building a flat panel and with this jig you only have to reseal the top for each use. I would probably seal the inside of the frame with epoxy varnish and then apply a healthy dose of Future floor wax as a parting agent. To build a panel lay your substrate in the frame, apply a coat of waterproof flooring adhesive with a 1/16” notch trowel ($50 for 5 gal), lay in any required framework and your foam core material. This would all have been cut and fitted prior to build-up. Trowel another coat of glue on the second substrate and lay it in the frame to close the panel. Use hand pressure to set the panel, and wooden wedges placed between the panel and frame to prevent things from shifting during glue-up. Seal the top of the frame with double sided carpet tape and 6 mil poly plastic vapor barrier, pad any sharp corners with a piece if foam packing material to prevent punctures when under vacuum. Now crank up the vacuum cleaner and check for leaks. You could even tap in a vacuum gauge to see how efficient the system is. Run the system for the recommended set time of the adhesive.

Voila you have a SIP. :thumbsup:

If all this sounds like too much effort then I like the idea of building a 2x6 frame skinned with plywood and a ramp at one end. You lay-up your panel in the driveway, set the frame on top and park your car on it overnight.
:applause: :applause: :applause:
User avatar
Mark Mckeeman
Teardrop Master
 
Posts: 157
Images: 10
Joined: Fri Jul 30, 2004 1:06 pm
Location: Ottawa, Ontario
Top

Voila you have an IP

Postby Guy » Fri Mar 24, 2006 3:55 pm

Dear Mark,

There are serious structural differences between an Insulated Panel, whih you desrcibe, and the Structural Insulated Panel that Sam is attempting.
Regards,

Guy
Keep on living, laughing, learning and loving.
Image
User avatar
Guy
1000 Club
1000 Club
 
Posts: 1521
Images: 44
Joined: Thu Nov 25, 2004 5:53 pm
Top

PreviousNext

Return to Teardrop Construction Tips & Techniques

Who is online

Users browsing this forum: No registered users and 24 guests