Wood Fenders

Anything to do with mechanical, construction etc

Postby dwgriff1 » Thu Apr 27, 2006 9:56 pm

Making a pair of one off fenders is certainly not worth the trouble.

That does not mean I won’t do it, just that it doesn’t make any sense, so don’t tell my wife.

However, if I used the right foam, I could build a pair of fenders as Andrew suggests -- bread and butter style. Smooth the foam and fiberglass the form.

Once the fiberglass is thick enough and smooth, the foam can be removed -- dig out with a spoon, or solvent -- leaving just the fiberglass.

Easy? NO. Fast? No.

Possible, YEA.

dave
User avatar
dwgriff1
500 Club
 
Posts: 947
Images: 4
Joined: Mon Jul 04, 2005 4:20 pm
Location: SW Idaho

Postby stedi » Thu Apr 27, 2006 11:08 pm

wow! whilst reading this thread, i just experienced a "ontogeny recapitulates phylogeny" moment. to wit, the thrill of witnessing and participating in the problem- solving process for just one facet of the construction of a tear just struck me. silly? maybe. fun? definitely! john, your idea would result in a beautiful fender. andrew, your engineering prowess just shines time and time again. steve f., as soon as i saw your cub-roy pattern, i knew that i'd found my profile. thank you all--it's an honor to rub virtual elbows with each of you. regards,
steve
the government does not produce one single bushel of corn, one single barrel of oil, or one unit of any other commodity. the only way it obtains the money that it awards to its chosen recipients is by taking it from others who earned it. this is called "voluntary taxation".
stedi
Teardrop Builder
 
Posts: 47
Joined: Sat Feb 18, 2006 5:03 pm
Location: Dowagiac MI

Postby Guest » Fri Apr 28, 2006 12:43 am

Dave,
I was going to build my art deco fenders out of copper, but then I checked out some different thickness' of copper sheets... I swear that stuff is softer than aluminum. (And the price... OMG!)
At first, because of the price of that orange metal... I was going to build mine up with plywood and skin with the thin copper, but then a friend told me about a copper additive for paint, so now I'm still going to skin them, but with aluminum, painted to simulate copper...

Oh... And on the inner fender well, I'll probably have them Linex'd.
Guest
 
Top

Postby angib » Fri Apr 28, 2006 10:37 am

Here is the next chapter of the wood fender novel!

Firstly, the 'bread and butter' method. Here is a cross-section though the highest point of the fender. It doesn't make sense to use bread and butter for the inner 2/3rds of the fender as that is single curvature, except for the flare-out at the back, and so that can be made from a single piece of ply. It's too tight for 1/4" ply so it's made of two layers of (red) 1/8" ply.

The outer 4" of the fender is made by bread and butter. I've shown it in (green) 1/2" ply 'slices' which means more pieces have to be cut than if using 3/4", but there's less fairing to do. The outer slice is replaced with two 1/4" slices, as the outermost slice hangs down quite a way in places.

Image

Each of those slices is sized so that there's 1" overlap with the next slice - it's tempting to reduce this to make the fender lighter and increase the (marginal) tyre clearance, but then the slice becomes quite floppy until it's bonded to the next slice.

To overcome this problem, each slice has four bosses incorporated in it and a hole through each boss connects all the slices together. Here are the shapes of some of the slices, to try to make this clear:

Image

Note that slices 1 and 15 are mostly inset to receive the curved ply skin, but that recess stops before the flare-out at the back, when the fender goes back to bread and butter construction. Slices 2 to 14 are identical and just extend over the flare-out.

After the whole fender has been assembled, those bosses all have to be cut off - not easy inside the curve of the fender but, at worst, they can be sanded off with an angle-grinder-with-sanding-pad ('electric spokeshave').

On that subject, let's not forget the safety warning like Norm gives: Sanding plywood must only be done wearing a industrial-quality facemask - wood dust is not just a nuisance, it is a direct health risk and the dust from some hardwoods is a carcinogen.

Juneaudave asked for the geometry of the Slumbercoach fender and I've sent you and John/micro a PDF, as it's not very legible like this:

Image

Anyone else who wants this material as a PDF, pm or email me - and don't forget to tell me (a) that it's the Slumbercoach fender PDF you want and (b) your email address!

Please note that the fender size is closely related to the tyre size - what I've shown is using a 26.1" diameter 205/75-14 tyre - but if another tyre is used, the fender size may need to be altered.

Switching back to bread and butter to make the flare-out on the back of the fender is a bit of hard work. Here is an alternative fender that just has a straight taper on the back, which I think would look very nice and be simpler:

Image

This fender also does not have the fault that the flared one has - as drawn, it is 49.5" long, so it doesn't quite fit in the width of a sheet of ply. Darn.

Andrew
User avatar
angib
5000 Club
5000 Club
 
Posts: 5783
Images: 231
Joined: Fri Apr 30, 2004 2:04 pm
Location: (Olde) England
Top

Postby Micro469 » Fri Apr 28, 2006 12:52 pm

Andrew, How long is the flared fender design? And how much modification for a 15" tire? :thinking:
John
Image
User avatar
Micro469
Super Lifetime Member
 
Posts: 3185
Images: 382
Joined: Mon Nov 07, 2005 10:46 pm
Location: Brampton,Ontario,Canada
Top

Postby angib » Fri Apr 28, 2006 3:12 pm

I've sent John corrected dimensions for a larger tye, but if anyone else wants them, they're fairly easy - just increase the radiuses of the circular part of the fender by 1/2" (13.5" inside, 18" outside) and leave everything else the same. It's a small enough change that it doesn't upset the look:

Image

It's the original fender with the flared-out end that's 49.5" long - the simpler straight-back fender is 45.6" long.

Andrew
User avatar
angib
5000 Club
5000 Club
 
Posts: 5783
Images: 231
Joined: Fri Apr 30, 2004 2:04 pm
Location: (Olde) England
Top

Postby Micro469 » Fri Apr 28, 2006 8:44 pm

That looks great Andrew, but I think with a little bit of tweaking I should be able to remove an inch and a half from the length. No one would really know except me, unless they got down on their hands and knees to measure it! LOL
:lol:
John
Image
User avatar
Micro469
Super Lifetime Member
 
Posts: 3185
Images: 382
Joined: Mon Nov 07, 2005 10:46 pm
Location: Brampton,Ontario,Canada
Top

Postby asianflava » Fri Apr 28, 2006 11:03 pm

This looks like a project by itself, pretty labor intensive. Maybe I'll try it after I've caught up on the ones that I'm currently working on.

I was thinking about doing it with MDF or particle board. After it was done, I can use it as a plug to make a female mold. Then I can make as many as I want. :thinking:
User avatar
asianflava
8000 Club
8000 Club
 
Posts: 8412
Images: 45
Joined: Mon Aug 02, 2004 5:11 am
Location: CO, Longmont
Top

Postby Juneaudave » Sat Apr 29, 2006 12:12 am

asianflava wrote:This looks like a project by itself, pretty labor intensive. Maybe I'll try it after I've caught up on the ones that I'm currently working on.

I was thinking about doing it with MDF or particle board. After it was done, I can use it as a plug to make a female mold. Then I can make as many as I want. :thinking:


In my case, I have bunches of scrap wood, glass, epoxy etc laying around that I had leftover from my canoe building days. I also got lots of time, seeing how I don't have a road out of Juneau anyway. What I don't have is the $$$$ for some fiberglass ones shipped to Alaska. I'm a thinking this is a good area for me to mess around with. Near as I can tell, for the Slumbercoach, it seems better to have your fenders done so you can get the profile curves right.
User avatar
Juneaudave
Super Duper Lifetime Member
 
Posts: 3237
Images: 380
Joined: Sun Jul 03, 2005 12:11 pm
Location: Juneau, Alaska
Top

Postby Roly Nelson » Sat Apr 29, 2006 4:10 am

My 1/8th inch plywood fender bottoms have been protected for the last 3 years with Line-X and show no signs of moisture problems. Works for me, don't understand what the problem is. I simply primed the bottom sides with Kilz, shot the Line-X on and so far, so good.

Roly, lucky to have a nephew in the Line-X business.
See the little 1/2 Nelson Woody constructions pics at: http://gages-56.com/roly.html
User avatar
Roly Nelson
L'il Ol' Woody Builder
 
Posts: 2971
Images: 13
Joined: Sun Jan 30, 2005 12:45 pm
Location: Wildomar, Calif
Top

Postby Denny Unfried » Sat Apr 29, 2006 8:40 am

Roly's fenders are a work of art. I took this pic at Sweetwater a couple years ago. Liza the attack dog has also done her job at protecting both of the teardrops.

Image
aka - "Uncle Denny"
<img src="http://www.uncledennyscorner.com/teardrop/photos/Linux.gif">
User avatar
Denny Unfried
sprint car builder/racer & all that jazz
 
Posts: 411
Joined: Mon Jun 21, 2004 8:54 am
Location: So Bay, CA
Top

Postby angib » Sat Apr 29, 2006 6:12 pm

asianflava wrote:I was thinking about doing it with MDF or particle board. After it was done, I can use it as a plug to make a female mold. Then I can make as many as I want. :thinking:

MDF is undoubtedly the perfect material for this job - cuts sweetly even with a jigsaw, sands pefectly smooth, has no significant grain and doesn't have hard glue in between the soft(er) layers of wood. But you need to not use a hard glue to join the sheets of MDF, or you will get the ply effect on a bigger scale - I reckon carpenter's glue (PVA) is best - epoxy as a glue is not a good idea as it's definitely harder than MDF.

But: never be tempted to take your face mask off.

Andrew
User avatar
angib
5000 Club
5000 Club
 
Posts: 5783
Images: 231
Joined: Fri Apr 30, 2004 2:04 pm
Location: (Olde) England
Top

Postby Woodbutcher » Sat Apr 29, 2006 7:44 pm

angib wrote:Here is the next chapter of the wood fender novel!

Firstly, the 'bread and butter' method. Here is a cross-section though the highest point of the fender. It doesn't make sense to use bread and butter for the inner 2/3rds of the fender as that is single curvature, except for the flare-out at the back, and so that can be made from a single piece of ply. It's too tight for 1/4" ply so it's made of two layers of (red) 1/8" ply.

The outer 4" of the fender is made by bread and butter. I've shown it in (green) 1/2" ply 'slices' which means more pieces have to be cut than if using 3/4", but there's less fairing to do. The outer slice is replaced with two 1/4" slices, as the outermost slice hangs down quite a way in places.

Image

Each of those slices is sized so that there's 1" overlap with the next slice - it's tempting to reduce this to make the fender lighter and increase the (marginal) tyre clearance, but then the slice becomes quite floppy until it's bonded to the next slice.

To overcome this problem, each slice has four bosses incorporated in it and a hole through each boss connects all the slices together. Here are the shapes of some of the slices, to try to make this clear:

Image

Note that slices 1 and 15 are mostly inset to receive the curved ply skin, but that recess stops before the flare-out at the back, when the fender goes back to bread and butter construction. Slices 2 to 14 are identical and just extend over the flare-out.

After the whole fender has been assembled, those bosses all have to be cut off - not easy inside the curve of the fender but, at worst, they can be sanded off with an angle-grinder-with-sanding-pad ('electric spokeshave').

On that subject, let's not forget the safety warning like Norm gives: Sanding plywood must only be done wearing a industrial-quality facemask - wood dust is not just a nuisance, it is a direct health risk and the dust from some hardwoods is a carcinogen.

Juneaudave asked for the geometry of the Slumbercoach fender and I've sent you and John/micro a PDF, as it's not very legible like this:

Image

Anyone else who wants this material as a PDF, pm or email me - and don't forget to tell me (a) that it's the Slumbercoach fender PDF you want and (b) your email address!

Please note that the fender size is closely related to the tyre size - what I've shown is using a 26.1" diameter 205/75-14 tyre - but if another tyre is used, the fender size may need to be altered.

Switching back to bread and butter to make the flare-out on the back of the fender is a bit of hard work. Here is an alternative fender that just has a straight taper on the back, which I think would look very nice and be simpler:

Image

This fender also does not have the fault that the flared one has - as drawn, it is 49.5" long, so it doesn't quite fit in the width of a sheet of ply. Darn.

Andrew


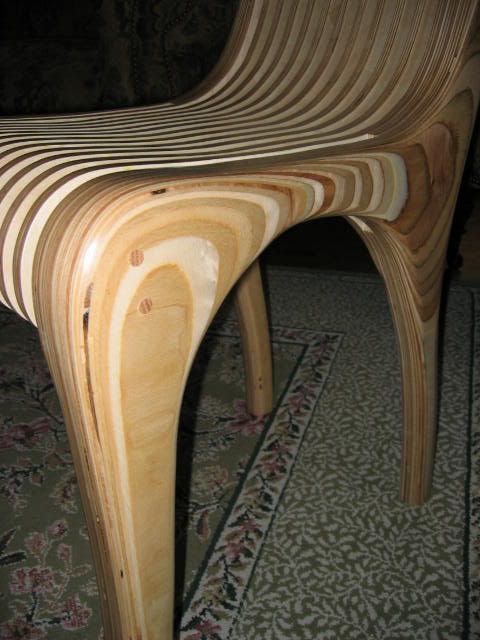
I made this chair out of 1/2" Baltic Birch plywood using the technique discribed here. It is the same basic principle. I did most of the rough shaping with a belt sander and then a DA sander. It takes much less time to shape then you would think. I could see these as a real nice fender design.

Image
User avatar
Woodbutcher
Platinum Donating Member
 
Posts: 4187
Images: 45
Joined: Fri Mar 10, 2006 10:01 pm
Location: Chicago Suburbs
Top

Postby Micro469 » Sun Apr 30, 2006 8:25 pm

Woodbutcher, I really like that chair. Did you do Baltic Birch right across or just the sides? BB is nor readily available up here, and when you do find it, it's usually in 4x4 sheets and frightfully expensive. Unfortunatly, most plywood up here is CRAP.
John
Image
User avatar
Micro469
Super Lifetime Member
 
Posts: 3185
Images: 382
Joined: Mon Nov 07, 2005 10:46 pm
Location: Brampton,Ontario,Canada
Top

Postby Woodbutcher » Sun Apr 30, 2006 9:24 pm

Yes the whole chair is made out of 1 4x8 sheet of 1/2" Baltic birch. Our local Menards lumber yards has been stocking it for around 45.00 per sheet. We also have some specialty lumber/ woodworking stores that sell mostly to hobbiests that stock the 5x5' pieces. You may also call some local cabinet shops and see if they will order it through one of their regular wholesalers.
User avatar
Woodbutcher
Platinum Donating Member
 
Posts: 4187
Images: 45
Joined: Fri Mar 10, 2006 10:01 pm
Location: Chicago Suburbs
Top

PreviousNext

Return to Teardrop Construction Tips & Techniques

Who is online

Users browsing this forum: No registered users and 41 guests