Page 1 of 2
roof skin question for 5'ers

Posted:
Wed Jul 12, 2006 6:51 amby oklahomajewel
Okay, I'm trying to save money but not at the risk of screwing up a pretty Jewel Box...
I have a 5'er and was going to use bendy plywood but have to cut pieces in 5' lengths to go across the roof bend (and interior) and end up having 2 seams that run the 5' way.
Has anyone covered their 5'er but used the whole 4x8 lengthwise and then had a long 8' seam for the extra foot? Then there is still a seam for the extra couple of feet of length...
How have you sealed those seams, either way ? And has it held up well?
I don't really wanna put a strip of anything down the middle or even across the roof to cover/hold together a seam.
THanks!
Julie
Posted:
Wed Jul 12, 2006 7:17 amby GPW
We did ours(6'W) with regular 1/4" luan ... very easy cross ways .... and strong , unliked a seamed joint roof panel ... scraps became part of another project ...crossbraces (2"x2") were on 12" ctrs. so the panels fell out naturally ... very easy , and you can leave the panels a bit long an trim it off once installed...
my seams are covered with fiberglass tape and epoxy resin .... No leaks .... so far ... all appears strong and intact , even after pulling it around the extremely bumpy roads in my neighborhood (stress test 199)
Posted:
Wed Jul 12, 2006 8:33 amby rasp
you could use 5x5 baltic birch that way little waste. roud here it runs about 12 bucks a sheet for 1/8"
Posted:
Wed Jul 12, 2006 8:37 amby halfdome, Danny
I used 2 layers of 1/8" x 60" x 60" Baltic Birch. The second layer was applied from the opposite direction to overlap the seams on the first sheet. When glued together with Tightbond ll it makes a stronger roof than one layer of 1/4" Bender Board ( Bendy Plywood).  Danny
Danny
Posted:
Wed Jul 12, 2006 8:44 amby JunkMan
I'm using 5' Baltic Birch, and am placing a small shelf where the seam will be, so I will have something to hide the seam. The shelf will also be a handy place to place keys, flashlight, eyeglasses and other small items at night.
Posted:
Wed Jul 12, 2006 9:38 amby tonyj
Julie,
Not building a 5'er (yet), but if I did the 4X8 and 1X8, I would want to bond that long seam so that the sheet becomes a 5X8 when completed, either by an epoxy/fiberglass, taped seam, scarf joint or my newly discovered finger joint. I wouldn't want an unsupported seam running the length of the tear perpendicular to the spars. As an alternative, you could fit braces perpendicular to the spars that support that seam. Personally, I would probably look for the 5X5 or plan on additional waste from 4X8 so the seams in the roof and ceiling all run parallel. But I was dropped on my head as a child, so I usually question my own logic.
Posted:
Wed Jul 12, 2006 10:48 amby madjack
Julie, I would put the seam crosswise over a spar...even double the spar if I thought it needed...if you run the seam lengthwise you have a problem to work out for framing for the seam to fall on....after that it depends on your final covering...if AL, there is no sealing problem if paint then doing as GPW has suggested is best...have built a couple of small boats thatway with FG taped seams and epoxy paint...the techniques works very well....
madjack

Posted:
Wed Jul 12, 2006 11:19 amby Steve Frederick
Julie,
I used 1/8" ply, cut to width(grain runs wall to wall) for the headliner.
For the roof, two layers, same deal, except that I glued them together in between. Place the joints over a spar, like M/J said.
Look at the cabin car
Posted:
Wed Jul 12, 2006 3:05 pmby Guy
Dear Julie,
If you look at 48Rob's Cabin Car you might find just the ticket. You could put a 3 foot section down the middle and two 0ne footer side panels. Cover the seems with "straps" of bendy ply to give it that "Cartier" feel on you Jewel Box. You could probably find some nice jeweled buckles to go along with it.
Re: Look at the cabin car
Posted:
Wed Jul 12, 2006 6:30 pmby Steve Frederick
Guy wrote:Dear Julie,
Snip.. Cover the seems with "straps" of bendy ply to give it that "Cartier" feel on you Jewel Box. You could probably find some nice jeweled buckles to go along with it.
OOOH!! Sort of like a trunk??


Posted:
Wed Jul 12, 2006 7:22 pmby Jiminsav
Julie,
you'll just have to have a seam, or like me, two seams on the roof.
It's not a big deal, the seams can be sanded smooth and filled with bondo and "viola" no seams showing through.
If you can find 5 foot wide plywood, well, if the OUTSIDE dimension is 5 foot, no problem, but if the INSIDE dimension is 5 foot, you'll come up short using 5 foot wide plywood.
Posted:
Wed Jul 12, 2006 7:58 pmby Miriam C.
Julie,
Since you are painting the edges shouldn't show. Perhaps your helper could help you do the finger joint Toni did. I got 5 wide 1/8 birch but it is patched on both sides. That won't show on yours.
The strap for a jewel box is cool and if you made a seam down the middle it could match your paint scheme. (I am assuming you still have the paint with the point in the back.)
Happy building
Miriam
Posted:
Wed Jul 12, 2006 8:30 pmby Chuck Craven
Julie
I built a wood Tono cover for a pickup truck bed.
Used two 8’ by 2’9” pieces with the seam down the center.
Under the seam was a 1 by 2.
The ¼” plywood was glued, screwed and fiberglass over that.
It was so strong I could stand on it, with no flex.
It was panted and I could not see the seam.
I think you just need something under the seam. Could be scraps of plywood or even just fiberglass cloth/ epoxy on the under side of it. That is if you can get to the seam form the inside! Else you need to run the seam over the roof spar. If you are using two layers of 1/8” plywood you can run the seams opposite each other should make it a lot stronger. The first layer will support the second layers lengthwise seam when glued together.
Chuck
Posted:
Thu Jul 13, 2006 1:49 amby bledsoe3
Julie, My trailer is 5' wide and I seamed sheets of 1/8" luan for the roof.
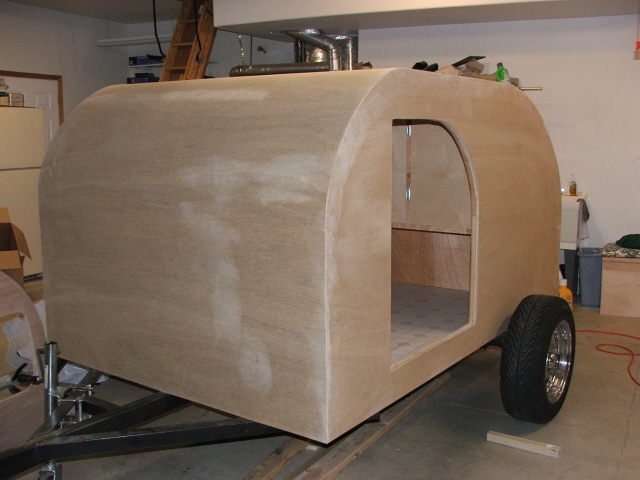
There is a seam over a spar near the top of the radius. The light sanded area in the middle is where some glue had dried on the surface. If not for the sanding you cannot tell there's a seam with out looking for it. Here's the thread of how to seam two pieces of ply together.
http://www.tnttt.com/viewtopic.php?t=3352
Adjust size as needed.
Posted:
Thu Jul 13, 2006 7:15 amby GPW
Long way splices are not good , seams running across the top(from side to side) are OK and to be expected....BASIC WOODWORKING
