Page 2 of 2

PostPosted: Tue Dec 29, 2009 12:41 am
by navigator
The electric jack would be great, but remember the side walls folds in. Could make the jack external, I guess...

The galley in the rear is of course best for weight distribution, plus puts the water tank over the axle, the front bed plan does not work out so well for balance. I have drawn it with the galley as a side pullout, which is OK, but I kind of like it sliding out the back as it does not require any additional support (legs to the ground). The galley cab would be supported by over-extension slides, so it fully clears the body.

PostPosted: Wed Dec 30, 2009 6:00 pm
by navigator
Aliner made a model called the Alite, I have only ever been able to find pictures of one:

Image

I modifed my design to be similar, but did not like it:
    - Reduced headroom
    - End lift wall is very tall
    - End lift wall leans in
    - Side lift walls are taller, and have to overlap when closed (with my design they do not)
The main advantage to their design is the lighter roof. And without insulated sidewalls as part of the roof, the body can be a bit wider, too.

PostPosted: Fri Jan 01, 2010 1:09 pm
by jagular7
Great plan and layout.

Make a subframe for the roof and use 70's vehicle hood hinges that are coiled sprung. The hinges would be the inside corners of the front panel and can be hidden with a shelving. To secure the roof in a down position, use external hood latches (Jeep hood hatches). They are spring-loaded so as to provide good pressure to secure the roof, but also enough to make the roof move separately than the body of the camper.

Keep the rear door offcentered. Add a slideout kitchenette type of thing out of the rear panel. The kitchette can drop down or slide out. It wouldn't be that deep but with the door offset to the side, it can be wide and tall. Have the rear panel drop as a support table to the slideout kitchen. Then you can also have another table slide out from between the drop panel and kitchen and that can be your table top. This would help you load the camper before the trip easier as well without completely opening the camper. You gain interior room when you use a slide out, and if the weather is really bad, you can enclose the kitchea area easily with canvas attached to the back end of the camper and around the table.

Since the bed is up front, you'll need access to under the head from the sides. It is difficult to tilt the bed upward enough to gain access to under the head of the bed.
Depending on the bedding material, you can tilt only half the bed to gain access to storage underneath. Keep this in line with the wheelwells. In front of the wells, you gain access through the sides. Have sliding trays come out from underneath and have swivel standing pegs drop to maintain stability to use 2 hands to load and unload cargo.

As for the pop-top, have your walls high enough so that you can sit up on the bed in a location where you can read, sit and watch tv, whatever. Do it at home to see how high you need to be to sit comfortably at the head of the bed.
If the walls are tall enough, and you don't want a too steep an angle of the roof, add another pop-top to the roof going the other way. It will only need to be long enough to give you the standing room you need at the base of the bed. IIRC Aliner has something like this.

For the hinges (piano) of the rear and side panels, look at keeping them on the subframe of the roof. This way, you can have the weight of the combined roof provide a seal along the mating surface of the panels and the piano hinges are sealed with being under the roof. To add, when the panels are folded up, they are out of the way against the ceiling. The piano hinge itself can provide sealing capabilities as well not only when roof is up but as well as down. Figure the hinge faces would be against sealing faces of the other panels. To hold the roof up with the flip down sides still secured up against the ceiling, add popup rods in the rear corners. This will support the loading and unloading of the camper before and after trips without using the side panels. This will support the process to drop the sides from the ceiling and securing to the base side panels as well. Though with the proper coiled hinge, I don't think you'll need the rods. Those vehicle hood hinges keep the hood up pretty well IIRC on the vehicles.

PostPosted: Fri Jan 01, 2010 7:27 pm
by starleen2
The only problem with the auto style hood springs are the side walls. A folding wall WILL get in the way of the springs. If they are mounted at the rear on the inside, then you can’t fold up (or down a wall) And kind of lifting mechanism will have to be external when you folding up two full walls. Look closely at the A-liner above – it’s rear hinge pivot is on the outside. That’s where your spring would have to be mounted. Sorry - you can’t hide the springs in cabinetry – how would you fold up the side wall with out notching out for cabinets?

PostPosted: Fri Jan 01, 2010 7:31 pm
by Ageless
If you mounted the spring hinges slightly inboard; that thin wedge section would clear when folded

PostPosted: Fri Jan 01, 2010 8:10 pm
by navigator
Mike, good thoughts...

Not sure which version you were referring to, probably the second one with the high part to front? Door on the side?

Here's a look with a scootched over rear door and a rear slideout galley, and outside under-bed storage access. There is galley space also above the slideout part, with a lift up lid:

Image

I like the idea of it being easy to cover with an awning. I see the pullout having a wall mount faucet recessed into the right side, with a panel that drops dow to support the tub... 8)

Note also the roof now has a curve to it, providing drainage when closed and a touch more headroom when open. (And a bit more style...)

The hinge I have in mind could just be a piano type, but a hurricane hinge may be better. The hinge point is outside, but there is a zero possiblity of water getting inside since it is below the level of the inside wall. It attaches to the rear of the roof, and a block secured to the body, right there at the junction of beige and green:

Image

PostPosted: Mon Jan 04, 2010 11:31 am
by jagular7
navigator wrote:.....snip.....
Image

I like the idea of it being easy to cover with an awning. I see the pullout having a wall mount faucet recessed into the right side, with a panel that drops dow to support the tub... 8)

Note also the roof now has a curve to it, providing drainage when closed and a touch more headroom when open. (And a bit more style...)
.....snip.....


The roof looks really pleasing now. However, if you wanted to keep it flat, look at a full size long bed pickup bed tonneau cover. Unless the width of the camper is wider than the top.....You can pick these up rather cheap on your local CL.

The hinge idea is something I thought about myself but haven't looked too deeply into it. Same for the tonneau cover.
Since my camping may involve 3 people, I also thought about having the tonneau cover flip off in the middle and flip open with a soft top providing a sleep loft. It would be similar to that of Flip Pac. Only use as necessary.

For the above pic, make the drop panel having an additional sliding top with flip down stand legs. That way you have table/counter top space to layout what you need. There are some sliders in the market that can support a given weight hanging out. But with stands, you won't have to worry about making the foundation/base of the sliders to handle the weight as well.

PostPosted: Tue Jan 05, 2010 10:25 am
by Prem
Love it. Very effective use of space.

No pun intended, but that is "thinking outside the box." (Especially the door on the front off set.) :thumbsup:

If you put in a clear skylight, that vaulted ceiling will really give the feel of spaciousness in a very small space.

Prem

PostPosted: Mon Jan 11, 2010 1:52 am
by navigator
Looks like the best use of space, and the best weight distribution, is putting the high end up front and having the door on the side. Still sketchuping...

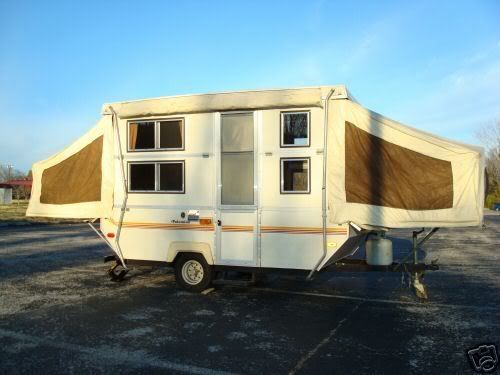
I suppose a quicker way to build would be to modify a Palomino hardside popup, and put walls on the ends instead of beds and canvas:

Image

(Note use of external supports.)