

Mike...
Teardrops n Tiny Travel Trailersor t n ttt for short (tnttt.com) |
![]() by mikeschn » Sat Jul 31, 2004 4:16 pm
by mikeschn » Sat Jul 31, 2004 4:16 pm
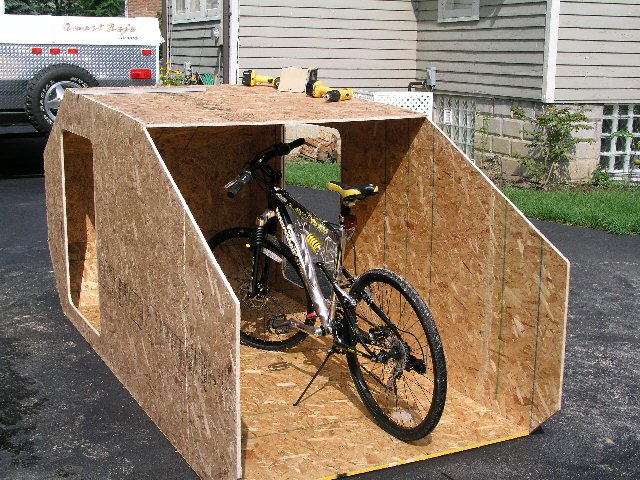
Shrug53 wrote:You gotta be kidding me! How do you work so fast? Looks good. What do you use to cut out your doors?


![]() by Steve Frederick » Sat Jul 31, 2004 5:48 pm
by Steve Frederick » Sat Jul 31, 2004 5:48 pm


![]() by mikeschn » Sat Jul 31, 2004 6:18 pm
by mikeschn » Sat Jul 31, 2004 6:18 pm
 This one definitely calls for 3/4" moisture resistant luan. :salut:
![]() by mikeschn » Sat Jul 31, 2004 6:51 pm
by mikeschn » Sat Jul 31, 2004 6:51 pm
![]() by RC » Sat Jul 31, 2004 7:23 pm
by RC » Sat Jul 31, 2004 7:23 pm
mikeschn wrote:Shrug53 wrote:You gotta be kidding me! How do you work so fast? Looks good. What do you use to cut out your doors?
Just a circular saw and a jig saw.
Mike...
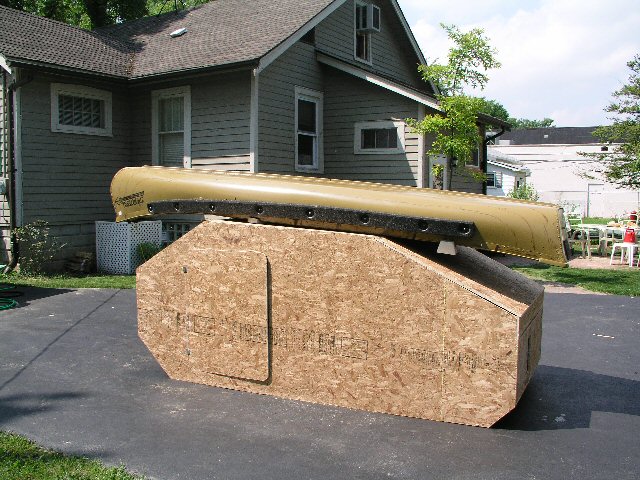
P.S. So do you agree with me, that this design body can be built in a weekend?
Weekend 1) Assemble trailer
Weekend 2) Build body
Weekend 3) Paint and go camping

![]() by mikeschn » Sat Jul 31, 2004 7:29 pm
by mikeschn » Sat Jul 31, 2004 7:29 pm
![]() by mikeschn » Sat Jul 31, 2004 7:38 pm
by mikeschn » Sat Jul 31, 2004 7:38 pm
![]() by mikeschn » Sat Jul 31, 2004 7:44 pm
by mikeschn » Sat Jul 31, 2004 7:44 pm
![]() by Chip » Sat Jul 31, 2004 9:03 pm
by Chip » Sat Jul 31, 2004 9:03 pm


![]() by Larry Messaros » Sat Jul 31, 2004 9:37 pm
by Larry Messaros » Sat Jul 31, 2004 9:37 pm
mikeschn wrote:As for the screws, apparently I am confused. I thought it was the confirmat screws
http://www.rockler.com/findit.cfm?page=652&sid=AFD15
but now I am reading that's for particle board.
So I guess I would go with a drywall screw, make sure it's long enough for the job, and predrill both the pilot and the clearance holes. You don't want to split the plywood any more that you have to. And stay away from the edges too. I probably wouldn't get any closer than 3" away from the edge.
Is anyone here an expert on plywood? What can you tell us? Ross, how about you? Steve? Anyone?
Mike...


![]() by DANL » Sat Jul 31, 2004 11:55 pm
by DANL » Sat Jul 31, 2004 11:55 pm

![]() by mikeschn » Sun Aug 01, 2004 5:19 am
by mikeschn » Sun Aug 01, 2004 5:19 am
![]() by Steve Frederick » Sun Aug 01, 2004 3:05 pm
by Steve Frederick » Sun Aug 01, 2004 3:05 pm
. Worth it for us, we love camping in the fall when it is cooler, even early winter.
![]() by Frank » Sun Aug 01, 2004 4:16 pm
by Frank » Sun Aug 01, 2004 4:16 pm
 Will have more faith next time! Course you are a bit younger and it is a lot cooler up there. Down here you have to stop every 15 min for a 30 min cool down.

Users browsing this forum: No registered users and 1 guest