Ready To Start The Northwoods

Did you just design your very own teardrop or tiny trailer? Want to discuss it? Here's the place to post your design for discussion!

Postby toypusher » Mon Apr 16, 2007 5:37 am

Greg,

Do you have a drawing that you could post to let us see what you have plannned?? If you have a hand drawn one, just take a pic and post that.
User avatar
toypusher
Site Admin
 
Posts: 43040
Images: 324
Joined: Fri Jan 28, 2005 12:21 pm
Location: York, PA Area

The Plan

Postby Bigwoods » Tue Apr 17, 2007 12:45 am

Kerry,

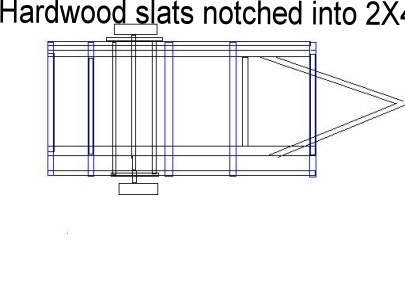
I am going to use 2X4 siderail 8' long to run the length of the trailer. They are supported very well in the rear by the angle iron above the widened springs. I am going to bolt the 2X4 through the holes that are in the angle iron.

My concern is the front of the 2X4s, by the tounge. We were going to weld steel supports to hold the front of the siderails, but decided to just notch the siderails, which sit a little higher than the frame, and have several "slats" across the trailer. The slats will be some hardwood I have laying around. Plywood will be across the slats to hold it together and bolted to the frame.

I think this will work as you only have 6" of floor extending past the frame. The frame supports all the weight.

The walls and the siderails will ride inside the angle iron. so the walls will hide the 2X4s. I hope to have some nice fenders to hide the exposed angle iron.

Originally the guy helping me thought we should run 2X4s across the frame for support, but if the base of the walls run parallel to the siderails I would be cutting more height away fron the interior.

I hope this is clear as mud. I will try to do a better drawing of the plans.

Image
Greg in Northern Minnesota

Image

Image
User avatar
Bigwoods
500 Club
 
Posts: 602
Images: 104
Joined: Thu May 27, 2004 10:45 pm
Location: Northern Minnesota

Brainstorm!

Postby Bigwoods » Tue Apr 17, 2007 12:52 am

I just realized that I was worried about the front corner supporting the weight. I could stick a piece of angle iron in the front corner and drill a hole in it the use the existing bolt on the bottom of the rail.

That would support the front of the siderail without welding or drilling any holes in the frame. I think that will work, but I'm tired and maybe not thinking clearly.
Greg in Northern Minnesota

Image

Image
User avatar
Bigwoods
500 Club
 
Posts: 602
Images: 104
Joined: Thu May 27, 2004 10:45 pm
Location: Northern Minnesota
Top

Re: Brainstorm!

Postby toypusher » Tue Apr 17, 2007 3:09 pm

Bigwoods wrote:I just realized that I was worried about the front corner supporting the weight. I could stick a piece of angle iron in the front corner and drill a hole in it the use the existing bolt on the bottom of the rail.

That would support the front of the siderail without welding or drilling any holes in the frame. I think that will work, but I'm tired and maybe not thinking clearly.


I think that this is the right direction. Are you running the angle all the way across the width of the frame and the extended part. That's how I interpreted what you said and think that would be more than sufficient to support your siderails. All of this will become a single unit when the entire box of the teardrop is put together. I would put some support under all four corners until you get most of it built. I had jackstands under mine until I was ready to pull it out of the garage for the first time. I was 99.99% percent complete before I removed the jackstands.
User avatar
toypusher
Site Admin
 
Posts: 43040
Images: 324
Joined: Fri Jan 28, 2005 12:21 pm
Location: York, PA Area
Top

Progress Continues

Postby Bigwoods » Mon Apr 23, 2007 11:43 pm

I'm still at it making some progress. The floor is nearly done, with some more trimming to do and more evil black stuff. On, thats nasty..

This is the floor before applying the plywood to make the floor.

Image

I took the support for the roller wheels that come with a Harbor Freight trailer. A little cutting and some paint and it bolted up just right. The 3/4" gap will carry the side walls.

Image

This is a close up of the support. It should work very nicely. I'll have to figure how to hide it if I decide it is needed.


Image
Greg in Northern Minnesota

Image

Image
User avatar
Bigwoods
500 Club
 
Posts: 602
Images: 104
Joined: Thu May 27, 2004 10:45 pm
Location: Northern Minnesota
Top

Postby mikeschn » Wed Apr 25, 2007 3:28 am

Looking good Greg,

You're off to a good start! Keep the pictures coming. Like MJ said, no pressure. :twisted:

Mike...

P.S. You got more pictures yet? :? :lol:
The quality is remembered long after the price is forgotten, so build your teardrop with the best materials...
User avatar
mikeschn
Site Admin
 
Posts: 19202
Images: 479
Joined: Tue Apr 13, 2004 11:01 am
Location: MI
Top

"Hillbilly Outfit"

Postby Bigwoods » Sun Apr 29, 2007 10:18 am

"Hillbilly Outfit" That what Mrs. Bigwoods said when she saw the evil black goo I had spead around on the underside of the frame. The floor is just about done and one wall cut out. I have to work today, but hope to have the walls up for a photo tomorrow.

I want to get a picture of the walls in place and some really neat fenders before I disassemble and get the galley and bulkheads in place.

Making progress and trying for Minden!
Greg in Northern Minnesota

Image

Image
User avatar
Bigwoods
500 Club
 
Posts: 602
Images: 104
Joined: Thu May 27, 2004 10:45 pm
Location: Northern Minnesota
Top

Postby cjm » Mon Apr 30, 2007 10:54 am

can you take some pictures of your axle mod.....maybe some close ups, It really is looking good!!!!

cjm
cjm
Teardrop Builder
 
Posts: 26
Joined: Sat Apr 30, 2005 1:28 am
Location: stockton, ca
Top

Axle

Postby Bigwoods » Mon Apr 30, 2007 11:49 pm

I climbed under the trailer but couldn't get a good picture with definition. The axle has been painted black top and bottom. It was really quite straight forward. We widened the axle carriers to 59 1/2 inches. Not sure that was the plan, but that is how it ended. The channel carries the axle and we call it a carriage.

The axle was cut in half. The Harbor Freight axle is U shaped with the opening on the bottom. We found a 1 1/4 steel rod. Probably an old axle for a car. It fits perfectly in the U. We ran it most all the way across the axle, inside the U and after clamping it was welded in the full length. We fabricated a piece of steel like a U and filled in the that gap. That was welded in also.

I will try to get some more light on the subject and get a photo. I finished the floor today, but ran into a snag as an antique belt sand blew up on me as I was shaping the profile. Injuries were minor burns Scared the bejeebers out of me. Photos to come.


Since I have started the project I have junked two Craftsman drills and now the sander. Getting tired of worn out tools.
Greg in Northern Minnesota

Image

Image
User avatar
Bigwoods
500 Club
 
Posts: 602
Images: 104
Joined: Thu May 27, 2004 10:45 pm
Location: Northern Minnesota
Top

Previous

Return to Member Designs

Who is online

Users browsing this forum: No registered users and 14 guests