A-Frame Pop Up

Did you just design your very own teardrop or tiny trailer? Want to discuss it? Here's the place to post your design for discussion!

easier yet

Postby jml79 » Mon Sep 22, 2008 3:23 pm

I don't think that you would even have to lock the rear roof in place, the 2 sections would support each other if they were grooved together at the top. If I have a few minutes later tonight I will try and draw a sketch of what I mean and you can let me know what you think.
jml79
Teardrop Builder
 
Posts: 30
Images: 7
Joined: Fri Aug 17, 2007 7:52 pm
Location: Ontario, Canada

Pics

Postby jml79 » Mon Sep 22, 2008 11:24 pm

Here are some quick drawings.

Image


Image

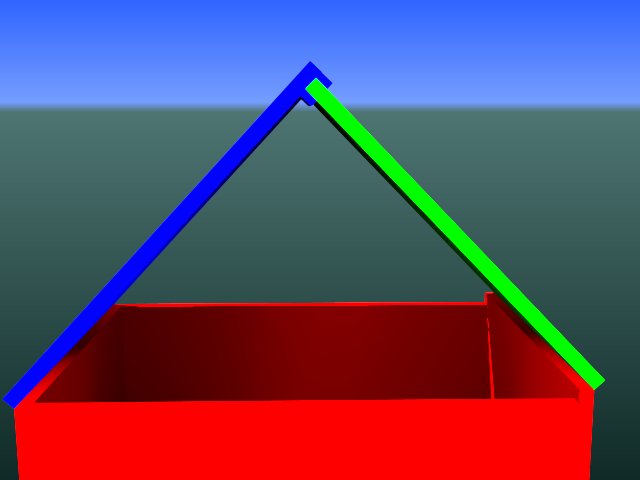
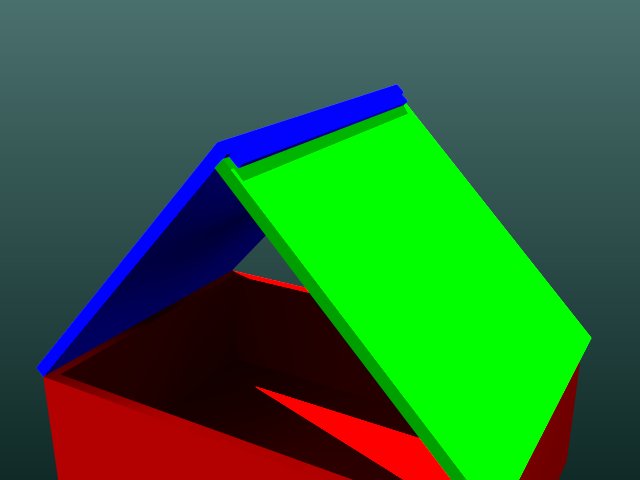
When I was drawing it I realized that one end would have to be offset by the panel thickness in order to allow the whole thing to close flat. I then decided to make the grooves not quite full width and then put the groove panel on the bottom when closed. This allowed for a smaller offset over all but you would have to swing the green panel up a little higher during setup and then swing the blue panel out from under and then on top. I thought it was a small price to pay to reduce the offset. Just my opinion. Let me know what you think.
jml79
Teardrop Builder
 
Posts: 30
Images: 7
Joined: Fri Aug 17, 2007 7:52 pm
Location: Ontario, Canada

Postby bgordon » Tue Sep 23, 2008 2:43 am

Hi,

Interesting thread!

By the way, you won't even need the groove if your gas springs are correctly installed and at the the right strength (pressure). The roof will stay upright.
Barrie

Keep moving forward.
Psalm 1:1-3.

Build Journal: bgordon's 5 week cardboard & fiberglass build
http://www.tnttt.com/viewtopic.php?f=50&t=38781
User avatar
bgordon
Teardrop Master
 
Posts: 299
Images: 122
Joined: Tue Apr 24, 2007 6:45 am
Location: Johannesburg, South-Africa
Top

I agree

Postby jml79 » Wed Sep 24, 2008 11:38 am

I agree that you could do that as well, I prefer tying the structure together mainly because I live in Canada and have had snow on my roof and camped in very strong winds and would just like the security of knowing that there is that little bit of extra strength. However, I wouldn't likely use gas struts as I hate them. JMHO.
jml79
Teardrop Builder
 
Posts: 30
Images: 7
Joined: Fri Aug 17, 2007 7:52 pm
Location: Ontario, Canada
Top

Postby Fuzzy Bear » Wed Sep 24, 2008 12:13 pm

I agree that the 2 roof halves should be tied together somehow, not quite sure of the mechanics I will use yet. My biggest concern is high winds. I'm thinking of allowing the 2 halves to work independently while being raised, then some type of interlocking setup when fully raised.

As for the gas struts, I'm first going to try to utilize the existing lift arms, if that won't work then I'll have little choice but to go with the gas struts. While I am going to try to lighten the framing as much as possible on the side walls, I will make sure they are still strong enough to handle the roof load, even if only for long enough to brace it in a catastrophic failure.

Spent last weekend camping in the old tent, but hope to get back to work on the project this weekend.
Fuzzy Bear
Teardrop Inspector
 
Posts: 22
Joined: Thu Jul 10, 2008 9:14 am
Location: CT
Top

Postby Fuzzy Bear » Tue Oct 14, 2008 2:07 pm

Well, after a couple of weeks with no progress finally got back to work on my build last Saturday. Finished up the rear roof section as far as framed and skinned. Installed a plexiglass skylight by mortising it into the framing and gluing and screwing it in place, then overlapped the outside skin by 1 1/2" around the perimeter. Just need to trim it out and caulk it. Ran an 8" wide band of plywood around the 2 sides of the roof that will overlap the box when closed to form a tighter seal. Plan to run aluminum angle around the outside of the roof for more strength and to cover the seam. Will be removing the old roof soon to give myself more room to work and hope to start on the front roof this coming weekend. Going slower than I had hoped but at least its showing some progress. Have updated my build diary and will post some new pictures to my web site ( www.aframecamper.homestead.com ) in the next day or two of the latest progress.
Fuzzy Bear
Teardrop Inspector
 
Posts: 22
Joined: Thu Jul 10, 2008 9:14 am
Location: CT
Top

Postby highlandercj-7 » Tue Dec 16, 2008 6:28 pm

Do you have a ALiner dealer near by? IF so take a look at one of them and you can get all the inspiration you need. They do a good job on there a frames.
highlandercj-7
Teardrop Inspector
 
Posts: 15
Joined: Sat Jul 28, 2007 10:34 am
Top

Postby Fuzzy Bear » Wed Dec 17, 2008 4:30 pm

No A-liner dealers in this area. Nearest one dosen't stock them but orders them as needed.

Winter hit earlier than my time frame had hoped for so for now I'm stalled. Hoping to get through the holidays, then with a few lucky breaks on the weather hope to get a bit more done before spring. Then once the nicer weather gets here, I'll get back to the building. If I can get a few weekends with decent weather I can get it to the point of being able to use it then finish up as I go. The entire build has taken a lot longer than I originally estimated, but I'm not too worried about it, its one of those projects that the fun is in the doing, having a nice camper when I'm finished is the icing on the cake.

Keep watching here and my build web site to see if we get some sun and work done over the next few months and thanks for all the encouragement.
Fuzzy Bear
Teardrop Inspector
 
Posts: 22
Joined: Thu Jul 10, 2008 9:14 am
Location: CT
Top

Postby Fuzzy Bear » Fri Mar 20, 2009 2:53 pm

Haven't visited here in a while, but I got such good friendly advice I wanted to check back in as hopefully I am able to get back to work on my A-Frame build. Hopefully winter here in the Northeast is pretty much behind us. Its the first day of spring though and woke up to snow flurries this morning. But according the the weatherman, the weekend is supposed to be nice enough for me to uncover the trailer for the first time in months and get back to work on it. Was a tough winter pulling into the driveway every day and seeing it covered in snow, knowing it was just waiting for me to get back to work. I'll be updating my web site as soon as I start to progress again.
Fuzzy Bear
Teardrop Inspector
 
Posts: 22
Joined: Thu Jul 10, 2008 9:14 am
Location: CT
Top

Postby Fuzzy Bear » Fri Jun 05, 2009 10:42 am

Well, summer has finally arrived here in New England, though the spring rains seem to have found a permanent home. Not much progress over the winter, but have gotten in a couple of days of building in recent months. The rear roof section is just about complete with framing, skinned, skylight and lift mechanism all in place. Am waiting to paint until the front section is done. Was able to jury rig a "garage" for the build using a 10X10 EZ up canopy and tarps for side walls which makes things a bit easier but still seems like too much to do and not enough time. I've rethought my timeline and my new one is whenever I get it done. I've recently updated the diary and pictures on my web site www.aframecamper.homestead.com

Was able to use the existing spring assisted lift arm on the rear roof, when its lifted fully into place and locked it holds the roof just fine. The spring assist is heavy enough that I can literally lift the roof into place with 1 finger. The front lift because of the way its hinged at the pivot point I am not sure will work. Need to get the front roof section completed and opened fully to see if I can make it work, otherwise its gas shocks for there. On the rear I will cut down the lift arm so it dosen't stick up so far. Moved a bit farther on the front framing after this pic was taken and have framed in for 2 14"x14" operable roof vents. Still a lot of fun working on the build, now just have to find the time and the extra $ for the materials. I'll continue to post and update the web site as I get farther along.

Image
Fuzzy Bear
Teardrop Inspector
 
Posts: 22
Joined: Thu Jul 10, 2008 9:14 am
Location: CT
Top

Postby goldcoop » Fri Jun 05, 2009 3:51 pm

Fuzzy-

The Aliner I'm working on uses torsion springs (you'll need a pair 1 right & 1 left) like these to lift the roof:

http://shop.easternmarine.com/index.cfm ... goryID=303

1 leg goes into a hole the front wall vertically & the other leg attaches to the inside of the roof frame.

Cheers,

Coop
User avatar
goldcoop
Silver Donating Member
 
Posts: 1276
Images: 32
Joined: Mon Jul 04, 2005 8:02 pm
Location: Lewisburg, PA
Top

Postby Fuzzy Bear » Mon Jun 08, 2009 3:21 pm

Thanks for the link. I may look into these if the plans I have don't work out. I was able to utilize the existing lift arms for the rear roof, but in working on it yesterday I snapped off one of the front arms. Probably just as well as it must have been weakened so better now than in a campground somewhere. I'm going to pick up a hydraulic lift arm this week to see how that will work for the front roof section.

Took the "garage" off this weekend so I could open it all the way up. The pics below gives a better idea of what the project will look like set up someday.

Image Image
Fuzzy Bear
Teardrop Inspector
 
Posts: 22
Joined: Thu Jul 10, 2008 9:14 am
Location: CT
Top

Postby jml79 » Mon Aug 03, 2009 10:56 pm

Wow, I haven't been around here for a while. Great to see this build is progressing. I can't wait to see it finished.
jml79
Teardrop Builder
 
Posts: 30
Images: 7
Joined: Fri Aug 17, 2007 7:52 pm
Location: Ontario, Canada
Top

Postby Fuzzy Bear » Tue Aug 04, 2009 1:37 pm

Its progressing slowly but surely. Don't get a lot of time to do a lot of work, but when I do it always refreshes me. Right now I'm aiming to have it ready for the 2010 camping season. I'm not rushing since my tow vehicle has had some issues and it will be a while before I can afford to get another one.

I have moved a bit more forward, the front roof section is almost done, I have it sheathed and installed an operable roof vent that I got off of e-bay for a bargain price of under $30 including shipping, brand new in the box. Last weekend I began framing up the street side wall. Trying to figure out how I am going to do the windows. Was hoping to use the old vinyl ones off the canvas but not sure yet if I can fit them in. Otherwise I am considering using the same as I did for the skylight and put in plexi into a sliding track then covered with screening. If we actually get a weekend without rain I may get a bit more done this weekend. The tenting worked out great for adverse weather until I got to the point of having to open the roofs to work on them now, the peak height is around 8' when opened off the floor of the box, so now I have to remove the tent to open it. I'll keep updating here and on my web site as I move along. .

Image Image Image
Fuzzy Bear
Teardrop Inspector
 
Posts: 22
Joined: Thu Jul 10, 2008 9:14 am
Location: CT
Top

Postby rebapuck » Tue Aug 04, 2009 7:52 pm

Keep plugging away. You'll get there.
Judy
1966 VW camper
1967 VW singlecab
Image
User avatar
rebapuck
.
 
Posts: 2243
Images: 1
Joined: Thu May 14, 2009 1:55 pm
Location: Chapel Hill NC
Top

PreviousNext

Return to Member Designs

Who is online

Users browsing this forum: No registered users and 7 guests