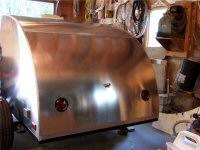
xrover wrote:Wow, that looks great. Any chance of posting some plans up?
Thanks
I wouldn't know how to plan this. I just made a compass out of a stick, a screw and drilled a hole for the pencil. I reamed the hole until I could get the pencil in tight.
Then made an arc. Then drew straight lines from the arc back to the radius center point such that I had 2 lines @ 90 deg.
Next I measured about 4" on both straight lines back from the arc. Drew a line across those 2 points (this is just because I wanted to conserve wood)

Then extend the ends of the arc (red) to compensate for the thickness of the wood.
Cut out the perimeter of combined yellow/red area. Then made 2 more copies of this piece.
To put it together you'll have 1 piece with both red areas, 1 piece with 1 red area and 1 piece with no red areas. I wanted the *inside* measurements of this structure to represent the plug (plaster doesn't stick to the wood edges well).
Then glue it together with polyurethane glue - holding the angles at 90deg with 3 picture frame clamps. (the clamps will be on the curved side - worked with my 24" radius however if your radius is small, I don't know if they will work)
Then I cut more arcs and made a lattice. I was not careful at all - didn't care about making anything straight. Just need fill in space and be strong enough to hold the plaster.
Then I took that 'weed stop' cloth and cut out pieces to cover the individual areas and used hot glue to fix them. I pressed the cloth and hot glue down to get it flat.
After that I bought some pine 1/4" x 1/2" trim from lowes, soaked and bent it to go around the edge.
Then start plastering. I used one of the side board scrap pieces with the arc as a gage . It takes many coats to get it to the right level and I didn't want it to collapse by putting it on too thick.
Once I got it to within 1/4" (3rd picture), I took it outside in the 20 deg weather and sanded all the extruding bumps off - enough so I could use a curved spatula on it. I used a (
http://www.harborfreight.com/cpi/ctaf/displayitem.taf?Itemnumber=95020) palm sander with 25 grit paper at this point. I had to repeat this process several times.
Then I made a curved 'spatual' out of a foot long piece of .25" luan - the curve being the concave arc of the plug. I started thinning out the plaster of paris more to the consistancy of a thin milk shake to fill the voids. And sanded the extruding bumps off in-between.
The final stage I had it built up to the right level but there will small pin holes and small voids. At this point I thinned out the plaster of paris to almost like whole-milk and poured it on a section of the plug and sqeegeed it off with a plastic 1.5" wide bondo spreader. Note: I squeegeed it ALL off ( i was not trying to add any more material just fill the small holes.) I wet sanded in-between passes. I had to repeat this process several times.
That's as far as I am. I'm not a professional. I did this only once before when I was a teenager. So we'll see how it goes.


