Our Take on the Sheep Wagon

Did you just design your very own teardrop or tiny trailer? Want to discuss it? Here's the place to post your design for discussion!

Our Take on the Sheep Wagon

Postby Dusty82 » Mon Jan 03, 2011 5:06 pm

Well, never say never.

I’m in the process of acquiring a full-sized Ford Econoline van from a friend of mine, so our excuses for not building a sheep wagon have just flown out the window. We’ll soon be the owners of a 1980 Ford Econoline Superwagon with a 460 cu in (7.5L) V-8 and C-6 automatic transmission. This thing has been highly modified for towing, and will tow well over 9000lbs. I don’t think I could build a sheep wagon that heavy, so we should be fine.

I already have a travel trailer frame just begging to be worked on. It came from a 70’s Kenskill travel trailer that was in such bad condition it couldn’t be salvaged. It features dual tandem axles with brakes. I have already arranged to take it over to this friend’s house and sandblasting and painting it there. I had originally planned on turning the frame into a flatbed utility trailer, but with the van coming, DW has tactfully hinted (ok, flat out stated) that a sheep wagon is in our future.

I don’t know if this still qualifies as a tiny travel trailer or not as the overall length of the body will be 14 feet. We debated a canvas roof vs. making it a woodie roof, vs. a sandwich type roof, and settled on the latter. More on that later.

Here are a few pictures of our take on a classic sheep wagon, modified to fit our Kenskill travel trailer frame. Please keep in mind that this design isn’t finished. I plan on adding a boot box to the rear end of it, and adding small boot boxes to the sides, to the front and rear of the wheels. I figure I’m about 75% finished with the design.

The Street Side:

Image

The Curb Side:

Image

We already have the wood stove, and at 14 inches wide, 30 inches tall, and 28 inches long, it’ll be a perfect fit.

Here’s the Under Bed Cabinet arrangement, which has a hidden surprise:

Image

And a shot of the same cabinet arrangement from below:

Image

You can see the fixed casters on the bottom of a couple of framed platforms. Those platforms roll out from under the bed like drawers to give access to the storage space below.

The Hidden Surprise:

Image

The false door front on the right side pulls out to give access to the hidden cassette toilet for those late-night calls of nature. These roll-outs are drawn to be 30 inches deep, but the roll-out on the left can be as deep as 60 inches, depending on what we decide to do with it.

I plan on using conventional framing for the sides of the lower box – 1 ½ X 1 ½ studs and top and bottom plates. The exterior of the lower box, and the bench platform will be made of ¾ inch ACX plywood. The front and rear walls will be framed with 2X4 dimensional lumber for a bit of added strength. The roof bows will be made of 1 ½ inch framing. The interior will be sheathed with 1/8-inch Luan, and the exterior will be sheathed with ¼ inch ACX. The roof will be of corrugated tin roofing panels for that rustic look. Of course the entire thing will be insulated to within an inch of its life.

We plan on making interior bows of hardwood (we haven’t decided which species yet) to give it an exposed-beam look. Some of the interior will be painted, and some will be finished wood. We haven’t decided on interior colors yet, but she wants the outside painted blue – her favorite color.

The picture window over the bed will be a transom window, hinged from the top, to give us an emergency exit should we need it. There will be a boot box beneath the window to act as a step to get out of the trailer in an emergency as well as to give us more outside storage.

That’s as far as I’ve gotten as of this morning. I plan on adding some cabinets to the street side interior. The exterior boot box on the curb side will hold a pair of deep-cycle batteries to give us 12 volt power, and I’m considering a fresh water tank on that side to counter-balance the weight of the wood stove, but I haven’t decided on that yet.

The original travel trailer had a fresh water tank under the bench that ran along the front wall, so the chassis was set up to haul that weight up front. I don’t think I’ll need to change the axle placement at all for this build, but I’m open to any and all input on that or anything else.

The hardest part of this whole thing will be waiting until spring to get started on it. I won’t be able to even start sandblasting the frame until this spring. The whole build will take place outside, and it’s just to ding-donged cold out there to do much of anything.

So that’s where I am so far. I eagerly welcome any comments, suggestions, complaints, pats on the… back, or demands for payment. I’ve never designed a trailer before, so I’m learning as I go. I’ll happily send a copy of my Sketch Up SKP file to fellow users for review (I know that I made a couple of mistakes in the drawing, but I can easily fix those mistakes when the time comes to make sawdust) and I welcome any design changes that will help this become reality. If anyone needs a better picture of any part of the design, just let me know and I’ll make it so.

Thanks in advance for any comments or suggestions!
TV: 2004 Jeep Liberty Sport

Currently stuck in a tent.
User avatar
Dusty82
The 300 Club
 
Posts: 313
Joined: Thu Jan 28, 2010 8:15 pm
Location: Southern Oregon

Postby Steve_Cox » Mon Jan 03, 2011 5:15 pm

Can't wait for the building to begin :thumbsup:
Steve
User avatar
Steve_Cox
4000 Club
4000 Club
 
Posts: 4903
Images: 196
Joined: Sun Apr 03, 2005 8:46 am
Location: Albuquerque New Mexico

Postby Shadow Catcher » Mon Jan 03, 2011 7:36 pm

I remember some one posting a link to a modern sheep camp wagon, far more advanced than the ones I remember seeing way too many years ago in Utah. I will be keeping track of this build. :thumbsup:
User avatar
Shadow Catcher
Donating Member
 
Posts: 5993
Images: 234
Joined: Sat Apr 11, 2009 8:26 pm
Location: Metamora, OH
Top

Postby Dusty82 » Mon Jan 03, 2011 9:36 pm

I've bookmarked so many links to websites about sheep wagons and vardos I don't remember which is what. I've seen everything from dilapidated and restored original wagons to freshly built modern interpretations. My head is still spinning, I tell ya!

I may be able to get some individual components done before spring, but I won't really be able to start on it until this spring. It was 19 degrees in our front yard this morning (it's supposed to be 12 tomorrow,) and things like paint and glue just don't like it that cold. Come to think of it, I'm not much of a fan of it myself.
TV: 2004 Jeep Liberty Sport

Currently stuck in a tent.
User avatar
Dusty82
The 300 Club
 
Posts: 313
Joined: Thu Jan 28, 2010 8:15 pm
Location: Southern Oregon
Top

Postby High Desert » Mon Jan 03, 2011 9:51 pm

Looks like a great plan :thumbsup: . I'll be another one watching this build with intrest!
Shaun

"it's not the years honey, it's the mileage"
High Desert
Platinum Donating Member
 
Posts: 8780
Images: 27
Joined: Wed Apr 08, 2009 1:46 pm
Location: SW Washington state
Top

Postby S. Heisley » Mon Jan 03, 2011 10:03 pm

Cool, cool, cool! :thumbsup:
User avatar
S. Heisley
Super Lifetime Member
 
Posts: 8772
Images: 495
Joined: Mon Sep 17, 2007 10:02 am
Location: No. California
Top

Postby droid_ca » Mon Jan 03, 2011 10:36 pm

this seems like you have some good ideas can't wait to see what other goodies you have to show us
There is a world, just beyond now,
where reality runs a razor thin seam between fact and possibility;

Anywhere I roam where I lay my head is home....
Image
“Fide Canem”
Please check out my build thread
viewtopic.php?f=5&t=52816
User avatar
droid_ca
Donating Member
 
Posts: 1981
Images: 176
Joined: Thu Sep 30, 2010 5:08 am
Location: Prince George BC Canada
Top

Postby Dusty82 » Sun Jan 09, 2011 3:41 am

Time for an update. Here's an oblique shot from the curb side front.

Image

As you can see I've run the ceiling sheathing all the way from front to rear and added the roof framing. I've also trimmed the front frame crossmember and added boot boxes to the sides. The area between the boot boxes is where the wheels are - I just haven't added the suspension to the trailer frame in the drawing yet. The boot boxes will act as fenders by themselves, but I'm still debating on adding normal steel tandem axle fenders just to keep the mud, yuck, and flying debris from messing up the rear-most boot boxes. The front box opposite the wood stove will house a pair of batteries and the two rear boxes may house propane tanks, depending on how elaborate a galley arrangement DW wants. All of them will have the proper venting, of course.

Here's an oblique shot from the curb side rear.

Image

I added bracing to the frame and a large boot box to the rear of the body. The boot not only adds storage, but will also act as a step. The window is a transom window, hinged from the top, to provide an emergency exit should we need it. Our thinking is that we can open the window, crawl out onto the boot lid, and hop off from there.

Just to prove that there's nothing to be ashamed of on the other side, here's the street side front from beneath.

Image

The angle brackets that stiffen the joint between the lower side and the bench platform will be made from 1/8 inch thick, 1 1/2 inch wide steel and painted flat black to look more like wrought iron. There will be a diagonal brace running from the bottom of the vertical piece of the angle bracket to the end of the horizontal piece. I haven't drawn it in yet because I haven't decided what kind of brace I want yet.

Overall, I think I'm about 90% finished with the drawing. I need to add a metal ceiling and roof panel that the stove pipe will go through, a Dutch door, the front sheathing, the roof sheathing, and another cabinet or two inside. I also need to add the suspension and the jack to the trailer frame.

I've been reading a lot about first-time builders over-engineering and over-building their first builds. I've gone pretty thin on the floor. I'll put 3/4 inch poplar over the metal frame, add a 1/4 inch ACX plywood exterior skin, add 3/4 inch poplar floor framing and insulation, then go with a 5/8 inch ACX plywood floor. The floor area under the wood stove will be aluminum sheet. The whole underside of the floor will get a good coat of goop to keep the water out.

The wall framing will be 1 1/2 X 1 1/2 kiln dried fir, the interior ceiling and exterior roof sheathing will be 1/8 inch luan. We're still deciding whether we want to go with flat sheet metal or corrugated tin for the roof's exterior. Both have advantages and disadvantages. I'm still deciding how I want to build the top bows. The front and rear walls will be framed in 2X4 kiln dried fir for added strength, so I know I'll have to piece the end roof bows together then cut them to shape. I'm debating on whether to go with 1 1/2 square fir to piece together the other top bows, or laminate 1/4 inch thick strips of poplar in the proper shape. Either way it's going to be a fun build.

Although you can't see it in the pictures I've posted so far, there is a heat shield on the wall right next to the wood stove. It'll provide a 1 inch air gap between the shield and the wall. It'll be bent out of heavy gauge sheet metal and painted with high-temp paint. The wall behind the stove and the stovepipe will be sheathed in aluminum from the floor to the ceiling.

I haven't really updated the interior since the first pictures, but when I do, I'll post some more pictures. We haven't decided on decor or colors yet, other than the blue paint on the body and on the interior bench. Some of the interior will be finished wood and some will be painted. We haven't really decided which yet.

I'll keep the updates coming as I have time to work on the drawing. Like I said before, though, I won't even be able to start on it until spring.
TV: 2004 Jeep Liberty Sport

Currently stuck in a tent.
User avatar
Dusty82
The 300 Club
 
Posts: 313
Joined: Thu Jan 28, 2010 8:15 pm
Location: Southern Oregon
Top

RE: Sheep Wagon

Postby mezmo » Mon Jan 10, 2011 1:22 am

Hi Dusty82,

Nice design!

I've always liked the Vardos, Sheep Wagons, Shepherds Huts
and Road Workers Huts - the original mobile home and very
straightforward.

Here's another Vardo site that may give you more ideas
for finishing things off:

http://www.gregsgypsybowtops.co.uk/default.html

He seems to have a nice touch with its design I think.
It's one of the best modern versions I've come across.
The soft top cover could easily be done in a more
permanent material.

Good luck as you start your build, it will be fun to see your progress.

Cheers,
Norm/mezmo
If you have a house - you have a hobby.
User avatar
mezmo
1000 Club
1000 Club
 
Posts: 1817
Images: 194
Joined: Fri Jan 01, 2010 4:11 am
Location: Columbia, SC
Top

Postby Dusty82 » Tue Jan 11, 2011 12:36 pm

Thanks very much for the link, Mezmo! I appreciate it!

I have him bookmarked, and he has a few ideas we like. We're still undecided on a few minor things, but most of it is coming together. All in all, this won't be too complex a build, with the possible exception of all the top bows.

So - here's another design update. As usual, I have the ceiling and roof panels shortened back to give me a view of the roof framing. All of the paint colors are tentative, and subject to change depending on DW's current mood. ;) First the curb side front:

Image

I added suspension to the trailer chassis. On this side I added a dual fender - we're still not sure if we like it or not. I also changed the shape of the "front porch." DW decided she didn't like that sharp, angular platform on the tongue, and after I changed it, I tend to agree with her. The size of the porch will still allow me to back the trailer up without damaging either the porch or our tow vehicle.

Here's the street side front without the fender for comparison purposes:

Image

I also added the tongue jack to the drawing, and scribbled in a patch of grass just to give me a visual base to level everything on.

The street side rear:

Image

I need to add tail lights and a license plate. I'm not sure where that's going to go yet.

The curb side rear:

Image

I'm leaning toward including the fender - possibly with a mud flap on the back of it. I'm also considering a 3rd brake light somewhere on the tail end, just for safety's sake.

Those with a sharp eye will notice the white exterior top bows. They'll go over the aluminum roof panels and cover the seams, providing another layer of leak protection. I also have some trim pieces drawn in that cover the joint between the bottom edge of the aluminum and the top edge of the painted upper side. The top and bottom edges of the trim will be beveled to let rain run off instead of soaking in.

Here are a couple of interior shots. First, a semi-aerial view:

Image

You'll have to pardon the lack of decent textures. I have the finished interior wood textured as Red Oak just so I can differentiate the interior wood from the intermediate and exterior wood in the drawing. As it sits right now, we're not really sure what kinds of woods we're going to use. We like lighter wood tones, so we're thinking along the lines of White Oak, Ash, or possibly Maple.

Standing in the doorway, looking toward the rear of the trailer:

Image

I "painted" the cabinets under the bed the same color as the body, and "painted" the walls and ceiling off-white to brighten things up a bit. Yes, the cabinets are the same color as the bench and the walls are the same color as the ceiling - Sketch Up adds shadows, depending on the perspective of the picture. The small shelf/cabinet sits at the foot of the bed - mainly to keep us from cracking our noggins on it in the middle of the night. Again, it's textured in Red Oak, but the wood species is still up in the air, so to speak. I need to add a shelf over the window, and I'm thinking about either small shelves or sconce-styled lamps flanking the window. Either way, I need to come up with some reading lights over the bed.

Here's a view as if you were sitting on the bed, looking toward the front of the trailer.

Image

(Last picture today - I promise.) :D

Here you can see the wood stove, the unfinished cabinets, heat shields, and the inside of the Dutch Door. I still need to add trim around the window in the door.

The heat shields are bent out of 1/16 inch thick aluminum sheet, and start 3 inches from the floor to allow air to flow upward, behind the metal. The shields provide a 1 inch gap between the shield and the walls. The tall shield behind the stove and stovepipe stops 3 inches below the ceiling to allow airflow. To be honest, the wood stove is more decorative than anything else. There's no doubt we'll use it on occasion, but we tend to camp mainly in the spring and summer, and I just don't see us lighting a fire in it when it's 101 degrees outside.

We call the cabinet opposite the stove a "dry sink," basically because it takes the place of a built in sink with plumbing. DW wants a bowl rack on the inside of the bottom half of the Dutch Door, and she has a huge stainless steel bowl for it that she intends to use as a sink when needed. I haven't added doors or drawer fronts to the cabinet yet because I'm waiting for "someone" to tell me how she wants the cabinet laid out. A framed mirror will go on the wall to the right of the door.

Overall, I think I'm about 99% finished with the design. When we get everything placed and decide on accessories like lights and vents, I'll go back and decide where I'm going to run wiring, put power converters, and hide exterior hook-ups. We've decided against water tanks, and will carry water cans with us, like we do now. I'll most likely get a tote to handle the gray water. Other than that, I think I'm down to last minute odds and ends like door hardware and accessories like cushions and curtains. I will say that we're enjoying the heck out of the design process. I just hope she enjoys the actual build as much as she enjoys this part of the whole thing... :lol:
TV: 2004 Jeep Liberty Sport

Currently stuck in a tent.
User avatar
Dusty82
The 300 Club
 
Posts: 313
Joined: Thu Jan 28, 2010 8:15 pm
Location: Southern Oregon
Top

Postby Danno » Tue Jan 11, 2011 3:13 pm

I'm not savvy on these "sheep wagon" deals, but what I do know like the back of my hand is the workings, clearances, fire risks, etc of burning with wood.

My question is about the window in the front, I hope that is usable as an escape, because otherwise the only exit is right next to a wood burning stove that probably violates every NFPA code I've ever read. heat sheilds may make you safer, but I doubt they make you safe.

I've seen little wagons like this before, and I know the stoves have been in use in them for quite a while without problems. I also know that I've been driving around for years without having a traffic accident, but for some reason I always buckle up. Better safe than sorry. Grandma used to carry dad on her lap in the old buick, and he never died, so I guess everyone has to know what their limits are with these things.

Just throwing the concept out there... Maybe I should have done a forum search for this sort of thing, i'm sure it's been covered before...
User avatar
Danno
Teardrop Advisor
 
Posts: 51
Images: 1
Joined: Wed Apr 07, 2010 4:22 pm
Location: Hamilton, IL
Top

Postby Dusty82 » Tue Jan 11, 2011 4:13 pm

Yep, the emergency exit was addressed in my update on Jan 9th. Look at the caption under the second picture:

"I added bracing to the frame and a large boot box to the rear of the body. The boot not only adds storage, but will also act as a step. The window is a transom window, hinged from the top, to provide an emergency exit should we need it. Our thinking is that we can open the window, crawl out onto the boot lid, and hop off from there."

If my measurements are correct, the top of the boot box will be roughly 46 inches off the ground. That's low enough to hop off of should we have to.

I agree with you 100% about rather being safe than sorry. Even without a stove, electricity, or even a book of matches in a drawer someplace, I wouldn't camp in any kind of camper or trailer that doesn't have a secondary egress. Heck, my Buck knife sleeps next to me in the tent in case I gotta make my own exit in a hurry... 8)
TV: 2004 Jeep Liberty Sport

Currently stuck in a tent.
User avatar
Dusty82
The 300 Club
 
Posts: 313
Joined: Thu Jan 28, 2010 8:15 pm
Location: Southern Oregon
Top

Postby Danno » Tue Jan 11, 2011 4:42 pm

i missed that bit in your update. thanks for pointing it out.

Now, I know it doesn't apply to campers, but NFPA 211 prohibits the use of solid fuel appliances in bedrooms and sleeping quarters. I'll never completely understand that because there are many many many cabins that are nothing but one big room that houses it all. This would be similar for a camper.
User avatar
Danno
Teardrop Advisor
 
Posts: 51
Images: 1
Joined: Wed Apr 07, 2010 4:22 pm
Location: Hamilton, IL
Top

Postby bobhenry » Wed Jan 12, 2011 6:48 am

I think the biggest concern is oxygen depravation. A wood stove pulls a lot of air to feed that fire. In a small confined space where someone is sleeping it can sneak up on you and you may not wake up. Don't get me wrong I have a wood burner at home ( in the dinning room) and have used my toy pot belly stove in the teardrop. ( yes I left a window partially open). I have no concerns about either as they are installed safely and operated correctly.

Image

Image
Growing older but not up !
User avatar
bobhenry
Ten Grand Club
Ten Grand Club
 
Posts: 10355
Images: 2614
Joined: Fri Feb 09, 2007 7:49 am
Location: INDIANA, LINDEN
Top

Postby Dusty82 » Thu Jan 13, 2011 2:59 pm

While I'm not an expert, I do have experience with wood stoves. The stove we're going to put in the sheep wagon came out of our living room - we replaced it with a pellet stove in 2006. I know that we need some ventilation to prevent CO build up, and a smoke alarm, propane detector, and CO detector will be installed as well.

I haven't drawn them into the design yet, but I plan on putting a fantastic fan over the bed and another toward the front, about 30 inches back from the front wall. Also, with the transom window right next to my side of the bed, it'll be easy to crack the window open a bit for ventilation, as well as for an emergency exit.

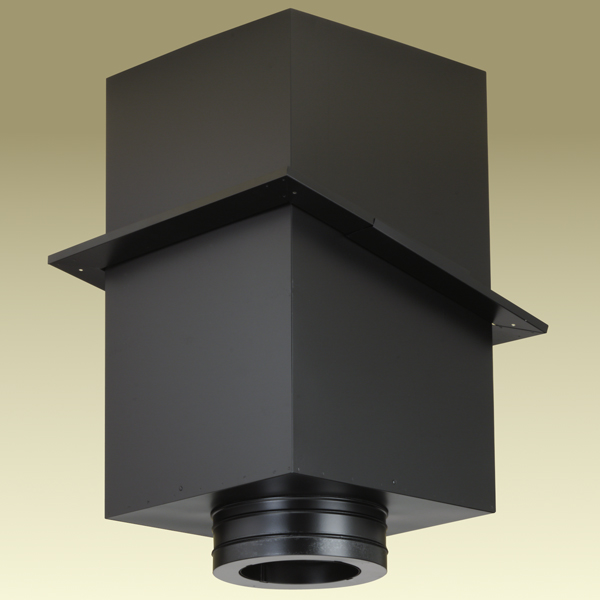
I'm also coming up with an idea for a "cathedral box" that goes in the ceiling. For those that don't know, a cathedral box is a metal box with a section of stove pipe going through it - like this:

Image

The box acts as a shield between the hot pipe and anything within the space between the ceiling panel and the roof panel, preventing things like insulation from coming into contact with the stove pipe. In this case, it'll provide a minimum of 8 inches of clearance all the way around the outer wall of the pipe. I've got the basic design floating around in my head, but I'll need to get the roof built and take some hard measurements from the assembly to finalize it. It'll be made of sheet steel, and I'll paint it with high-temp paint. On the inside I'll cover that entire section of roof in aluminum (we're thinking a piece of stamped aluminum or tin would look great up there.) Of course a spark arrestor will top off the stove pipe on the outside.

To reiterate; since most of our camping is done in spring, summer, and early fall (DW isn't interested in cool weather camping - if it isn't at least in the 70s, forget it) I really don't see the stove being used much at all. I tried to eliminate the stove from the design, but she put her foot down. She says, "The stove makes the whole thing. I want it." So, in the spirit of domestic harmony (i.e. when mamma's happy, everyone's happy) the stove stays. ;)

I'm not trying to be flip or start an argument with this statement, but this design has been around for over 100 years, and Vardos have been around for several centuries. I figure none of those designs would have lasted long if folks were dying left and right when they lit the stove. Having said that, I'm trying to take every reasonable precaution available to me in this design.

I DO appreciate ALL input, and I am grateful to everyone who has expressed concerns over the stove. Please understand, however, that I am doing my research and asking for opinions, guidance, and suggestions when it comes to having the stove in the trailer - I have one advantage in that a good friend of mine installed residential wood stoves for a living, and he's giving me all kinds of advice.

Please know that I'm not taking the installation lightly. I want it to be safe above all else. If anyone thinks I'm overlooking something or not taking enough precautions, please let me know! I need to find out now rather than after the fact.
TV: 2004 Jeep Liberty Sport

Currently stuck in a tent.
User avatar
Dusty82
The 300 Club
 
Posts: 313
Joined: Thu Jan 28, 2010 8:15 pm
Location: Southern Oregon
Top

Next

Return to Member Designs

Who is online

Users browsing this forum: No registered users and 13 guests