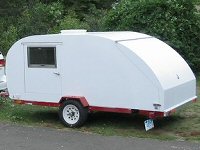
CNC Design

Did you just design your very own teardrop or tiny trailer? Want to discuss it? Here's the place to post your design for discussion!

Re: CNC Design

Postby tony.latham » Sat Nov 23, 2013 11:44 pm

capnTelescope wrote:Tony,

Twins! I have a white Taco with a shell, too. An '01 TRD extra cab with 4WD. I'm keeping it until one of us dies. :thumbsup:


Yep, my four-door is about to roll over 100,000! It's been a great rig and If get hits by an astroid tonight, I'll have another one by the end of next week.
Image
User avatar
tony.latham
Gold Donating Member
 
Posts: 6899
Images: 17
Joined: Mon Jul 08, 2013 4:03 pm
Location: Middle of Idaho on the edge of nowhere

Re: CNC Design

Postby Cuppa » Sun Nov 24, 2013 1:39 am

Certainly no advice from me.... just a question.

Given that you have the accuracy of the CNC router & the design advantages this offers ..... why are you choosing to build using timber(lumber) rather than a lighter waterproof material like polyurethane foam fibreglass sandwich? Design can mean that no fasteners at all are required, the whole thing is glued together. A friend of mine built a 4wd expedition vehicle body this way. He designed it on Google Sketchup & gave the files to the company who manufacture the sandwich panel who then cut the panels for him on a CNC router. The panels glued together using internal cabinets as structural supports as you have suggested, together with the advantages of being quick to construct & ready insulated & no framework required.

His design & construction has now been proven with the vehicle having covered many thousands of miles across some of the roughest roads in the world, overland from Australia to the UK, Africa & now a good part of the way back again with the ‘box’ having held together 100%.

http://www.epicycles.com/Truck%20Blog/2 ... -01-01.htm

Cuppa
User avatar
Cuppa
Teardrop Inspector
 
Posts: 4
Joined: Mon Nov 18, 2013 6:44 pm

Re: CNC Design

Postby mezmo » Sun Nov 24, 2013 2:02 am

Hi Brad/cT,

Nice design there. Since your're one of the first, if not the first, to CNC
it yourself, please include some of those details with that as you do your cuts.
Interest in that will be high.

Just from perusing the forum over time:

- The consensus on the door sill height seems to be more-or-less for the
up-flange be about 1/2 the thickness of the mattress, the objective being,
to avoid/prevent that part of the wall framing from cutting into the back
of your legs when you sit down on the mattress from the outside.

- For the night-time/inclement weather shoe storage while inside, a lot use
the plastic container/bin, as mentioned, and some have built permanent
exterior access under floor drawers for such [as well as other storage].
depending how complex you want to get, a mid way between the free
bins and the permanent drawer, would be to get the covered plastic
containers you plan to use [one for each person's side] and affix a couple
of large enough aluminum "C" channels on their sides to act as runners
for the overhanging top rims of the containers to slide in - not as involved
as the permanent drawers but just as convenient. [The empty shoe bins
travel inside and are put in place outside when you set up camp.]

- One reason, besides redundancy, for following the house framing practice
of having the perimeter horizontal 'framing' pieces over-span the upright
'framing' pieces, besides stress transfer, is to provide solid wood surface for
any screws etc. used to affix any cladding or trim and such. This avoids any
end grains in that situation. Of course, if everything is glued, that may not
be of any big concern. There are certainly plenty of approaches to all this in
practice when building a TD or TTT. That's just the more 'usual' approach.

We'll all have fun watching you have fun in the build.

Cheers.
Norm/mezmo
If you have a house - you have a hobby.
User avatar
mezmo
1000 Club
1000 Club
 
Posts: 1817
Images: 194
Joined: Fri Jan 01, 2010 4:11 am
Location: Columbia, SC
Top

Re: CNC Design

Postby capnTelescope » Sun Nov 24, 2013 4:41 pm

Cuppa wrote:Certainly no advice from me.... just a question.

Given that you have the accuracy of the CNC router & the design advantages this offers ..... why are you choosing to build using timber(lumber) rather than a lighter waterproof material like polyurethane foam fibreglass sandwich? Design can mean that no fasteners at all are required, the whole thing is glued together...


Hi Cuppa, I'm glad you asked that question, because I can get up on the soapbox for a minute or two.

Well, a couple of reasons... First of all, the idea never occurred to me. :thinking: I honestly haven't done any research into Foamie construction. Second, I wanted to go with what I know, and stick to more or less traditional construction (kinda the same as reason 1). My goal was to have a wall that weighs less than plain old 3/4 ply, has insulation for the cabin, and that provides machined surfaces for attaching bulkheads, etc.

I'm using lumber for the framing because (no offense intended to those who've done it.) every time I see someone screwing into the edges of plywood, my inner woodworker cringes, because this is very likely to split the laminations. Screwing into the edge of a board is OK because there is no possibility of delaminating natural wood. Final assembly will be by glue-and-screw for strength. I wanted the strongest possible joints since I do some moderate offroading from time to time. Screws will be going through plywood faces into the lumber. The proper way to do it IMHO.

I took a quick look at your friend's build, and I will be going back to take a closer look. It is an interesting concept that might fit in with my next build. (There's always a next build, isn't there?)

Anyway, thanks for a good thought-provoking question.

I'll burn that bridge when I come to it.

Brad
ImageImageImage

Building the Bed & Breakfast
User avatar
capnTelescope
Lifetime member
 
Posts: 1218
Images: 368
Joined: Sun Jun 27, 2004 3:44 pm
Location: Round Rock, TX
Top

Re: CNC Design

Postby capnTelescope » Sun Nov 24, 2013 4:50 pm

mezmo wrote:Hi Brad/cT,

Nice design there. Since your're one of the first, if not the first, to CNC
it yourself, please include some of those details with that as you do your cuts.
Interest in that will be high.


Thank you. Yes I will. Count on it.

mezmo wrote:... a mid way between the free
bins and the permanent drawer, would be to get the covered plastic
containers you plan to use [one for each person's side] and affix a couple
of large enough aluminum "C" channels on their sides to act as runners
for the overhanging top rims of the containers to slide in - not as involved
as the permanent drawers but just as convenient. [The empty shoe bins
travel inside and are put in place outside when you set up camp.]


I like it! You will see this later, as I get to final details.
I'll burn that bridge when I come to it.

Brad
ImageImageImage

Building the Bed & Breakfast
User avatar
capnTelescope
Lifetime member
 
Posts: 1218
Images: 368
Joined: Sun Jun 27, 2004 3:44 pm
Location: Round Rock, TX
Top

Re: CNC Design

Postby Cuppa » Sun Nov 24, 2013 5:49 pm

Thanks for your response Brad. Going with what you know makes sense. Do have a read of my friend’s build (& what he’s done with it since) as I expect you will find it of interest. I’m not yet ‘au fait’ with what folks here think of as ‘foamie construction’. Perhaps the PU fibreglass sandwich is a proprietary version? You might be interested in the manufacturer’s web site for future info, (I expect the US will have similar manufacturers). http://vanglass.homestead.com/index.html

Cuppa
User avatar
Cuppa
Teardrop Inspector
 
Posts: 4
Joined: Mon Nov 18, 2013 6:44 pm
Top

Re: CNC Design

Postby capnTelescope » Mon Nov 25, 2013 12:37 am

Cool, Cuppa.

I expect a number of Foamies (they make teardrops mostly out of foam material, I think.(They are a different breed IMO.)) will be interested in that.

I see you are a newbie. Welcome to TnTTT. More is merrier.
I'll burn that bridge when I come to it.

Brad
ImageImageImage

Building the Bed & Breakfast
User avatar
capnTelescope
Lifetime member
 
Posts: 1218
Images: 368
Joined: Sun Jun 27, 2004 3:44 pm
Location: Round Rock, TX
Top

Re: CNC Design

Postby capnTelescope » Mon Nov 25, 2013 2:21 pm

Here's a case where when your favorite tool is a hammer, everything looks like a nail. When your favorite tool is a CNC machine, ...

I'm using the CNC to trace the outline onto a piece of wall plywood.

First, you need something to hold s writing implement, like a felt tip marker. Parts made on CNC, of course. It fits in the same holder I use for the router motor.
Image

Then you create g-code from your CAD drawing and draw the outlines.
Image

The finished product:
Image

Finally, tape & staple cardboard, so you can get the feel of what your interior is like.
Image

I will be shortening the rear cabinets, so I can get under there and tuck in the sheets.
I'll burn that bridge when I come to it.

Brad
ImageImageImage

Building the Bed & Breakfast
User avatar
capnTelescope
Lifetime member
 
Posts: 1218
Images: 368
Joined: Sun Jun 27, 2004 3:44 pm
Location: Round Rock, TX
Top

Re: CNC Design

Postby GuitarPhotog » Mon Nov 25, 2013 4:30 pm

Prototyping with cardboard like that can save lots of problems downstream.

You are correct in wanting to change the rear cabinets. I hate having to go "head down" under mine to tuck in the sheet at the foot of the bed.

<Chas>
:beer:
GuitarPhotog
Silver Donating Member
 
Posts: 1779
Images: 55
Joined: Tue Feb 08, 2011 12:52 pm
Location: Grants Pass Oregon
Top

Re: CNC Design

Postby halfdome, Danny » Mon Nov 25, 2013 6:28 pm

I will be shortening the rear cabinets, so I can get under there and tuck in the sheets.

If you order a two piece mattress all you need is room for your feet when laying in bed.
We have a two piece mattress and pull the aft section over the forward section a few inches to slip on the fitted pad and sheets, then push it back.
Head banging avoided.

A CNC is something I'd love to have but don't have the room in my shop.
I've used a 30' aluminum trammel ( 10' sections ) on my router for the big stuff.
Has anyone made something like a CNC that hinges from the wall so it could be folded to the wall when not in use?
:D Danny
ImageImage
"Conditions are never just right. People who delay action until all factors are favorable do nothing". William Feather
Don't accept "It's Good Enough" build to the best of your abilities.
Image
Teardroppers Of Oregon & WashingtonImage
User avatar
halfdome, Danny
*Happy Camper
 
Posts: 5883
Images: 252
Joined: Sun Aug 14, 2005 11:02 pm
Location: Washington , Pew-al-up
Top

Re: CNC Design

Postby mikeschn » Mon Nov 25, 2013 6:33 pm

You could design a cnc that is mounted permanently to the wall... like one of these panel saws...

Image

Mike...
The quality is remembered long after the price is forgotten, so build your teardrop with the best materials...
User avatar
mikeschn
Site Admin
 
Posts: 19202
Images: 479
Joined: Tue Apr 13, 2004 11:01 am
Location: MI
Top

Re: CNC Design

Postby Junkboy999 » Mon Nov 25, 2013 11:39 pm

halfdome Danny

Here is a video of a folding CNC machine.
Folding CNC Machine
https://www.youtube.com/watch?v=bksUuudEVfo

Also on YouBoob I seen a CNC machine that was mounted on the wall. Two rails where attached to the wall about 2 foot apart ( His LONG axis ) Running on those two rails was his shorter axis. It was sticking out like a over head Radial arm saw. ( it was hinged so it could swing in flat against the wall ) his up and down ( z Axis ) was mounted on that arm. at the time of the video he had no table just a stool to place his stock on. He was in the process of making a fold down table as well. Sorry I can't seem to find the video. It was europen video and I don’t remember the title.


Brad

Love cnc machine. The idea of the cardboard is great. How well do you sleep? I turn over a bit in my sleep, and have managed to kick the underside of my cabinets and break a toe nail. ( ouch )

Got any YouBoob video of it running?
User avatar
Junkboy999
1000 Club
1000 Club
 
Posts: 1259
Images: 52
Joined: Fri Jul 06, 2012 9:18 pm
Location: Wichita, KS
Top

Re: CNC Design

Postby capnTelescope » Tue Nov 26, 2013 12:47 am

Hi, guys.

GuitarPhotog & Halfdome, Danny -- Yeah. Also I get a little claustrophobic in those kind of places. Not that I change my sheets that often. Oops! Too much info?

Danny -- You could get a smaller machine, like a 4x4, and just do a little at a time. It's possible to get long parts done on a shorter machine. Heck, I'm doing 10 feet on an 8 footer. It's just more work and fussy setups.

Mike -- One problem with the vertical setup is that you can't use it as a workbench. Most of the time, I only use about 2' x 4' of my table area for cutting, and the rest is clutter. OTOH, that panel saw is superior as it sits, without the computer. It does have a brain attached, which is far more versatile.

JunkBoy -- I watched the vid of the foldup. He left out the big grunt that goes with lifting the thing up. My machine must weigh in at about 400 pounds + bench. I had 3 neighbors help me move it from the sawhorses to the new CNC-cut bench it's on now. My share felt like 80-100 pounds. Oh! and you have to mount that puppy firmly so it doesn't fall off and come crashing down. I've given up defying gravity in my old age.

I'm not much of a tosser-and-turner, but those cabinets were worrying me about that. Head banging and toe stubbing don't add anything good to the camping trip.

I drew 6-inch shorter cabinets on the cardboard, and they seemed a bit small. I thing I'll go up 3 inches. That will give me about 22-23 inches from floor to bump on the noggin. This is still going to be way better than half a pickup bed with a low ceiling.

By popular demand, I'll get my video of the drawing up tonite, I hope. I watched it too many times while I was editing. You sure couldn't tell I ever spent a single evening at Toastmasters.

Thanks to all for your comments.
I'll burn that bridge when I come to it.

Brad
ImageImageImage

Building the Bed & Breakfast
User avatar
capnTelescope
Lifetime member
 
Posts: 1218
Images: 368
Joined: Sun Jun 27, 2004 3:44 pm
Location: Round Rock, TX
Top

Re: CNC Design

Postby halfdome, Danny » Tue Nov 26, 2013 9:08 am

Thanks Junkboy for that folding CNC machine video.
That's a sweet set up he has.
Wonder if it's a DIY machine or a kit.
Everything in my shop with the exception of the table saw station is on wheels.
Wheels make a small shop larger.

Mike, the panel saw idea is one I'll have to look into, thanks.

Brad, I wasn't aware you could do longer projects with a shorter machine. :thinking:
One store fixture shop I worked at the operator of the CNC would dovetail panels together to make a longer project work.
It's okay if the joint will be covered over, not okay if exposed.
Thanks,

:D Danny
ImageImage
"Conditions are never just right. People who delay action until all factors are favorable do nothing". William Feather
Don't accept "It's Good Enough" build to the best of your abilities.
Image
Teardroppers Of Oregon & WashingtonImage
User avatar
halfdome, Danny
*Happy Camper
 
Posts: 5883
Images: 252
Joined: Sun Aug 14, 2005 11:02 pm
Location: Washington , Pew-al-up
Top

Re: CNC Design

Postby capnTelescope » Tue Nov 26, 2013 11:40 am

Danny -- You can make smaller sections and join them, like you described. Also, on a gantry machine, the X axis (perpendicular to the gantry) is open. You can take the too long workpiece and move areas of it into the work zone until you get the whole part done. It takes some care to get the setups right, but doable. I'll be doing that on my walls. I'll be sure to do a video on this when I get there.

If the part is wider in the Y (gantry) direction than the machine, you'll need a bigger machine.
I'll burn that bridge when I come to it.

Brad
ImageImageImage

Building the Bed & Breakfast
User avatar
capnTelescope
Lifetime member
 
Posts: 1218
Images: 368
Joined: Sun Jun 27, 2004 3:44 pm
Location: Round Rock, TX
Top

PreviousNext

Return to Member Designs

Who is online

Users browsing this forum: No registered users and 5 guests