Video is up!
Includes a tour of the machine and the actual drawing on the plywood. I also left in a couple of "oops-es" for comic relief. I had a couple of problems related to my not usually going to the extremes on the axes.
It ain't purty, but it's real.
Teardrops n Tiny Travel Trailersor t n ttt for short (tnttt.com) |
CNC Design
52 posts
• Page 3 of 4 • 1, 2, 3, 4
Re: CNC Design
![]() by capnTelescope » Tue Nov 26, 2013 11:52 am
by capnTelescope » Tue Nov 26, 2013 11:52 am
-

capnTelescope - Lifetime member
- Posts: 1218
- Images: 368
- Joined: Sun Jun 27, 2004 3:44 pm
- Location: Round Rock, TX
Re: CNC Design
![]() by aggie79 » Tue Nov 26, 2013 6:42 pm
by aggie79 » Tue Nov 26, 2013 6:42 pm
Welcome Captain T!
Glad to have another teardropper from the great state on board. Be sure to check out the South Central section for area gatherings.
I can't claim that my teardrop is "light weight" - I haven't had it weighed - but you're spot on in that the different assemblies contribute to the structure. The picture below is the interior side of my teardrop. I cut dados for the bulkhead framing, and headboard face frame and shelf, and a rabbett for the floor. (The rabbett is extra wide because my sidewall overhangs the frame rail and I wanted to leave some space between the frame rail and sidewall.)
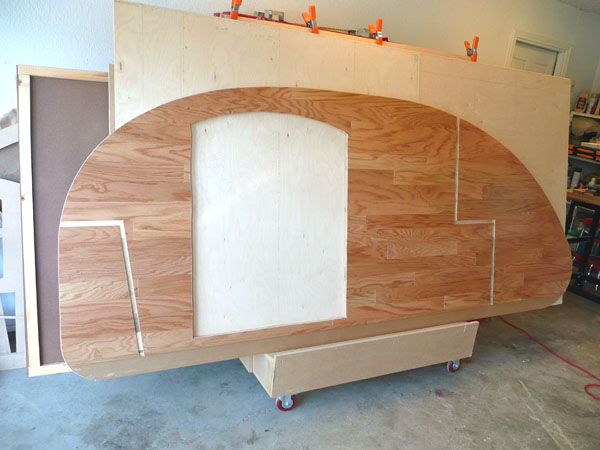
This is a picture of the walls and floor and framing together.

Even without the exterior wall and roof skins the assembly is amazingly strong.
I don't know what exterior finish you plan on having, but take a look at Planovet's build: http://www.littleswissteardrop.com/buildpictures.html. Mark completed almost all of his interior and exterior finishes before assembling his teardrop.
Others have commented to your questions. Here are some miscellaneous thoughts I had on your design:
1. Depending upon your finishes, but 1/8" plywood inside and out will be plenty strong instead of the heavier 1/4" plywood.
2. Also 1/2" plywood could by used for the bulkhead framing instead of 3/4" plywood.
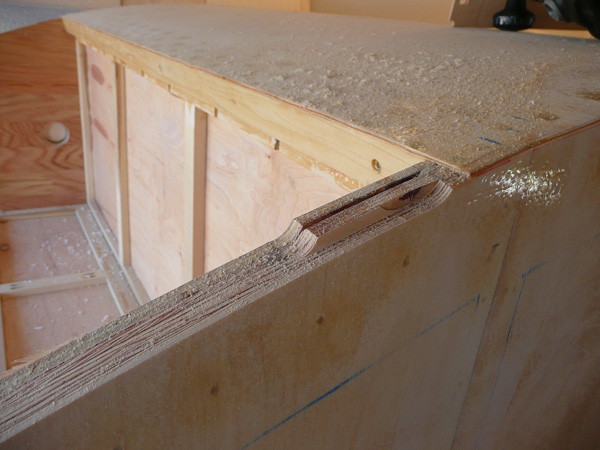
3. Before you cut the profile, you need to figure out how you are going to do your hatch. They fall into four categories - Steve Frederick method (this is what Planovet used), zero offset hurricane hinge, offset hurricane hinge, and "Len's method". The first three will require you to notch of cut your profile. I used the zero offset hurricane hinge, but the "zero offset" refers the the roofline being on the same plane for and aft of the hinge. Aft of the hinge, you need to notch the profile to allow for thickness of the overhanging roof skin(s) and weatherstripping. Here's a section showing what I'm talking about.
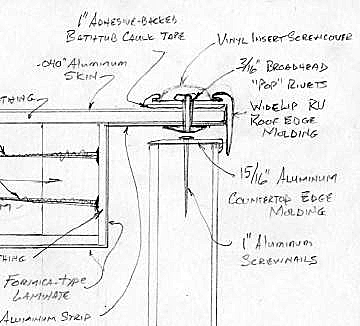
(Credit goes to Grant Whipp for the drawing.)
Here's chicken-scratching showing the notch in relation to the sidwall/hatch/framing:
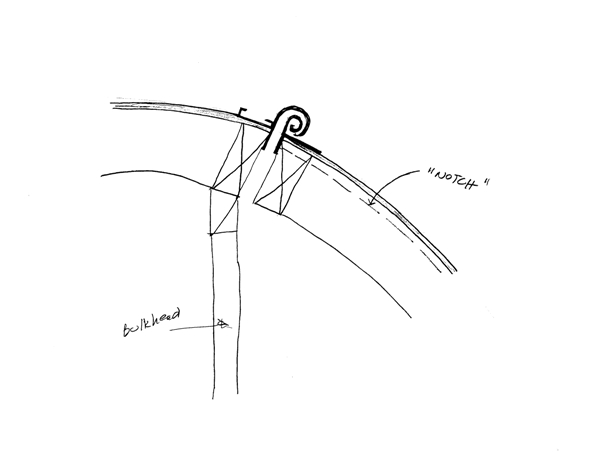
I cut the notch with a router after the walls were up. Here's a picture showing the notch almost completed:
In Len's method, no notch or cut is required for the profile: http://www.tnttt.com/viewtopic.php?p=1045874#p1045874.
I can't wait to see this build get going!
Take care,
Tom
Glad to have another teardropper from the great state on board. Be sure to check out the South Central section for area gatherings.
capnTelescope wrote:Strength and light weight are the main goals. I haven't seen even one builder complain that their Tear wasn't heavy enough. I also want to minimize the amount of left-over dead tree.
Most designs have a number of subcomponents that are added after some initial assembly. Most notably, bulkheads, the cabinetry in the cabin and galley. My design makes these an integral part of the structure, adding strength while adding minimal extra weight.
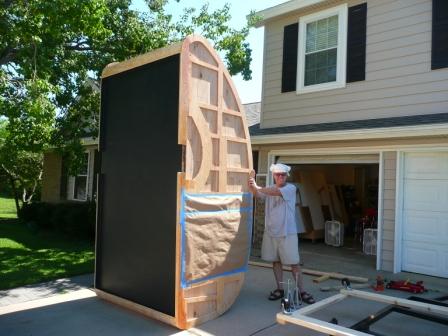
I can't claim that my teardrop is "light weight" - I haven't had it weighed - but you're spot on in that the different assemblies contribute to the structure. The picture below is the interior side of my teardrop. I cut dados for the bulkhead framing, and headboard face frame and shelf, and a rabbett for the floor. (The rabbett is extra wide because my sidewall overhangs the frame rail and I wanted to leave some space between the frame rail and sidewall.)
This is a picture of the walls and floor and framing together.
Even without the exterior wall and roof skins the assembly is amazingly strong.
capnTelescope wrote:Also, we often make some compromises with good woodworking practices. Most notable here is the common way of installing bulkheads and roof spars. Often, bulkheads are mounted by screws from the outside into the edges of the bulkhead plywood. This has several disadvantages. Most notably, screwing into end grain risks splitting the wood. It is less stronger than a screw through the face of the plywood. But IMHO the bulkheads can be one of the main sources of strength of the basic cabin assembly of floor, walls and bulkheads. Also, the through screws from the outside make extra work, as you usually see them countersunk and filled over and sanded. That's a lot of extra work. It also prevents you from skinning and trimming the walls until after assembly. When the walls are vertical, you have to fight gravity. So I want to skin the wall subassemblies on the workbench, before any assembly begins. I'm risking scratches and dings, so we'll see how that goes.
I don't know what exterior finish you plan on having, but take a look at Planovet's build: http://www.littleswissteardrop.com/buildpictures.html. Mark completed almost all of his interior and exterior finishes before assembling his teardrop.
Others have commented to your questions. Here are some miscellaneous thoughts I had on your design:
1. Depending upon your finishes, but 1/8" plywood inside and out will be plenty strong instead of the heavier 1/4" plywood.
2. Also 1/2" plywood could by used for the bulkhead framing instead of 3/4" plywood.
3. Before you cut the profile, you need to figure out how you are going to do your hatch. They fall into four categories - Steve Frederick method (this is what Planovet used), zero offset hurricane hinge, offset hurricane hinge, and "Len's method". The first three will require you to notch of cut your profile. I used the zero offset hurricane hinge, but the "zero offset" refers the the roofline being on the same plane for and aft of the hinge. Aft of the hinge, you need to notch the profile to allow for thickness of the overhanging roof skin(s) and weatherstripping. Here's a section showing what I'm talking about.
(Credit goes to Grant Whipp for the drawing.)
Here's chicken-scratching showing the notch in relation to the sidwall/hatch/framing:
I cut the notch with a router after the walls were up. Here's a picture showing the notch almost completed:
In Len's method, no notch or cut is required for the profile: http://www.tnttt.com/viewtopic.php?p=1045874#p1045874.
I can't wait to see this build get going!
Take care,
Tom
-

aggie79 - Super Duper Lifetime Member
- Posts: 5405
- Images: 686
- Joined: Tue Aug 07, 2007 5:42 pm
- Location: Watauga, Texas


 that the trunk lid is just like a galley hatch. Without a Hurricane Hinge. Can this be done on a Tear?


