Page 1 of 7

Ultralight Construction...

PostPosted: Wed Mar 01, 2006 7:01 pm
by mikeschn
Day 1

Built a table to build those durn walls on... Unlike the last table I built, which was a wimpy thang, this one will hold bags of sand, or 14 feet of water, or a vaccuum bag, what ever is the handiest, without collapsing. :banana:

Image

Who knows what the next day will bring...

Mike...

PostPosted: Wed Mar 01, 2006 10:36 pm
by weasel
Nice work Mike :thumbsup: :applause:

PostPosted: Thu Mar 02, 2006 10:00 pm
by Miriam C.
That is nice. Mines prettier. I can't wait to see the ultralight put together.
does this mean you got kicked out of the kitchen. Was that you or someone else.
Get back to work! :hammer:

Hope you are having as much fun with this design as the rest of us.
Miriam
:miriams:

PostPosted: Fri Mar 03, 2006 8:48 pm
by Arne
Mike, I've been gone for about a month, traveling.....

Are you building an ultrlight?....

I have a very similar looking 1800# trailer still in my shed in the boxes.... and the plan is to do an ultrilight with very little frame.... will have a lot of steel left over.

PostPosted: Sat Mar 04, 2006 6:10 pm
by mikeschn
Yes Arne, I am going to try to build an ultralight...

I say that because we all know, some days are good, and some days are bad... today was a bad day. :crying1:

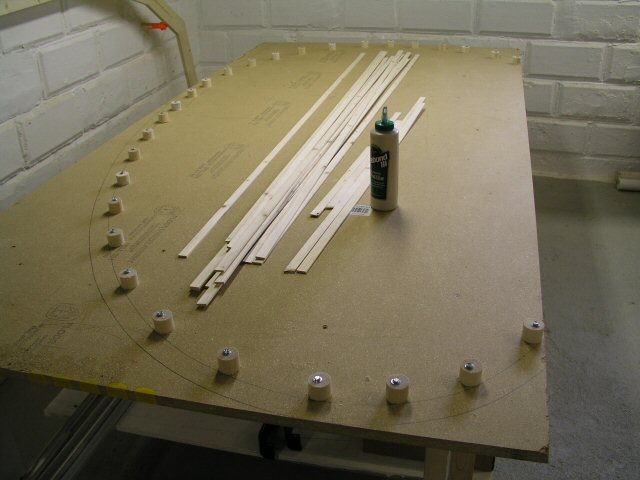
Let me share a few pictures with you...

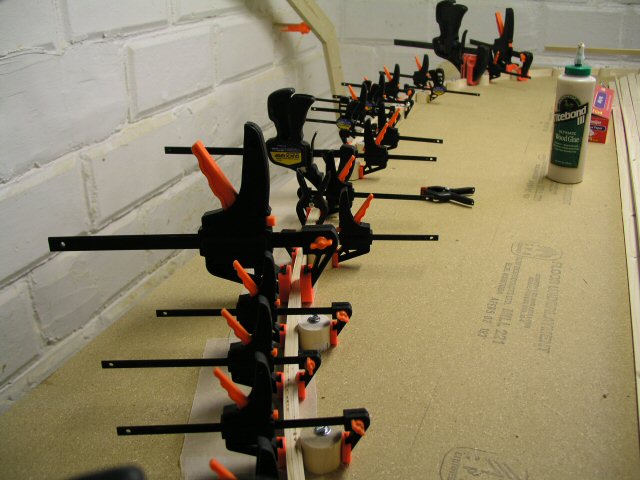
After I glued up those 1x4's I cut the template out of the 5.2mm luan... that's less than 1/4". Let me tell you... that luan is like a rubber band... it moves all over the place.... I figure, no problem, I'll clamp it down... Later on I find out that the 1 1/2" width isn't really enough to keep the router stable... but I'm getting ahead of myself... I set the template on top of the pine frame, and figured I'd make a practice cut...

Image

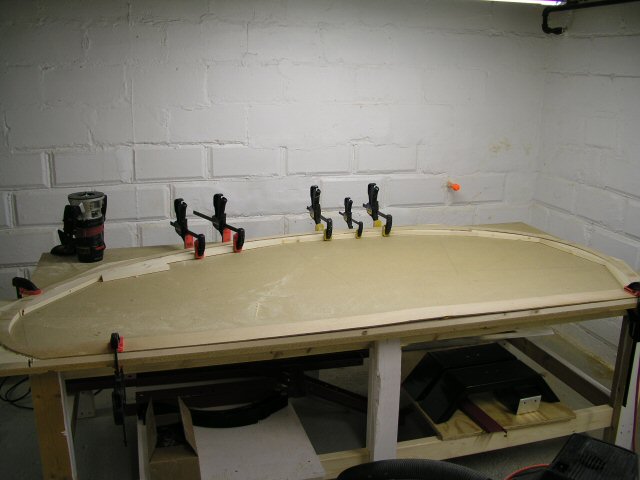
The inside cut went fine...
Image

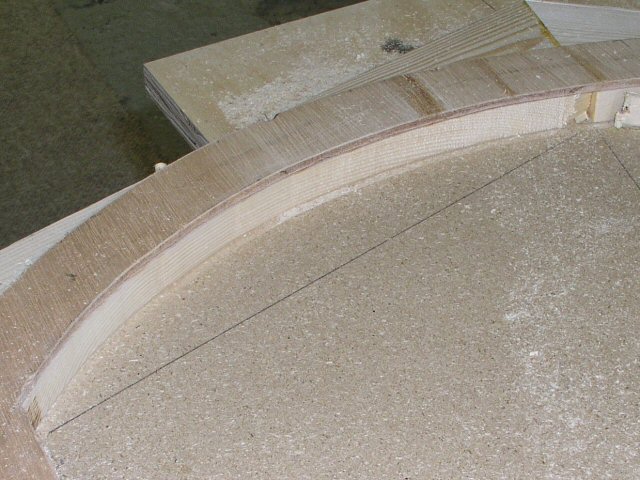
then I tried an outside cut.... suddenly I noticed that the bit was cutting into the pattern.... :shocked: Image

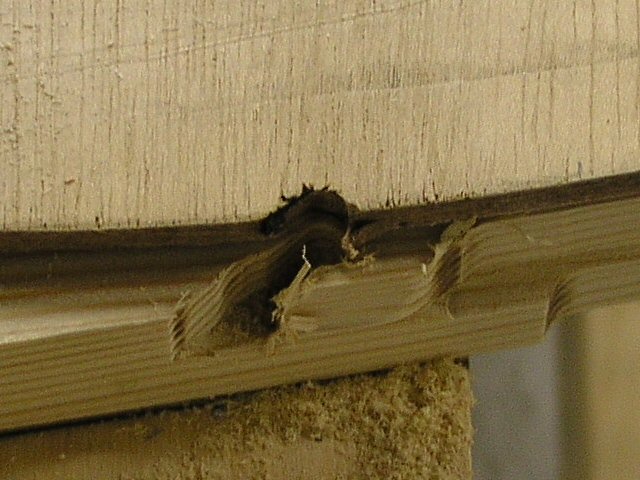
Hey, that's not supposed to happen... So I look at the collar on the router... it either melted, or got chipped away... Needless to say I am not a happy camper...
Image

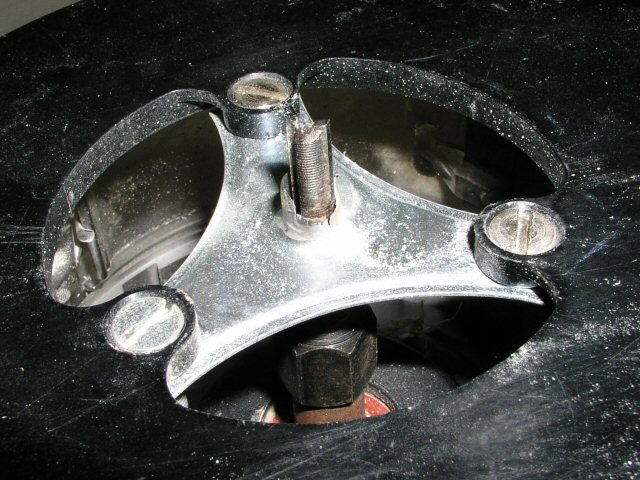
I either need a better router guide, or I have to change my method of construction to the one that Subtear is using...
http://www.teardrops.us/userfiles/33/te ... anean.html

Hmmmm :pipe: I think it's time to bounce this off one of our experts... Steve Frederick... Steve, your thoughts...

Mike...

PostPosted: Sat Mar 04, 2006 6:18 pm
by madjack
...get a Porter-Cable router with the 2 piece, screw together bushing set...we just luv it at the shop.................. 8)

PostPosted: Sat Mar 04, 2006 6:30 pm
by Ken A Hood
GUIDE SET
BASE PLATES

I have some of their products, and they all work well together. You can even make your own router table, to whatever size you need.

Here is a link from Steve Frederick

PostPosted: Sat Mar 04, 2006 7:18 pm
by Guy
Dear Mike,

Here is the link from Steve Frederick posted in the "Router Masters" thread

http://www.mlcswoodworking.com/shopsite_sc/store/html/smarthtml/pages/routacc1.html

Those are the bearing he uses.

PostPosted: Sat Mar 04, 2006 7:24 pm
by Chip
Making a mental and visual note here,, stay from Roto Zips and routers,,,

chipper

PostPosted: Sat Mar 04, 2006 7:24 pm
by mikeschn
Yep,

I think it's time to place that order...

Tomorrow though, I think I have to start a new side using the laminated strip method...

Mike...

PostPosted: Sat Mar 04, 2006 7:30 pm
by asianflava
I like using ball bearing bits instead of guide bushings. Just my preference though. I'm sure one is better than the other, depending on the situation.

PostPosted: Sat Mar 04, 2006 7:58 pm
by Steve Frederick
Two things..I use a top-bearing pattern bit when the pattern is on top..a bottom bearing bit otherwise.

For pattern work with a guide bushing..get a Porter-Cable-Type base and some brass screw-on bushings..
Image

I get my stuff fromMLCS
Also, For really critical cuts, coat the pattern edges with epoxy, paint, or even wax, to keep snags and bumps to a minimum.
I'd fix the pattern with some schmutz (epoxy/wood dust/silica) and carry on!

PostPosted: Sat Mar 04, 2006 8:11 pm
by madjack
Steve Frederick wrote:Two things..I use a top-bearing pattern bit when the pattern is on top..a bottom bearing bit otherwise.

For pattern work with a guide bushing..get a Porter-Cable-Type base and some brass screw-on bushings..
Image

I get my stuff fromMLCS
Also, For really critical cuts, coat the pattern edges with epoxy, paint, or even wax, to keep snags and bumps to a minimum.
I'd fix the pattern with some schmutz (epoxy/wood dust/silica) and carry on!


...that is perzactly how we operate and the shop...gee great minds really do think and act alike :lol: :lol: :lol:
madjack 8)

PostPosted: Sat Mar 04, 2006 10:15 pm
by Steve_Cox
mikeschn wrote:Yep,

I think it's time to place that order...

Tomorrow though, I think I have to start a new side using the laminated strip method...

Mike...


I like the laminated strip method too. After learning from Roly how to do the outside trim on my woody that way, I too decided it would be a great way to do a frame lay up, can't wait to try it out. On the trim job I used 7 layers of .200ths thick red oak with epoxy. Love it when people come up and ask "how did you bend that?"

PostPosted: Sun Mar 05, 2006 3:53 pm
by mikeschn
Today is a better day... Went to HF, where they were having a big sale, and took my 10% off coupon... Got that portable bandsaw, and a bunch of clamps.

Got home and fit up the table with a bunch of dowel pieces...

Image

Then I started glueing up my strips... (which are 1/8" thick btw) The first two strips were a little tricky, but the third one went on really easy. I'm experimenting with titebond III, and it appears I can put on another strip every 30 minutes... The most important thing I learned today is, I didn't buy enough clamps... You need one on every dowel piece, and one inbetween...

Image

It's getting to be fun now!!!

Mike...