Step 3: Build the floor

Here is a generic building plan for a teardrop designed by the members of T&TTT.

Step 3: Build the floor

Postby mikeschn » Tue Apr 26, 2005 12:45 pm

Step 3: Build your floor ½” fir plywood
(Revised 10-May-2005 to allow for sidewalls to cover trailer frame)

The floor is built from 2 sheets of 5’x5’x1/2” Baltic birch., and xx 1x2s. Cut both sheets of Baltic birch to 48” x 58 ½. Place the two sheets together on a flat surface, so that you end up with a rectangle 96”x58 ½”. (The trailer is 58” x 96”. The floor should hang over the trailer by about ¼” on each side.

Using Gorilla glue /polyurethane glue, and 1 ¼” stainless steel screws, glue and screw the first 8’ long piece of 1x2 to the long edge of the floor.

Glue and screw the (5) 55 ½” subfloor studs to the plywood as shown in the drawing below.

Image

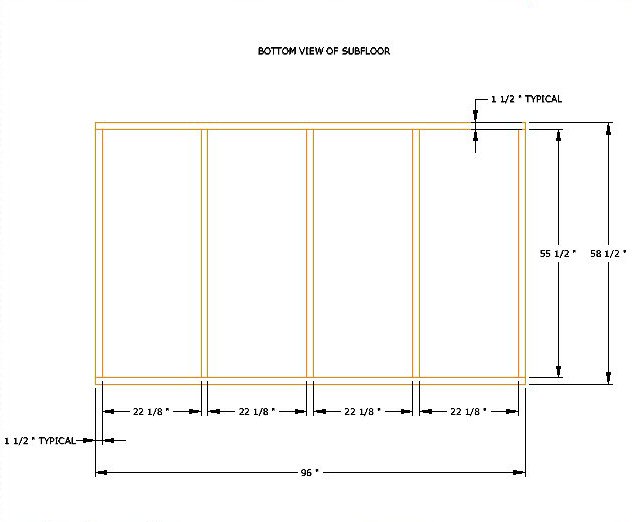
Here's a pdf of that drawing...
http://www.mikenchell.com/images/subfloor.pdf

Glue and screw the last 8’ long piece of 1x2. Let the glue dry overnight.

The floor can be uninsulated for 3 seasons camping, or insulated for 4 seasons camping. If you decide to insulate, cut the ¾” extruded polystyrene on the table saw to fit into the floor recesses. Have all 4 pieces prepared before coating the floor with roof tar.

Use roof tar to coat the underside of the floor, making sure not to get any tar on the sides where the walls will be attached.

Press the EPS into the wet tar and screw the EPS into the recesses with 1 ¼” stainless steel panhead screws and fender washers. Use about 12 screws per panel. Let dry. Drying could take several days or more, depending on the temperature.

The stainless steel hardware is used because it has a fine thread and a controlled length, to help prevent you from breaking thru the floor. (If you break thru the floor, remove that screw, grind off the tip, and screw it back in.)

Bolt the floor to the trailer with 3/8” bolts, (5) bolts per side. Use flat washers and nylock nuts.
Last edited by mikeschn on Fri May 27, 2005 5:45 pm, edited 3 times in total.
The quality is remembered long after the price is forgotten, so build your teardrop with the best materials...
User avatar
mikeschn
Site Admin
 
Posts: 19202
Images: 479
Joined: Tue Apr 13, 2004 11:01 am
Location: MI

Postby toypusher » Sat Apr 30, 2005 3:39 pm

Mike,

It may be overkill, but how about a spline and gorilla glue the two halves of plywood together? Or do you think that is too much for a beginner?

Kerry
User avatar
toypusher
Site Admin
 
Posts: 43040
Images: 324
Joined: Fri Jan 28, 2005 12:21 pm
Location: York, PA Area

Postby TomS » Tue May 10, 2005 7:20 pm

Mike, A couple of details on the floor specific to the Red Trailer.

1. There are some bolt heads in the top of the frame where the cross members meet the side rails. In order for the frame to sit flush with the top of the frame relief holes need to be cut for these bolt heads.

a. Clamp the frame in place.

b. tap the frame with a rubber mallet or a hammer and block of wood at each of these bolt heads to make a shallow impression of the bolt head in the bottom of the frame.

c. Cut a shallow relief holes for each bolt using a Forstner bit. Use a spare bolt to check for adequate depth.

2. The Red Trailer frame comes with predrilled mounting holes for mounting a plywood deck. Builders can save themselves a lot of drilling by utilizing these holes. Here's what I did:

a. After cutting the relief holes mentioned above and before coating the underside of the floor, place the the floor in position on the frame.

b. Take a 3/8" mounting bolt and dip one end in the roofing asphalt. Crawl under the trailer and locate your first mounting hole. Pass the bolt through the mounting hole and press the wet bolt firmly against the floor assembly. This will leave a perfect black mark showing the exact location of the mounting hole. Repeat with all the other mounting holes. It's nice to have a helper for this step.

c. Remove the floor assemply from the frame. Use the marks left by the wet bolt to drill your mounting holes. Counter sink the other side using a Forstner bit large enough to accomodate the bolt and the socket you plan to use when mounting the floor.

d. After mounting the floor, fill in the counter sinks for the mounting holes with wood filler.

Here's a couple of other details I noticed.

Why cut the insulation on a table saw? Wouldn't that make an awful mess. With the static electricity generated, I picture thousands of tiny particles sticking to everything in sight. I don't know if there are any adverse health effects from inhaling foam particles. But, I don't want to give the Medical folks and opportunity to find out. This stuff cuts very easily with a simple box cutter and a straight edge.

Also, why use Baltic birch for the floor. You're only going to cover it up. ACX ply is cheaper and easier to find.

Just my $.02 worth (Thats $.03 for you Canadians and $.20 for Kai down in Mexico ;-)
Tom Swenson
[email protected]
User avatar
TomS
1000 Club
1000 Club
 
Posts: 1367
Joined: Thu Nov 18, 2004 2:06 pm
Location: Fitchburg, MA
Top

Re: Step 3: Build the floor

Postby backwoodsman » Mon May 23, 2005 6:45 pm

mikeschn wrote:Glue and screw the (5) 55 ½” subfloor studs to the plywood as shown in the drawing below. (drawing forthcoming)

Glue and screw the last 8’ long piece of 1x2. Let the glue dry overnight.


Mike-

Please submit the drawings, I'm unclear on what you mean by this.

Thanks,

Greg
You don't know what you don't know!
User avatar
backwoodsman
Donating Member
 
Posts: 106
Images: 35
Joined: Wed Mar 23, 2005 5:28 pm
Location: Tyler, Texas
Top

Postby JunkMan » Mon May 23, 2005 8:59 pm

TomS wrote:Why cut the insulation on a table saw? Wouldn't that make an awful mess. With the static electricity generated, I picture thousands of tiny particles sticking to everything in sight. I don't know if there are any adverse health effects from inhaling foam particles. But, I don't want to give the Medical folks and opportunity to find out. This stuff cuts very easily with a simple box cutter and a straight edge.


Tom,

I have cut tons of this stuff on the table saw, and it doesn't make as much of a mess as you would think, not much worse than sawdust. The advantage is that it leaves perfect edges. If your measurments are correct, and everything ids square, this stuff will fit like it was poured in if you ues a table saw. I have tried several other ways to cut this stuff, and nothing I have tried cuts as clean or works as nice as a table saw.

I am using foil covered foam on my trailer (more R value), not sure what the name of it is, but it isn't the bead type foam. It cuts real nice with a sharp utility knife and a straight edge.
Jeff & Odie
Black Hills of South Dakota
User avatar
JunkMan
500 Club
 
Posts: 974
Images: 50
Joined: Sun Oct 24, 2004 6:21 pm
Location: Rapid City, South Dakota
Top

under floor coating

Postby backwoodsman » Tue May 24, 2005 8:46 am

Has anybody lined the bottom of the trailer with aluminum?
I am planning on using a sheet of aluminum instead of the black tar bed-liner stuff. I'm going to have plenty left over after skinning the sides & top.
Pros? Cons?

Thanks,

Greg
You don't know what you don't know!
User avatar
backwoodsman
Donating Member
 
Posts: 106
Images: 35
Joined: Wed Mar 23, 2005 5:28 pm
Location: Tyler, Texas
Top

Postby SteveH » Thu May 26, 2005 7:15 am

Greg,

I'm certainly no authority, but would think even if you covered it, you should also seal the wood, maybe even a better job than if it wasn't covered, because of the possibility of moisture getting into the wood thru seams/joints and not being able to get out, or down.

I can tell you the Camp-Inn I saw last weekend is a plywood floor with some sort of sealer on it, like varnish or something. The roofing tar/emulsion that a lot of us have used looks to be a much better sealing agent, and it's cheap. The only bad things are it stinks while putting it on and curing and it's pretty nasty if you get it on ya.
SteveH
Calling an illegal alien an "undocumented immigrant"is like calling a drug dealer an "unlicensed pharmacist ".
User avatar
SteveH
2000 Club
2000 Club
 
Posts: 2101
Images: 42
Joined: Mon Nov 01, 2004 8:28 am
Location: Bexar Co, TX
Top

Re: Step 3: Build the floor

Postby mikeschn » Thu May 26, 2005 7:33 am

backwoodsman wrote:
mikeschn wrote:Glue and screw the (5) 55 ½” subfloor studs to the plywood as shown in the drawing below. (drawing forthcoming)

Glue and screw the last 8’ long piece of 1x2. Let the glue dry overnight.


Mike-

Please submit the drawings, I'm unclear on what you mean by this.

Thanks,

Greg


Hey Guys,

Sorry the drawings are taking so long... I am trying to learn a new cad package (the one that angib uses) so that I can make clear PDFs. My solid modeling package doesn't do drawings very well.

But I have a 4 day weekend, I'll be doing some studying... and maybe I can even crank out a drawing or two.

Mike...

PS. AmyH, how do you make your illustrations?
The quality is remembered long after the price is forgotten, so build your teardrop with the best materials...
User avatar
mikeschn
Site Admin
 
Posts: 19202
Images: 479
Joined: Tue Apr 13, 2004 11:01 am
Location: MI
Top

Re: Step 3: Build the floor

Postby mikeschn » Fri May 27, 2005 5:48 pm

backwoodsman wrote:
Mike-

Please submit the drawings, I'm unclear on what you mean by this.

Thanks,

Greg


Hey Greg,

I put the drawing up just now... Hope that helps... (It's in the first message in this thread)

Mike...
The quality is remembered long after the price is forgotten, so build your teardrop with the best materials...
User avatar
mikeschn
Site Admin
 
Posts: 19202
Images: 479
Joined: Tue Apr 13, 2004 11:01 am
Location: MI
Top

Re: Step 3: Build the floor

Postby backwoodsman » Tue May 31, 2005 8:54 am

mikeschn wrote:Step 3: Build your floor ½” fir plywood
(Revised 10-May-2005 to allow for sidewalls to cover trailer frame)

The floor is built from 2 sheets of 5’x5’x1/2” Baltic birch., and xx 1x2s. Cut both sheets of Baltic birch to 48” x 58 ½. Place the two sheets together on a flat surface, so that you end up with a rectangle 96”x58 ½”. (The trailer is 58” x 96”. The floor should hang over the trailer by about ¼” on each side.


Mike,

Why do you hang the floor over 1/4" on the edges? I was thinking of making mine flush using the full 5' width of the plywood. (I am not using the red trailer, I'm going to weld my own)
What gives?
Thanks,
Greg
You don't know what you don't know!
User avatar
backwoodsman
Donating Member
 
Posts: 106
Images: 35
Joined: Wed Mar 23, 2005 5:28 pm
Location: Tyler, Texas
Top

Postby mikeschn » Tue May 31, 2005 9:00 am

The 1/4" overhang is to allow for inaccuracies in the trailer, and to allow the wall to bolt up flush with the subfloor/floor.

You could indeed make it flush with the trailer. But you have to ensure that it is flush and that the trailer doesn't protrude out past the floor. If it does, you'll have a hard time getting your walls to stay vertical.

Mike...
The quality is remembered long after the price is forgotten, so build your teardrop with the best materials...
User avatar
mikeschn
Site Admin
 
Posts: 19202
Images: 479
Joined: Tue Apr 13, 2004 11:01 am
Location: MI
Top

Why baltic birch.

Postby Mitheral » Mon Sep 05, 2005 12:12 pm

TomS wrote:Also, why use Baltic birch for the floor. You're only going to cover it up. ACX ply is cheaper and easier to find.


Advantages of Baltic Birch:
1) Comes in 5'X5' sizes. Less waste.
2) Twice as many layers, stronger product.
3) No internal voids, stronger product.

The extra laminations make it worth it all by it's self; the lack of voids will make it less likely to delam from moisture.
Mitheral
Teardrop Master
 
Posts: 179
Images: 19
Joined: Mon Sep 05, 2005 12:05 pm
Location: Canada
Top

Re: Why baltic birch.

Postby asianflava » Mon Sep 05, 2005 1:57 pm

Mitheral wrote:Advantages of Baltic Birch:
1) Comes in 5'X5' sizes. Less waste.
2) Twice as many layers, stronger product.
3) No internal voids, stronger product.


Mine was actually 60 1/8 in. I used glued up panels for my cabinetry, I never cut the ends which insured that they would be the same length and parallel.
User avatar
asianflava
8000 Club
8000 Club
 
Posts: 8412
Images: 45
Joined: Mon Aug 02, 2004 5:11 am
Location: CO, Longmont
Top

Re: Why baltic birch.

Postby Mitheral » Fri Sep 09, 2005 3:42 pm

asianflava wrote:Mine was actually 60 1/8 in. I used glued up panels for my cabinetry, I never cut the ends which insured that they would be the same length and parallel.


Thats cool, one free saw cut.
Last edited by Mitheral on Fri Sep 09, 2005 10:23 pm, edited 1 time in total.
Mitheral
Teardrop Master
 
Posts: 179
Images: 19
Joined: Mon Sep 05, 2005 12:05 pm
Location: Canada
Top

Postby bledsoe3 » Fri Sep 09, 2005 8:01 pm

Mitheral, Are you building the generic Benroy. If so, where are you at on it?
If you do what you've always done, you'll get what you've always got.
User avatar
bledsoe3
3000 Club
3000 Club
 
Posts: 3694
Images: 112
Joined: Tue Jun 07, 2005 5:55 am
Location: Oregon, Portland
Top

Next

Return to Generic Building Plans

Who is online

Users browsing this forum: No registered users and 4 guests