Beginners Tool Kit!

Important Information and Stickies...
(Threads with essential information about building teardrops)

Re: Beginners Tool Kit!

Postby Cliffmeister2000 » Tue Jun 19, 2012 9:21 am

Very nice! I also like the lace curtains above the workbench. If I had those, I'd have a fire in no time! :D
God Bless

Cliff

♥God. ♥People.
1 John 4:9-11

My Teardrop build pictures
User avatar
Cliffmeister2000
Titanium Donating Member
 
Posts: 3622
Images: 157
Joined: Thu Jul 26, 2007 10:18 pm
Location: Phoenix, AZ

Re: Beginners Tool Kit!

Postby artfd » Tue Jun 19, 2012 9:55 am

Would like to know the dimensions of the Perspex piece, cost & source.
artfd
Teardrop Advisor
 
Posts: 62
Images: 4
Joined: Wed Apr 01, 2009 9:56 pm
Location: NE OH

Re: Beginners Tool Kit!

Postby webbaldo » Tue Jun 19, 2012 2:07 pm

Cliffmeister2000 wrote:Very nice! I also like the lace curtains above the workbench. If I had those, I'd have a fire in no time! :D


Lol!, its just my shed nets (curtains) to stop people noseying in! Ive welded classic mini car shells and they havent caught fire yet lol! Got the extinguisher incase!

The perspex is actually 1/2" thick, sourced from work. (I work in a school with a big 'wood shop' so plenty of spare bits knocking around.) It was actually an old door sign protector. The knob is off a wood plane which is no longer useable. I used longer screws to attach the router and countersunk the holes in the plastic. Same with knob. Cost - free!

I used the original router base (thin plastic under the main cast body) to align the screw holes. I then attached the router and with a bit installed, plunged the router down to get the exact centre for the main hole. I then removed the router and used a holesaw to cut the main hole. Once cut I just reassembled everything.

It just screws on so isnt permenant and the original base can easily be screwed back on

My router is a cheap generic model and quite small. The perspex is roughly 14inch x 8. Not measured to any particular size, just the width it came in.

Im using the other side of the offcut for the router sub-base for my router table project. When I get around to it!
Likes to think he's Norm from New Yankee Workshop

In reality, hes a average DIY'er with a 18x16ft Wooden shed
webbaldo
Teardrop Master
 
Posts: 243
Images: 0
Joined: Tue Jun 12, 2012 1:51 pm
Location: Europe
Top

Re: Beginners Tool Kit!

Postby artfd » Wed Jun 20, 2012 9:18 am

I have purchased special bases for this kind of router, but nothing offered for sale is as appropriate as what you devised. Thanks for posting, it's a great idea.
artfd
Teardrop Advisor
 
Posts: 62
Images: 4
Joined: Wed Apr 01, 2009 9:56 pm
Location: NE OH
Top

Re: Beginners Tool Kit!

Postby webbaldo » Thu Jun 21, 2012 1:21 am

artfd wrote:I have purchased special bases for this kind of router, but nothing offered for sale is as appropriate as what you devised. Thanks for posting, it's a great idea.


No problem, thanks!, Like I said however I can't take credit for the idea, ive just made my own version of the 'off the shelf' version.

Im actually gonna try build a very basic (and I mean basic) router table over the next few days so ill post some pics when done. Just need to find some straight mdf first!
Likes to think he's Norm from New Yankee Workshop

In reality, hes a average DIY'er with a 18x16ft Wooden shed
webbaldo
Teardrop Master
 
Posts: 243
Images: 0
Joined: Tue Jun 12, 2012 1:51 pm
Location: Europe
Top

Re: Beginners Tool Kit!

Postby angeli » Sat Sep 15, 2012 10:56 am

I think with my luck, probably a nice big rubber mallet and some plastic explosives would be an essential part of the tool kit. :fb
Wherever you go, there you are.
User avatar
angeli
Teardrop Inspector
 
Posts: 9
Images: 2
Joined: Mon Sep 10, 2012 1:20 am
Location: FL
Top

Re: Beginners Tool Kit!

Postby webbaldo » Sun Feb 24, 2013 8:29 am

Ive been building my TD for four months now a night or two a week and ive come to find the following items indispensable.

Alu Trim Drilling Jig

Image

I made this just using scrap wood, and fitted it to my drill press base. Its a kinda mini drill press table.

Image

I built it to drill the holes regularly and accurately in all my trim. Ive marked 4inch lines either side, all my trim has fixings 4inchs apart.

Image
Image

Finally the bit at the front is to lock in place the half round molding when drilling it. It just bolts to the table.

My second set is two jigs which are dead handy, a round corner jig which is used for all my cabinets,

Image
Helped to make the round edges
Image

And the other is a right angle jig I used to build all my cabinet framing using a pocket hole screw jig from kreg. (The cheapest one), wrote all the measurements on back as well!

Image
Image

As you can see us brits use metric and imperial measurements at the same time lol!, best of both worlds. Hope these help someone else! I picked the ideas up from around the net.
Likes to think he's Norm from New Yankee Workshop

In reality, hes a average DIY'er with a 18x16ft Wooden shed
webbaldo
Teardrop Master
 
Posts: 243
Images: 0
Joined: Tue Jun 12, 2012 1:51 pm
Location: Europe
Top

Re: Beginners Tool Kit!

Postby markhusbands » Wed Apr 24, 2013 9:41 pm

Before starting my current teardrop project, I had never used a plunge router or pocket screws. I have a hard time imagining how I'd do this project without them. And I am using a mini-Kreg jig - OFTEN.
133923
User avatar
markhusbands
Teardrop Master
 
Posts: 285
Images: 58
Joined: Tue Jul 03, 2012 3:17 pm
Location: Denver, Colorado, USA
Top

Re: Beginners Tool Kit!

Postby webbaldo » Mon May 13, 2013 5:45 am

markhusbands wrote:Before starting my current teardrop project, I had never used a plunge router or pocket screws. I have a hard time imagining how I'd do this project without them. And I am using a mini-Kreg jig - OFTEN.


seconded, best £10 ive ever spent.
Likes to think he's Norm from New Yankee Workshop

In reality, hes a average DIY'er with a 18x16ft Wooden shed
webbaldo
Teardrop Master
 
Posts: 243
Images: 0
Joined: Tue Jun 12, 2012 1:51 pm
Location: Europe
Top

Re: Beginners Tool Kit!

Postby donnan » Tue May 21, 2013 4:34 am

Well I have read through this thread and I have realised if you can't find your tools and you have numerous of them ie; tape measures, pencils, drill bits........ you are not the type of person that likes organisation and put things back where they belong.

Remember in woodwork class...there was a peg board on the wall and all those nice black silouhette's where each tool needed to be returned after use?

If I don't put things back where they go, I just lose them. Like a number of you here. Start putting your tools back where they belong and you will find them EVERYTIME you need them.

I am a Handyman and I use all sorts of tools everyday. If I don't put tools back where they go EACH time I use them, then they are lost and I waste too much time looking for them. It's common sense guys.....put your tools in a home and that is where they belong. Keep putting them back there and they are always there when you need them.! :R

Paul
Life is too short not to enjoy it :)
When I gamble I like to win.
http://www.realpayers.com
User avatar
donnan
Teardrop Advisor
 
Posts: 64
Images: 8
Joined: Sun May 12, 2013 12:18 pm
Location: Tamworth Australia
Top

Re: Beginners Tool Kit!

Postby Squareback » Mon Mar 10, 2014 8:44 pm

:cry: Used to be I couldn't get in the door for being a small fry. Now I find I'm omitted for being too big!
Not going to list the tools I'm using cause it would probably just piss everybody off. :x
http://www.imageevent.com/cabinetry :D
LEVI
Image
User avatar
Squareback
Teardrop Inspector
 
Posts: 21
Images: 7
Joined: Sun Mar 09, 2014 1:29 pm
Top

Re: Beginners Tool Kit!

Postby ctstaas » Sat Mar 29, 2014 8:09 pm

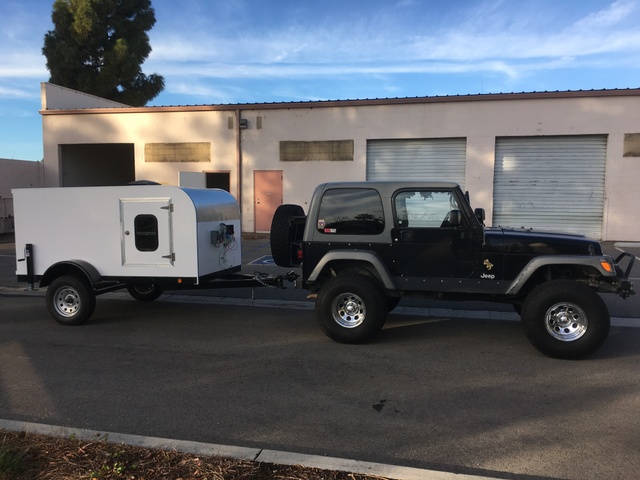
All the tools I used to make this trailer were previously owned by me and are common to most shadetree workers. Tool substitution for budgetary concerns or user preference is totally acceptable. I welded the frame with a Lincoln 110V wire feed welder with 0.30”flux cored wire. Multiple passes were required on some weld joints and a larger welder could have reduced this requirement. A “buzz box” stick welder would be a very inexpensive alternative to use in this application. The welds were ground with a 4” Makita disk grinder were needed. All holes were drilled with a bench top drill press or hand held drill. The steel and aluminum pieces were cut with a abrasive cut off saw, portable band saw and hack saw. Many types of saws could be used to cut the steel but the aluminum trim required a high level of accuracy and was done by hand with my hacksaw and a miter box. I cut most of the wood with my Skill saw but most would prefer to cut the curves with a jig saw or other reciprocating type saw. A hand held rip saw, coping saw, and back saw were used on several pieces. Other wood cutting was done with a vibrating wood saw. The use of a table saw would be beneficial but is not required. Several types of clamping devises were used including 5’ pipe clamps. C-clamps, vise grips, strap clamps, and spring clamps. Other hand tools include hammers, tape measure, center punch, pen, pencil, soapstone, felt tip marker, pop rivet gun, screwdrivers, cordless screwgun, number/letter stamps, pliers, wire cutters, wire strippers, adjustable wrench, caulking gun, ratchet/ sockets, Wire brush, soldering torch, combination square, framing square, paint brush, putty knife or four-in-one, metal files, wood chisel, VOM, Pressure test gauge, torque wrench, 4’striaght edge. I used a pad sander and belt sander to prep for paint. Electrical connections were soldered with an electric solder iron.

Numerous providers were needed to procure the multiple parts are materials required. The steel for the frame was purchased from the local steel supply house. The plywood and lumber, fire extinguishers, glue, screws, copper tube and fittings, flux and solder, tape, wire, electrical trim, galley hatch latches, Teflon tape, bolts, nuts, washers, paint, and primer were purchased from a building supply store. I bought the trailer hitch, exterior lights, fenders, aluminum trim, door hinges, inverter, battery and connecters, solar panel, trailer jack, safety chain, battery powered lights and receiver from an agriculture supply house. The axles were bought on-line. I bought the tires and wheels from a commercial tire warehouse. The roof vent, interior and galley lights, battery box, propane supply lines, and interior fan were purchased from an RV dealer. The hurricane hinge, weather drip edge, door latches and handles, and windows were purchased from Lil Bear Teardrop Trailers. The flat screen DVD player was purchased at a national chain store. The welding supplies, sundries, and safety equipment were purchased from an industrial gas supplier. I found the foam for the mattress from the army surplus store.
ctstaas
Teardrop Master
 
Posts: 252
Images: 12
Joined: Sat Mar 22, 2014 4:40 am
Top

Re: Beginners Tool Kit!

Postby bywil45 » Sun Apr 06, 2014 11:36 am

Bonjour à tous,

Et oui, je suis Français, et comme tout bon français, je parle très mal anglais, et je l'écris encore plus mal.
Je possède un peu d'équipement, Scie sauteuse, fraiseuse à lamello, Visseuse. Il me manque pas mal d'outil, mais je vais m'équiper doucement.

mon plus gros problème est de trouver des accessoires comme les charnière de teardrop, (hinges hurricane). Cela n'existe pas en France, ou alors, je ne sais aps ou chercher.

Si vous avez des plans pour ça, je vous donne de l'argent pour que vous m'en envoyez en France.

Pour en revenir à l'outillage, je vais déjà tâcher d'acheter des produits KREG TOOL.

:thinking:
Wilhem BENCE

Le france ne connait pas les teardrop, je vais changer la donne en devenant la seul société de fabrication française.
bywil45
Teardrop Inspector
 
Posts: 5
Images: 16
Joined: Sun Apr 06, 2014 9:38 am
Location: Bazoches les gallerandes, France
Top

Re: Beginners Tool Kit!

Postby grantstew8 » Tue Apr 08, 2014 8:58 am

Bienvenue sur le forum

Comme beaucoup de gens anglais mon français est terrible et prononuciation est terrible.
Pour parler à mes amis qui sont Brésiliens qui vivent à Nice, j'utilise google translate. Ce n'est pas parfait; une partie de la traduction demande de l'imagination à comprendre, mais il fonctionne.

Je suis en Ecosse et comme vous avez du mal à trouver des pièces de rechange pour la remorque.
Ils sont souvent appelés des noms différents, donc une charnière de l'ouragan est parfois appelé une charnière décalage. La charnière pour la cuisine à l'arrière est appelé une charnière continious et ainsi de suite.

J'ai trouvé une pièce de rechange fournisseur de pièces de camion en Angleterre qui a toutes les pièces dont j'ai besoin. Je suis sûr que les usines de fabrication de moteur français, il doit y avoir des fournisseurs semblables autour de vous.

Bonne chance et ne pas avoir peur d'écrire sur le forum et il suffit d'utiliser Google Translate.

***************************************************************************************************************************************************************

Welcome to the forum

Like many english people my french is terrible and prononuciation is awful.
To speak to my friends who are Brazillian who live in Nice, I use google translate. It's not perfect; some of the translation requires imagination to understand but it works.

I'm in Scotland and like you have struggled to find spare parts for the trailer.
They are often called different names, so a hurricane hinge is sometimes called an offset hinge. The hinge for the kitchen at the back is called a continious hinge and so on.

I have found a truck spare part supplier in England that has all the parts I need. I am sure with the french motor manufacturing plants, there must be similar suppliers around you.

Good luck and don't be afraid of writing to the forum and just use google translate.
User avatar
grantstew8
The 300 Club
 
Posts: 448
Images: 77
Joined: Tue May 28, 2013 5:26 pm
Location: Dunfermline, Scotland
Top

Re: Beginners Tool Kit!

Postby bywil45 » Thu Apr 24, 2014 8:26 am

Bonjour à tous.

J'ai trouvé des charnières hurricane. mais celle-ci me paresse mieux que ce que j'ai pu trouvé sur les sites américain.
La charnière arrive près à fleur de a tôle. Elle ne se voit presque pas.

Ma grande question, est comment faire pour que mes éléments ne glisse pas. En effet, je vais également m'en servir pour mes portes latérales. De ce fait, les charnières vont être en position verticale. Qu'est que qui va empêcher ma porte une fois ouverte de glisser et tomber.

Merci.

*************************

Hello to all.

I found hinges cyclone. But this one is better lazy to me than what I was able to found on sites American.
The hinge arrives near on the surface of has sheet steel. it does not almost see itself.

My big question, is how is that my elements do not slide. Indeed, I am also going to use it for my side doors. Therefore, hinges are going to be in vertical position. Whom is that which is going to prevent my door open time from sliding and from falling.

Thanks.
Wilhem BENCE

Le france ne connait pas les teardrop, je vais changer la donne en devenant la seul société de fabrication française.
bywil45
Teardrop Inspector
 
Posts: 5
Images: 16
Joined: Sun Apr 06, 2014 9:38 am
Location: Bazoches les gallerandes, France
Top

PreviousNext

Return to Essential Information about building teardrops

Who is online

Users browsing this forum: No registered users and 1 guest