Gadget Mans Adventure Trailer Photos

Converting Cargo Trailers into TTTs

Re: Gadget Mans Adventure Trailer Photos

Postby pete42 » Sat Mar 31, 2012 10:45 am

Any time you get tired of building and want to sell can I have first choice?
I really am amazed by the talent you guys poscess Me on the other hand I couldn't make a toothpick from a log
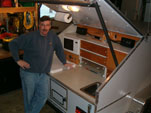
Pete
User avatar
pete42
Super Lifetime Member
 
Posts: 2203
Images: 13
Joined: Sat Nov 07, 2009 11:52 am
Location: SouthWest Ohio

Re: Gadget Mans Adventure Trailer Photos

Postby svu3r93 » Sat Mar 31, 2012 11:25 am

Since you have done such a fantastic job on your entire trailer - workmanship and stain color - I'd get the unfinished doors, and stain to match the rest of the trailer. You are an inspiration to everyone on this forum!
svu3r93
Teardrop Inspector
 
Posts: 19
Images: 47
Joined: Fri Nov 25, 2011 10:50 pm
Location: Reno, NV

Re: Gadget Mans Adventure Trailer Photos

Postby pappaw » Sat Mar 31, 2012 4:22 pm

:thumbs up1:
Image Cheers from Granny, Pappaw, and Cocoa (the Dachshund) Image
pappaw
Teardrop Master
 
Posts: 240
Images: 14
Joined: Mon Nov 22, 2010 12:15 pm
Location: S.W.Ohio
Top

Re: Gadget Mans Adventure Trailer Photos

Postby PKCSPT » Sat Mar 31, 2012 9:26 pm

If I HAD won the lottery I think I would have hired you to build us a CT conversion.
Its beautiful and has me thinking.
121172 116946 159644
PKCSPT
Silver Donating Member
 
Posts: 1515
Images: 61
Joined: Wed Mar 31, 2010 11:27 pm
Location: Minnesota
Top

Re: Gadget Mans Adventure Trailer Photos

Postby Gadget Man » Sat Mar 31, 2012 9:33 pm

Thanks for all the great compliments.
I hope you guys can get some ideas from my build pictures and can see it's not that hard to build with wood.

Today I mounted my sofa/bed to the wall.
You will see my idea for place to haul my fishing rods without them getting broken. I mounted a 4 inch tube under the bed so I can slide them in from the back. I have to fix the big scratch I put in the tube. I can haul awning poles or marshmallow sticks in there also.
The reason I had to make these wooden stands were so I could cut the metal wall brackets and make the mounts 2 inches narrower than it would have been if I left them "stock".
If I would have left them stock I would not have been able to put two sofa/beds in the trailer. I only have 80 inches inside my trailer. Now I'm still at 41 inches for one bed, but I know I can squish 1 inch of the cushion into the other bed.

Image

Image

Image

Image

Image

Image

Image

One down, One to go.

Gadget Man
My kids may be smarter than me,
But I know more.
User avatar
Gadget Man
Teardrop Master
 
Posts: 298
Images: 23
Joined: Tue May 10, 2005 4:41 pm
Location: Elk River MN
Top

Re: Gadget Mans Adventure Trailer Photos

Postby Gadget Man » Sun Apr 01, 2012 8:06 pm

OK, so today I was able to mount the left side sofa/bed.
The poly was still tacky this morning from me putting on the second coat last night at midnight. I really wanted to finish today.
Here are a few pictures of the left side sofa install and a few shots of some interior decorating I did with a couple old metal signs I had.

When the two beds are folded down, they are tight together, sort of makes one big bed. My wife wanted me to mount the two couches exactly across from each other so they would make one big bed when folded down. Sleeping sideways across the trailer. 80 inches vs 68 inches.
It would have been nice, but then I would not have had room for the rear wine bottle cabinet.
I still want to mount a few little shelf's somewhere, but otherwise all the big construction projects are finished, except the rear screen door and make the back ramp a level patio, hanging from chains.

Image

These are the custom mounts I had to build. I had to cut 3 inches off of the stock bracket in order to get them to fit inside my Trailer.

Image

Image

Image

Image

Image

Image

Image

I have two of these table posts. I think I'll make two small personal tables rather than one big table.

Image

Image

This is how I see the trailer most of the time. The left side folded up so we can walk past and get out on the ramp/patio and the right side down so we can sit and see the TV. Then there will be a little snack table somewhere in the middle
:D

Gadget Man
My kids may be smarter than me,
But I know more.
User avatar
Gadget Man
Teardrop Master
 
Posts: 298
Images: 23
Joined: Tue May 10, 2005 4:41 pm
Location: Elk River MN
Top

Re: Gadget Mans Adventure Trailer Photos

Postby Trainman45 » Mon Apr 02, 2012 2:16 am

Hi GMan,
Excellent build. !! ... Looking forward to some pics while your out camping to see it in action. :applause:
Ride the Rails,
Trainman
User avatar
Trainman45
Teardrop Advisor
 
Posts: 69
Images: 57
Joined: Mon Oct 24, 2011 2:50 pm
Location: Southwest Traveler USA
Top

Re: Gadget Mans Adventure Trailer Photos

Postby pappaw » Mon Apr 02, 2012 10:23 am

Trainman45 wrote:Hi GMan,
Excellent build. !! ... Looking forward to some pics while your out camping to see it in action. :applause:


Yea, what he said, lol 8)
Image Cheers from Granny, Pappaw, and Cocoa (the Dachshund) Image
pappaw
Teardrop Master
 
Posts: 240
Images: 14
Joined: Mon Nov 22, 2010 12:15 pm
Location: S.W.Ohio
Top

Re: Gadget Mans Adventure Trailer Photos

Postby pete42 » Mon Apr 02, 2012 10:47 am

I for one have your post book-marked for that if and when moment I ever get a cargo trailer.
please keep us up to date on the little things that make your build stand out I just know your not finished.
I too want a 7 foot wide,
the bunks I want don't need to be very wide I need an aisleway for those late night
potty breaks which seem to come more frequent than they did 30 years ago.
thanks again for sharing :wine:

pete
User avatar
pete42
Super Lifetime Member
 
Posts: 2203
Images: 13
Joined: Sat Nov 07, 2009 11:52 am
Location: SouthWest Ohio
Top

Re: Gadget Mans Adventure Trailer Photos

Postby Gadget Man » Sat Apr 07, 2012 9:22 pm

Friday was my Birthday and I had it off from work for Good Friday, my wife had to work so I guess I get a free pass to play in the garage all day.
My wife came home and she asked what I was building that "tray" for? I told her it was special project just for her.
She could not figure out what it was. She kept thinking it was a shelf or a tray.
I stained it so it would match everything else. I really had her going right up until the last moment, when I screwed it to the floor in the bathroom.
My wife and I are both right at 6-foot, so lifting the porta-potty up 2 inches made it much more comfortable.

I also made some new cabinet doors out of real oak so I could stain them to match everything else. I like it better that the pre-stained doors I tried to make work.

Image

Image

Image

Not a "tray" at all...
I made a 2" riser for my Porta-Potty. It's 3/4 oak plywoor framed with 2.5 oak and screwed to the floor for a very solid platform.
I then sewed up a strap to hold everything in place going down the road.

Image

Image

Image

Image

Gadget Man.
My kids may be smarter than me,
But I know more.
User avatar
Gadget Man
Teardrop Master
 
Posts: 298
Images: 23
Joined: Tue May 10, 2005 4:41 pm
Location: Elk River MN
Top

Re: Gadget Mans Adventure Trailer Photos

Postby Gadget Man » Sat Apr 07, 2012 9:33 pm

Saturday Morning Project.
I worked on mounting the LED lights up under the cabinets. I wanted them to shine down on the sofas while sitting so one could read.
These lights have a dimmer switch so the brightness is adjustable. I found them on E-Bay.
They turned out just as I thought when I ordered them.

Image

Image

Image

Gadget Man
My kids may be smarter than me,
But I know more.
User avatar
Gadget Man
Teardrop Master
 
Posts: 298
Images: 23
Joined: Tue May 10, 2005 4:41 pm
Location: Elk River MN
Top

Re: Gadget Mans Adventure Trailer Photos

Postby Gadget Man » Sat Apr 07, 2012 10:03 pm

I did one more thing to the trailer on Friday, I took out the stock plain-Jane roof vent and mounted my Fantastic Fan. I'm not sure of the model number
but it's the one with forward and reverse with the 3 speed fan with thermostat.
I wasn't sure what to expect when I climbed up on the roof. I laid out a couple half sheets of 1/2 inch plywood on the roof to distribute my 210 pounds evenly over the roof so I could lay across the roof and work on the vent.
I found out that a very sharp razor blade scrapper would cut off the factory sealant like a hot knife through butter. I removed all the sealant and all the screws and the old vent came right out.
The Fantastic Fan was a perfect fit in the factory hole. I used an entire tube of 50 year silicone to seal the new vent.
I works like a million-bucks.
Now I think I'll temporarily mount the old stock vent in the still un-cut hole I had the factory install in the back for the air conditioner.
I have one of those clam-shell covers for the stock vent so I can leave it open a couple inches all the time to keep the trailer aired out. I chose not to mount one of the clam-shell covers on the Fantastic Fan because it prevents you from opening it more than 2 inches. I wanted to be able to crank it wide-open for maximum air flow.

Image

Image

Image

Image

Image

Image

Image

Here is a picture of the clam-shell cover thing I was talking about.
I'm going to mount this in the second vent hole I have in the rear of the trailer.
Then when I finally get an air conditioner, I can remover this vent and mount the A/C unit. The 120 volt AC wire is already in the ceiling.

Image

Gadget Man
My kids may be smarter than me,
But I know more.
User avatar
Gadget Man
Teardrop Master
 
Posts: 298
Images: 23
Joined: Tue May 10, 2005 4:41 pm
Location: Elk River MN
Top

Re: Gadget Mans Adventure Trailer Photos

Postby Gadget Man » Sun Apr 15, 2012 9:14 pm

I have a few more pictures of the Adventure Trailer insides after the sofa/beds were installed.
And a few pictures of how I added 2 more 12 volt plug-ins up in my bar cabinet area. I bought a 2-plug outlet and cut the "male" end off and hard wired it to a separate 12 volt circuit I already put inside the wall. This will mostly be to plug in the TV when I want to run it on 12 volt power.

Image

Image

Image

Image

Image

Image

Image
My kids may be smarter than me,
But I know more.
User avatar
Gadget Man
Teardrop Master
 
Posts: 298
Images: 23
Joined: Tue May 10, 2005 4:41 pm
Location: Elk River MN
Top

Re: Gadget Mans Adventure Trailer Photos

Postby Kankujoe » Fri Apr 20, 2012 2:03 am

Gadget Man,

Your build looks great!

Will you be adding any tie down points for transporting your bikes?
Joe

Ad-ven-ture: 1. an undertaking involving risk, unforeseeable danger, or unexpected excitement. 2. an exciting or remarkable experience. Trav-el-er: 1. one who seeks to experience their world. 2. one who seeks to be immersed in other cultures.
User avatar
Kankujoe
Adventure Traveler
 
Posts: 301
Images: 19
Joined: Sun Mar 04, 2007 1:30 am
Location: Missouri, West-Central - Out in the Woods
Top

Re: Gadget Mans Adventure Trailer Photos

Postby pete42 » Fri Apr 20, 2012 8:16 am

I checked your build once again and even though I have seen it before I wonder if you had placed the wine
cabinet under the TV against the bath wall you could have mounted the beds straight across from each other
don't get me wrong I would never tell you how to build I'm just wondering.

yours is the build I will look at for ideas if and when............

pete
User avatar
pete42
Super Lifetime Member
 
Posts: 2203
Images: 13
Joined: Sat Nov 07, 2009 11:52 am
Location: SouthWest Ohio
Top

PreviousNext

Return to Cargo Trailer Conversions

Who is online

Users browsing this forum: No registered users and 7 guests