I also do some metal working and fabrication.
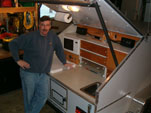
Here is a picture of the rolling bench I built a couple years ago. It's been getting a workout lately.
I'm not sure which Kreg pocket screw set I have, but it was close to $90.00 when I bought it. The key is the special drill bit with the stop collar.
And as far as my 12 inch chop saw, I use a fine toothed carbide blade for all this oak I've been cutting. I switch back to a rough cut carbide blade for cutting construction lumber.
The camera is a small Canon Power Shot SD940 IS, 12.5 Mega Pixels.


Gadget Man