6x12 Loadrunner Cargo Conversion - Keeping It Simple

Converting Cargo Trailers into TTTs

6x12 Loadrunner Cargo Conversion - Keeping It Simple

Postby webforage » Mon Aug 23, 2010 8:47 pm

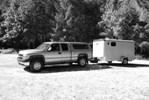
I recently bought a new 6x12 Interstate Loadrunner cargo trailer with the idea of converting it to a camp trailer. My limited skills and tools dictate that I keep the conversion very simple. I also want to keep the trailer design flexible so I can still haul larger items if needed. Most of the items I’m using are off the shelf items or things I already have.
Image

Stay tuned.[/img]
Favorite tools: 3 lb hammer and a circular saw.
User avatar
webforage
Teardrop Builder
 
Posts: 25
Images: 39
Joined: Mon Aug 23, 2010 2:20 pm
Location: Oregon

Floors

Postby webforage » Mon Aug 23, 2010 8:50 pm

The first things I did was to put in some flooring. I used Traffic master Resilient Flooring with a bamboo design. It is a heavy vinyl that comes in 6â€
Favorite tools: 3 lb hammer and a circular saw.
User avatar
webforage
Teardrop Builder
 
Posts: 25
Images: 39
Joined: Mon Aug 23, 2010 2:20 pm
Location: Oregon

Postby webforage » Mon Aug 23, 2010 8:54 pm

Walls
Next I put up wood paneling on the side walls. The paneling was inexpensive 1/8â€
Favorite tools: 3 lb hammer and a circular saw.
User avatar
webforage
Teardrop Builder
 
Posts: 25
Images: 39
Joined: Mon Aug 23, 2010 2:20 pm
Location: Oregon
Top

Postby webforage » Mon Aug 23, 2010 8:56 pm

Rear Ramp
The trailer has a ramp on the rear wall that folds down. I installed vinyl tile on this. I used traffic master peel and stick. It did not stick very well. I found it takes about a week for the tile adhesive to set. With the hot weather the tiles would fall off when I had the ramp up. I ended up stapling some of the tiles around the bottom of the ramp. Now, after a few weeks, they are really adhering to the ramp. I’m hoping this problem is solved.
Image
Favorite tools: 3 lb hammer and a circular saw.
User avatar
webforage
Teardrop Builder
 
Posts: 25
Images: 39
Joined: Mon Aug 23, 2010 2:20 pm
Location: Oregon
Top

Postby webforage » Mon Aug 23, 2010 9:01 pm

Windows
I bought two 14 x 23 inch windows. The install took quite a bit of work. I made a template and cut the first window using a jig saw. However, the long blade bent and made the inside cut too large. I caught this before I went too far but had to adjust the placement to cover the inside cut. On the second window I cut the outside about 3/8â€
Favorite tools: 3 lb hammer and a circular saw.
User avatar
webforage
Teardrop Builder
 
Posts: 25
Images: 39
Joined: Mon Aug 23, 2010 2:20 pm
Location: Oregon
Top

Postby webforage » Mon Aug 23, 2010 9:03 pm

Where’s the Spare?
I welded a cross bar to the underside of the A frame and mounted the spare under the tongue. I will add a safety cable to lock it down. I also welded sheet metal to the top of the tongue to mount a storage box.
Image
Favorite tools: 3 lb hammer and a circular saw.
User avatar
webforage
Teardrop Builder
 
Posts: 25
Images: 39
Joined: Mon Aug 23, 2010 2:20 pm
Location: Oregon
Top

Postby webforage » Mon Aug 23, 2010 9:07 pm

Lights
I found some LED 120 v lights at Ikea. They’re very bright for LEDs and slipped easily between the roof ribs and the luan on the ceiling. They come in a pair and have a long cord with a switch. I ran the wire along the top of the wall behind the molding and mount the switch to the wall near the front of the trailer.
Image

I found another LED light at Big Lots that runs on both 120v and AA batteries. It has three sets of LEDs that can pivot and automatically switches between power sources. It is not as bright but I like having a battery light.
Image

My favorite light is the red rope light. I had this and thought it might work. I laid it behind the molding above the paneling. The light is indirect and reflects off the aluminum for an interesting effect. I think it is pretty cool but my wife thinks it is a bit gaudy and reminiscent of a brothel. Can’t make everybody happy all the time.
Image
Rope light exposed
Image
Favorite tools: 3 lb hammer and a circular saw.
User avatar
webforage
Teardrop Builder
 
Posts: 25
Images: 39
Joined: Mon Aug 23, 2010 2:20 pm
Location: Oregon
Top

Postby webforage » Mon Aug 23, 2010 9:13 pm

Bed/couch
I found a couch/bed/chaise lounge at Ikea. It folds down into a double bed. The head of the bed will also fold up so it is like a chaise lounge. I added some sliders on the feet so it won’t damage the floor when sliding it out into the bed position. I need to add something to secure it for traveling.
Image

Storage
Ikea also had storage racks that will take several different sizes of baskets. I also found some heavy wood cutting boards that fit on top of the racks that made really good counter tops. The racks also are stackable and clip together so they are easy to secure and more stable. We had one of those organizers that have a lot of pockets so I hung it on the side of the tall rack for additional storage.
Image

Entertainment
Of course I had to add my TV which is really an extra monitor I had that has a built in tuner. I added some rabbit ears and it works. I have a couch and a remote. It does not get better. 8)

Table
I had an old wood table that came out of a trailer. I cut the top down and hung it on the wall using a piano hinge. I then used a couple coat hooks on the wall above the table to secure the cables that keep the up when in use. When not in use it folds down against the wall and the hooks can be used to hang other items.
Image
Favorite tools: 3 lb hammer and a circular saw.
User avatar
webforage
Teardrop Builder
 
Posts: 25
Images: 39
Joined: Mon Aug 23, 2010 2:20 pm
Location: Oregon
Top

Postby starleen2 » Mon Aug 23, 2010 9:15 pm

Looking good so far :thumbsup: One thing I might suggest is a bungee cord to secure all them baskets during transit!
User avatar
starleen2
5th Teardrop Club
 
Posts: 16272
Images: 224
Joined: Sat May 12, 2007 8:26 pm
Location: Pea Ridge ,AR
Top

Postby webforage » Mon Aug 23, 2010 9:23 pm

Today I de-badged the trailer. I removed all of the Loadrunner decals and the unbearable dealer advertising. It looks so much cleaner without the oversized labels that were on all four sides. The vinyl decals that were warmed by the sun pulled off easily. The ones in the shade took a little more work. The dealer sticker left some residue that was hard to remove. I started with WD-40 but that did not remove the glue. I then tried some finger nail polish remover and that did not work. I finally went with the nuclear option and used brake disc cleaner. I did test this solvent out on an inconspicuous spot and it did not damage the paint. I would not recommend using this as it will take some paints off.
Image
I still need to think about heat, air, 12 volt and other items but I have a good start. It’s a fun project.
Favorite tools: 3 lb hammer and a circular saw.
User avatar
webforage
Teardrop Builder
 
Posts: 25
Images: 39
Joined: Mon Aug 23, 2010 2:20 pm
Location: Oregon
Top

Postby webforage » Mon Aug 23, 2010 9:34 pm

starleen2 wrote:Looking good so far :thumbsup: One thing I might suggest is a bungee cord to secure all them baskets during transit!


Securing everything is a must. I once forgot to latch my fridge door in a 5th wheel I had. By the time I made it to the campground I had quite a "trailer salad" on the floor. Mayo, mustard, and soda pop can make quite an interesting design.
Favorite tools: 3 lb hammer and a circular saw.
User avatar
webforage
Teardrop Builder
 
Posts: 25
Images: 39
Joined: Mon Aug 23, 2010 2:20 pm
Location: Oregon
Top

Postby pete42 » Tue Aug 24, 2010 10:02 am

Nice looking build :applause:

one day I'll join the CTC ranks.
User avatar
pete42
Super Lifetime Member
 
Posts: 2203
Images: 13
Joined: Sat Nov 07, 2009 11:52 am
Location: SouthWest Ohio
Top

Postby kstephenson » Tue Aug 24, 2010 1:11 pm

Nice looking conversion.....what part of the country are you from?
Have you considered insulating the trailer?
Kevin
Georgia State Parks Canyon Climbers Club
Hunting - Fishing - Camping- Backwoods
User avatar
kstephenson
Teardrop Advisor
 
Posts: 95
Images: 24
Joined: Fri Mar 12, 2010 12:31 pm
Location: Vidalia, Georgia
Top

Postby webforage » Tue Aug 24, 2010 9:36 pm

The trailer lives in western Oregon. I thought about insulation but so far I have not needed it. I might change my mind if I take it out to eastern Oregon in the winter but I don't have plans to do that just yet. Where I live the important thing is to keep out of the rain.
Favorite tools: 3 lb hammer and a circular saw.
User avatar
webforage
Teardrop Builder
 
Posts: 25
Images: 39
Joined: Mon Aug 23, 2010 2:20 pm
Location: Oregon
Top

Postby webforage » Tue Aug 31, 2010 8:20 pm

I'm still keeping my conversion simple. Very simple.

I added a battery box on the tongue. Its bolted down to the plate I welded on the tongue. Below it sits the spare and it has a safety/lock cable which also prevents access to the bolts holding down the battery box.
Image

I wired the 12v using a 12 guage wire. It’s not very big for a 12v system but I’m not going to be pulling very much load. I will be using it for some lights and a laptop.
Image

When parked I will run the cord back to the electric hatch on the side of the trailer. When towing, I will store the cord in the battery box. This picture shows both the 12v and 120v cords passing through the hatch.
Image
Image
Favorite tools: 3 lb hammer and a circular saw.
User avatar
webforage
Teardrop Builder
 
Posts: 25
Images: 39
Joined: Mon Aug 23, 2010 2:20 pm
Location: Oregon
Top

Next

Return to Cargo Trailer Conversions

Who is online

Users browsing this forum: No registered users and 4 guests