Gadget Mans Adventure Trailer Photos

Converting Cargo Trailers into TTTs

Re: Gadget Mans Adventure Trailer Photos

Postby Gadget Man » Thu Jun 07, 2012 9:10 pm

Don
My B&D converter did not really come with any factory way to mount it. There were little rubber feet on the bottom, I took them off and then drilled my own holes
in the corner plastic tabs so I could screw it to the wall. Once you get yours I'm sure you will see a way to mount it. Don't be afraid to drill your own holes, pick the appropriate screws firs then drill corresponding holes.

I went to Fastenal today and special ordered some 1.75 self tapping sheet metal screws for when I re-mount the bed and the wine rack back to the wall studs.
I never liked the original 1.50 inch screws I used, They felt a little short. So maybe moving the sofa/bed is all for the good. :roll:

I also bought a roof A/C unit. Stay tuned for some pictures of mounting that... :thinking:

Gadget Man :beer:
My kids may be smarter than me,
But I know more.
User avatar
Gadget Man
Teardrop Master
 
Posts: 298
Images: 23
Joined: Tue May 10, 2005 4:41 pm
Location: Elk River MN

Re: Gadget Mans Adventure Trailer Photos

Postby Wolfscout » Thu Jun 07, 2012 9:19 pm

I wonder if you could criss cross some Velcro strapping to mount that inverter on a wall.
I've been gnawing on doing something real similar on the door to my cabinet. I dislike the idea of using metal strapping to hold such a unit.
I've been racking my small brain to figure out how to make a nylon basket type holder that would work.
btw I like that Wagan Tech Smart 400Winverter.
Larry Fulmer, Jr.

2016 8X20 Homestead Patriot CTC
CTC 2

'90 6x12 Wells Cargo Trailer Conversion
my 1st build= CTC 1 FB album history.
User avatar
Wolfscout
500 Club
 
Posts: 511
Images: 32
Joined: Tue Jun 14, 2011 5:01 pm
Location: Newberry, S.C.

Re: Gadget Mans Adventure Trailer Photos

Postby Gadget Man » Sat Jun 09, 2012 9:34 pm

Well the 1.75 inch screws I ordered from Fastenal came in yesterday, so I decided it was time to move my sofa / bed.
Boy, what a difference good hardware makes, I had used El-cheapo screws from my local big-box home store and just never felt 100% on how secure everything was.
My original screws were 1.50" long #10 self tapping sheet metal screws because that was all I could find. When it came time to make some adjustments I thought it was time to go looking for some good quality screws of the proper size. I went to Fastenal and special ordered 1.75" inch #12 self taping screws. The 1.75" screws were really what I needed in the first place, the 1.50" inch screws just never bit far enough into the wall studs to make me happy.
I went through and swapped out all the 1.50" screws with these 1.75" screws. I bought 25 and used them all, I need to call and order more.

Here are a few photos of the screws, the good quality (american made ?) screw is on the left, the cheapo screw is on the right.
Not only are the #12 screws a bit larger, but the extra 1/4 inch in length bite further into the wall studs, they drill in faster and bite hard.
This first photo is of a package of 2.0" inch screws that I was going to use until I found the correct sized 1.75 inch screws, the 1.50" were the same brand.

I guess the moral of the story is...Don't skimp on the hardware.

Image

Image

Image

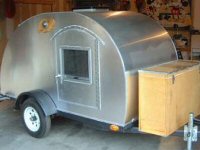
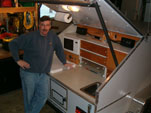
Then here is are a few photos of the newly relocated sofa -bed and wine cabinet.
The sofas are now directly across from each other so when folded down make a full sized bed. And when I moved the sofa back I had to move the wine rack.
So I decided to also lower the TV down about 6 inches. Then I measured and cut the bottom legs off the wine rack cabinet.
This lower section was originally going to be where the spare tire was going to be mounted. I'm not sure I'm all in love with the new placement of the sawed off cabinet, but I'll use it for now and think about building something different this winter.

Image

Image

Image

Image

Image

Image

Image

Gadget Man :beer:
My kids may be smarter than me,
But I know more.
User avatar
Gadget Man
Teardrop Master
 
Posts: 298
Images: 23
Joined: Tue May 10, 2005 4:41 pm
Location: Elk River MN
Top

Re: Gadget Mans Adventure Trailer Photos

Postby pete42 » Sun Jun 10, 2012 11:05 am

Gadgetman said "the 1.50" inch screws just never bit far enough into the wall studs"
without going back and reading your post again just how thick are your wall studs?
if you are referring to the metal studs then as you know any of the screw that "sticks" out through the metal stud doesn't do anything
I should not be surprized at how fast you make changes and how well everything looks.
your trailer comes the closes to what I would like in a trailer so keep me in mind if you ever think about selling.
pete
User avatar
pete42
Super Lifetime Member
 
Posts: 2203
Images: 13
Joined: Sat Nov 07, 2009 11:52 am
Location: SouthWest Ohio
Top

Re: Gadget Mans Adventure Trailer Photos

Postby Glenlivet » Sun Jun 10, 2012 12:56 pm

That had me wondering too... a guy would figure that as long as the threaded portion of a self tapping screw engages the metal stud for its very thin chord, then that's all it can do and any additional screw length does nothing but to increase any chance of punch-through.
But I'm missing something in my mental picture because the quality and soundness of all the work and design is top notch. I have followed this project with great interest.
User avatar
Glenlivet
Donating Member
 
Posts: 145
Joined: Thu Sep 08, 2011 10:07 pm
Location: Hope B.C.
Top

Re: Gadget Mans Adventure Trailer Photos

Postby Gadget Man » Sun Jun 10, 2012 2:38 pm

Thanks Guys for keeping me on my toes and for paying attention.

Keep in mind on a 1.75" self taping screw, the drill tip part (which is almost 1/4 inch) does nothing for holding power.
So when you measure from under the screw head to where the threads start it's only 1 3/8 inch. Even on a 1.75 inch screw.
So now my 1.75" screws are really back to 1 3/8" as far as holding power. So the 1.50" screws I originally used were really only slightly longer than 1.25 inch.

On my cabinet design I'm using all 3/4 inch oak. So when you add up the 3/4 inch oak, the 1/4 inch wall paneling, plus put a washer on the top, that adds up to over 1" .
My wall studs are 1" square tubing, perfect to screw into, The screw tip lands somewhere in the middle of the 1" square center. You will know when you hit the other side of the (inside) of the square wall stud, so no real fear of drilling all the way through, (boy, that would suck)

So now, with jumping from a #10 screw to a #12 screw, I feel better already, but knowing that I have buried the screw tip at least 1/4 inch into the stud I feel better yet.
Even with all this I'm only "catching" about 4 screw threads with the 1.75 inch screws, I bet with the 1.50 inch screws, I may have been lucky to have caught 2 screw threads.

I know this all may seam frivolous, but I slept better last night. :D

Gadget Man :beer:
My kids may be smarter than me,
But I know more.
User avatar
Gadget Man
Teardrop Master
 
Posts: 298
Images: 23
Joined: Tue May 10, 2005 4:41 pm
Location: Elk River MN
Top

Re: Gadget Mans Adventure Trailer Photos

Postby Pyrofish » Mon Jun 11, 2012 8:44 am

The funny about skrimping on hardware at the local HD or Lowes, is the cheaper hardware is often more expensive there than it is at Fastenal. Fastenal just seems pricey when you're doing because you're not loading up with a bunch of wood, caulk, Oh, I needed another outlet too... For one of the floor screws I was using, Fastenal was 1/3rd the price of Lowes. :?
User avatar
Pyrofish
Teardrop Master
 
Posts: 182
Images: 14
Joined: Thu Jun 02, 2011 8:53 am
Location: Mims, Fl
Top

Re: Gadget Mans Adventure Trailer Photos

Postby pete42 » Mon Jun 11, 2012 9:00 am

peace of mind let's one sleep peacefully.

I used lots of self tapping screws in my job I understand about the tip.

when using regular bolts if you want the flutes to fit tighter you need to drill a smaller hole before tapping
a smaller hole means the bolt threads would have more "ledge" to hold on too.

having worked on airplanes (private not airlines) is where I learned about what holds and what isn't needed
to always place a bolt with the threads facing down so if a nut does come off the bolt won't fall out which could ruin your day.

maybe your redo will help others understand about self tapping screws and save them some trouble down the road.

thanks for the pictures they help to understand someday I'll learn or rather take the time to learn how to post pictures.

pete
User avatar
pete42
Super Lifetime Member
 
Posts: 2203
Images: 13
Joined: Sat Nov 07, 2009 11:52 am
Location: SouthWest Ohio
Top

Re: Gadget Mans Adventure Trailer Photos

Postby d30gaijin » Mon Jun 11, 2012 6:52 pm

pete42 wrote:having worked on airplanes (private not airlines) is where I learned about what holds and what isn't needed
to always place a bolt with the threads facing down so if a nut does come off the bolt won't fall out which could ruin your day.
pete


Pete,

I'm a licensed A&P too but haven't worked in the field in years. Still I have never forgotten the rule for fastener installation: Down, Aft, or Inboard.

Don
User avatar
d30gaijin
Titanium Donating Member
 
Posts: 594
Images: 139
Joined: Sat Jun 12, 2010 9:27 pm
Location: Boise, Idaho
Top

Re: Gadget Mans Adventure Trailer Photos

Postby d30gaijin » Mon Jun 11, 2012 7:07 pm

Gadget Man wrote:I also bought a roof A/C unit. Stay tuned for some pictures of mounting that... :thinking:
Gadget Man :beer:


G Man,

I take that to be an RV roof A/C Unit? I bought one used locally last year but have yet to mount it and am now not sure if I will. It is one huge mutha of an A/C unit. By installing that puppy on the roof of our 6x10 CT I would be able to create arctic conditions inside on the hottest day of the year. :snowstorm: 
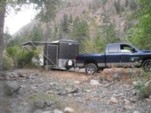
Did I mention the thing is huge? :embarassed: I hope you'll have help getting it up there. :O

Don
User avatar
d30gaijin
Titanium Donating Member
 
Posts: 594
Images: 139
Joined: Sat Jun 12, 2010 9:27 pm
Location: Boise, Idaho
Top

Re: Gadget Mans Adventure Trailer Photos

Postby pete42 » Mon Jun 11, 2012 7:55 pm

Don I never tried to get an A&P license I am friends with an airport owner who is one plus an inspector
back in the 60's and 70's I would help him tear down for annuals and then reinstall everything as well as help cover
fabric planes and some painting I also had two homebuilt airplanes one metal one fiberglass.
I stopped helping as much when his kids got big enought to do what I was doing but it was a great way
to learn about how airplanes functioned.
sadly I had to sell my planes when I became diabetic havent'n flown in years.
now I fly the recliner

pete
User avatar
pete42
Super Lifetime Member
 
Posts: 2203
Images: 13
Joined: Sat Nov 07, 2009 11:52 am
Location: SouthWest Ohio
Top

Re: Gadget Mans Adventure Trailer Photos

Postby Gadget Man » Mon Jun 11, 2012 9:25 pm

Don

"Yes you are correct Sir" (that's my best ed McMahon impression) I bought a roof top A/C unit.
My trailer has the factory installed reinforced, framed in A/C spot. I paid $40.00 extra for this option.
I think I got a pretty good deal, it's a 13,500 Btu Dometic unit. I got the roof top part and the inside air distribution box for about $650.00 out the door.
That was with MN sales tax, no shipping.

I un-boxed it far enough tonight to get the installation manual out so I could read through it.
I cut out the ceiling of the trailer to expose the 14 X 14 frame for the A/C. I always thought 14 x 14 was industry standard for all A/C or roof vents.
The Dometic manual says it must be 14 1/4 x 14 1/4 with a +- of 1/8 inch . My opening is exactly 14 x 14.
I've looked at all the mounting hardware and can't see any reason why it won't fit perfectly.
I'm surprised how easy these things are to install. Well...once you get it up on the roof it will be easy. There is no special silicone sealant or special glue needed. You simply put it down perfectly straight over your hole, then go inside and sandwich your roof between the outer unit and the special mounting plate inside.
There are (4) - 8" inch long 3/8 bolts that go in each corner, you torque them down to 50 Lbs and that will squish the factory "seal ring" down to the perfect specs to hold out any rain water. That's great, I've always wanted a torque wrench so now I have a good excuse to buy one.

Here are a few pictures of the unit and my inside hole, I will not cut the outer roof until the day I'm going to complete the entire install.

Image

Image

Image

Image

Image

Image

Gadget Man :beer:
My kids may be smarter than me,
But I know more.
User avatar
Gadget Man
Teardrop Master
 
Posts: 298
Images: 23
Joined: Tue May 10, 2005 4:41 pm
Location: Elk River MN
Top

Re: Gadget Mans Adventure Trailer Photos

Postby Gadget Man » Sat Jun 23, 2012 10:45 pm

Today my Son came over to help me lift the new Air conditioner up onto the roof.

I borrowed a small set of scaffolding from a neighbor to help with getting the unit up on the roof. The only problem was that it was to long to put straight across the back of the trailer. The scaffolding is 74 inches and my ramp is only 72 inches. So anyway, I had to put the scaffold halfway inside the trailer in order to be able to use it at all.

I laid some nice cedar boards across the roof to help distribute my weight, along with a small piece of 3/4 plywood that I could kneel on.
I went up and cut the hole with a pair of basic tin snips. The thin metal roof cuts like butter.
Once the hole was cut we lifted the A/C unit onto the scaffold, it weighs about 100 pounds, so trying to do this with a step ladder was out of the question, the scaffolding platform was a perfect halfway stop. Then we each got on a side and lifted it straight up and onto the back of the trailer. The I got up on the roof and my Son got up on the scaffolding. Then we lifted it up and into place. The installation instructions clearly state that you cannot slide the unit across your roof or you will damage the gasket under the unit, you must lift it and place it down over your 14 x 14 hole. But once you even get it close, you can reach up from inside, through the hole to square it off and get it in the exact spot.
Then the rest is all completed from inside. There are these 6 inch long bolts that you tighten in each corner. It will compress the gasket and make it water tight.

When running on low cool, it is fairly quiet. It also has 3 fan speeds.
I'm sure if I ran it on high cool long enough I could hang meat in there.


Image

Image

Image

Image

Image

Image

Image

Image

Gadget Man :beer:
My kids may be smarter than me,
But I know more.
User avatar
Gadget Man
Teardrop Master
 
Posts: 298
Images: 23
Joined: Tue May 10, 2005 4:41 pm
Location: Elk River MN
Top

Re: Gadget Mans Adventure Trailer Photos

Postby d30gaijin » Sun Jun 24, 2012 11:19 am

G Man,

Nice install on the roof a/c unit! That's a good looking a/c unit. I like the fairly low profile of the Dometic. :thumbsup:

Don
User avatar
d30gaijin
Titanium Donating Member
 
Posts: 594
Images: 139
Joined: Sat Jun 12, 2010 9:27 pm
Location: Boise, Idaho
Top

Re: Gadget Mans Adventure Trailer Photos

Postby pete42 » Mon Jun 25, 2012 5:00 pm

You'r latest install only makes me want a cargo trailer that much more.

If after you finish and you just have to have a bigger one I know an old man in Ohio
who would be happy to take your old one off your hands.

have cash will travel........... :thumbsup:

I showed your trailer to my brother who could not believe someone had done such a nice job of building
he said to tell you good job.

pete
User avatar
pete42
Super Lifetime Member
 
Posts: 2203
Images: 13
Joined: Sat Nov 07, 2009 11:52 am
Location: SouthWest Ohio
Top

PreviousNext

Return to Cargo Trailer Conversions

Who is online

Users browsing this forum: No registered users and 15 guests