Glenlivets 6X10 cargo toy hauler conversion

Converting Cargo Trailers into TTTs

Glenlivets 6X10 cargo toy hauler conversion

Postby Glenlivet » Thu Sep 08, 2011 10:38 pm

As a guy with the goofy idea that he should buy a cargo trailer that has a decent build and is made for packing stuff around, and if he just adds a few things so that he can not only haul his ATV around but can stay in it, his own home made toy hauler...
I almost laughed as I found this site to find that it's already been done a hundred times over. :lol:
Remember the old story of the ugly duckling and he finds out that he's actually a swan, and there are many swans! I mean just look at all the swans on this site. :D

Anyway, I have read some of the stuff posted on here and marveled that a lot of the things I have encountered on this adventure have been dealt with in exactly the same manner as I've done, (or done better than I).

Thought I'd share a few nuggets from my own build, and update as I go. So here goes:

Image

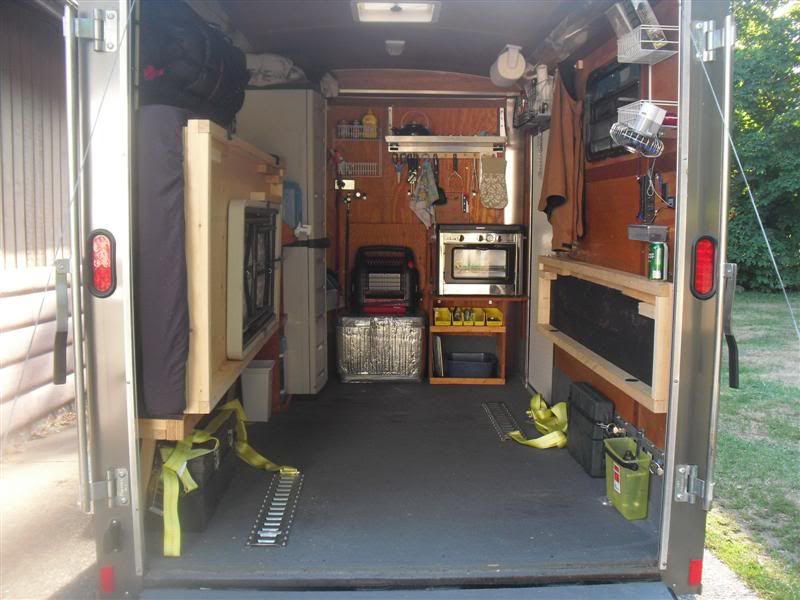
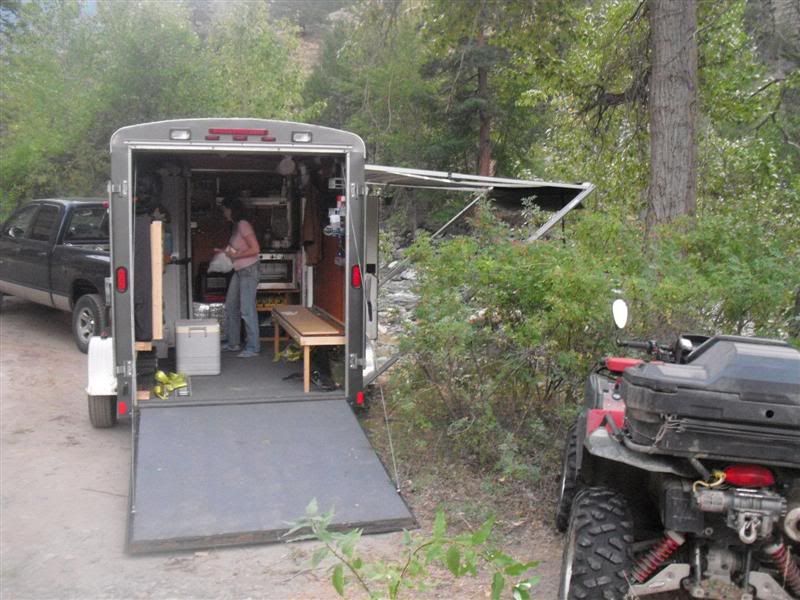
The rear ramp door open and the bed all stowed away.

Image

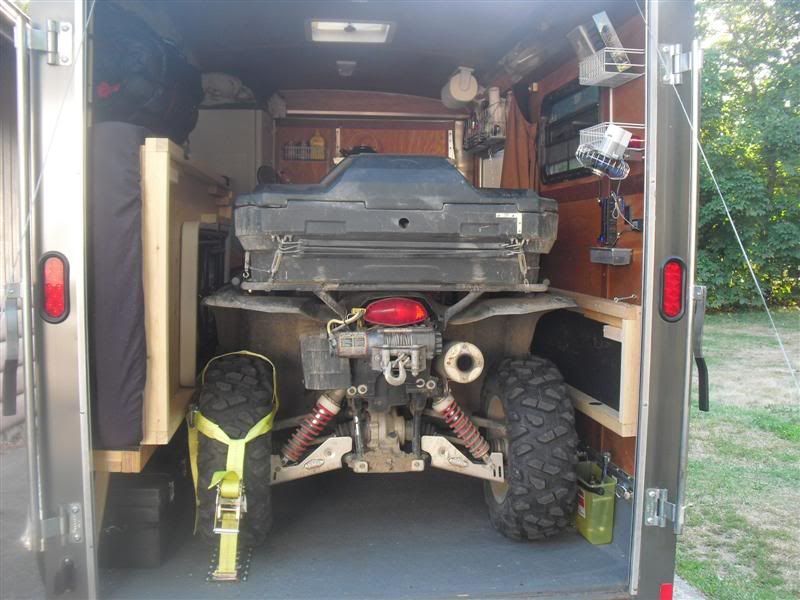
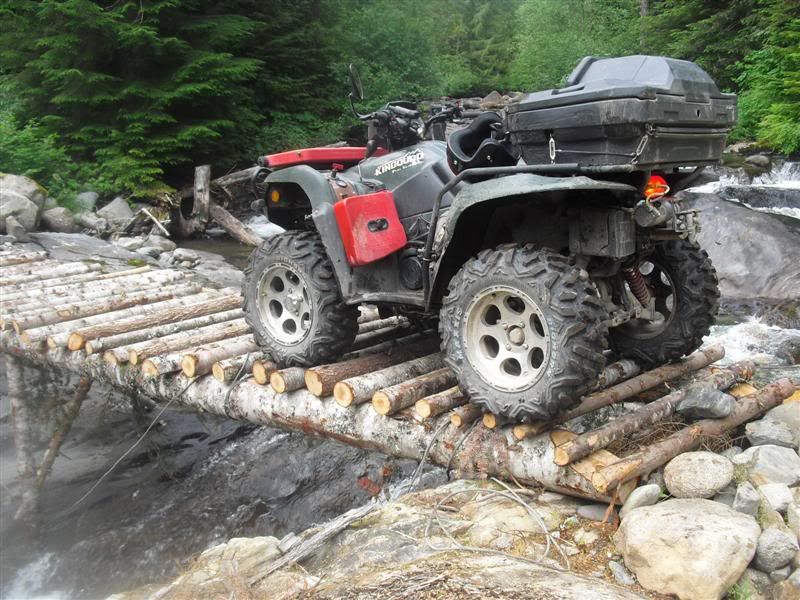
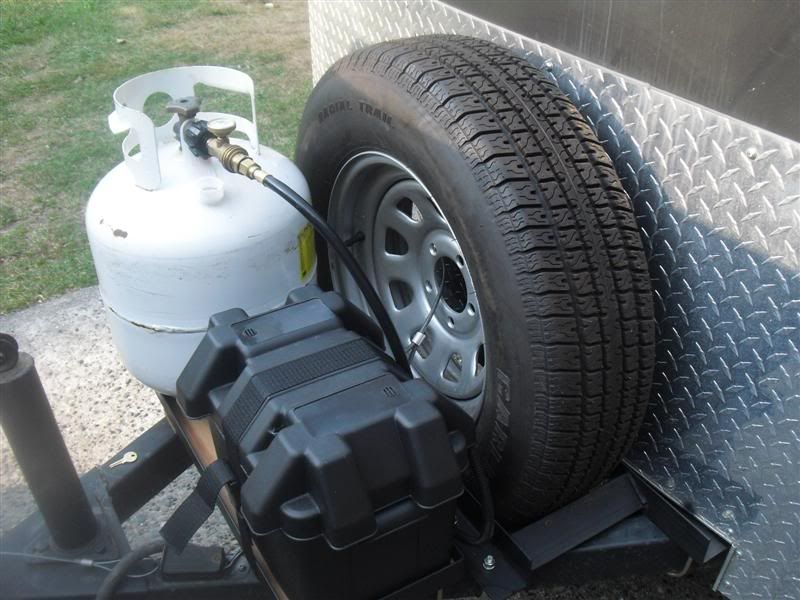
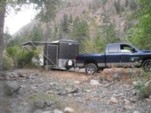
The ATV loaded and lashed down. Not much room to spare! The left rear and right front tires are held down to E-track on the floor by tire web. Good enough that race cars are transported with these things.
Besides, no room for tie-downs. I can get at the right front via the RV side door and the rear via the ramp door.

Image

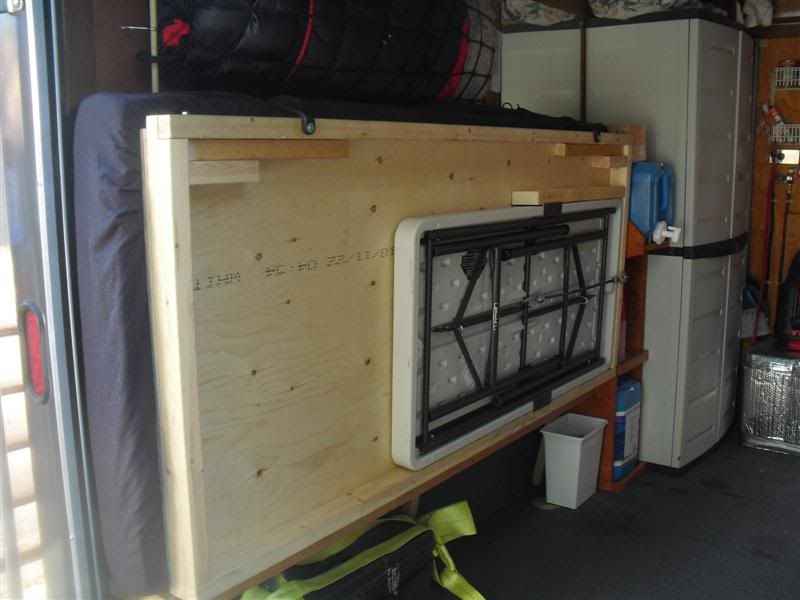
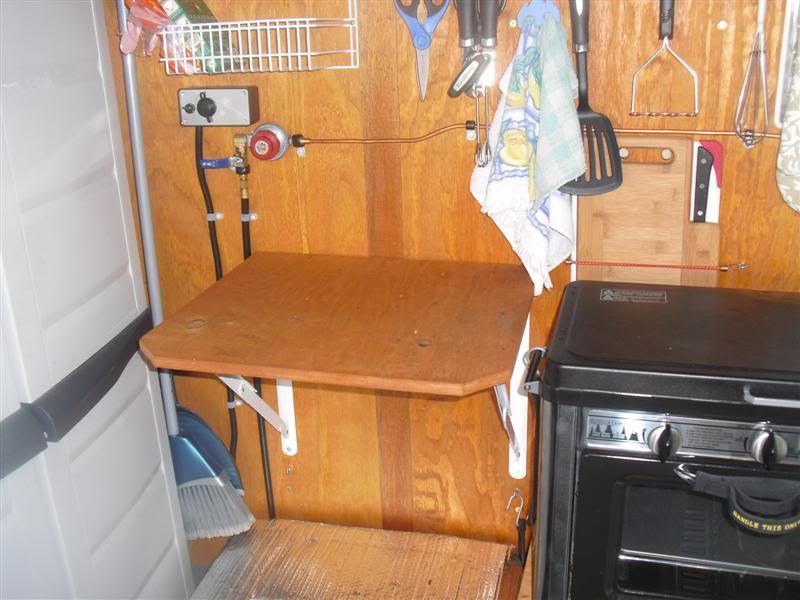
The bigger side of the bed. The table slides into it's holders, two 6" 1 1/2 angle iron pieces inset into the wood rails hold the four foot long table up by its middle. To get it out I just unhook the bungee, swing out the table legs, slide the whole table two feet to the left and it's down and ready to use in seconds. :D

The first 8" of the bed is solidly mounted to the left wall and the rest swings up on a piano hinge. That gives me a place to store the two 4" thick 35 x 75 foam mattress pieces, side by side.

Image

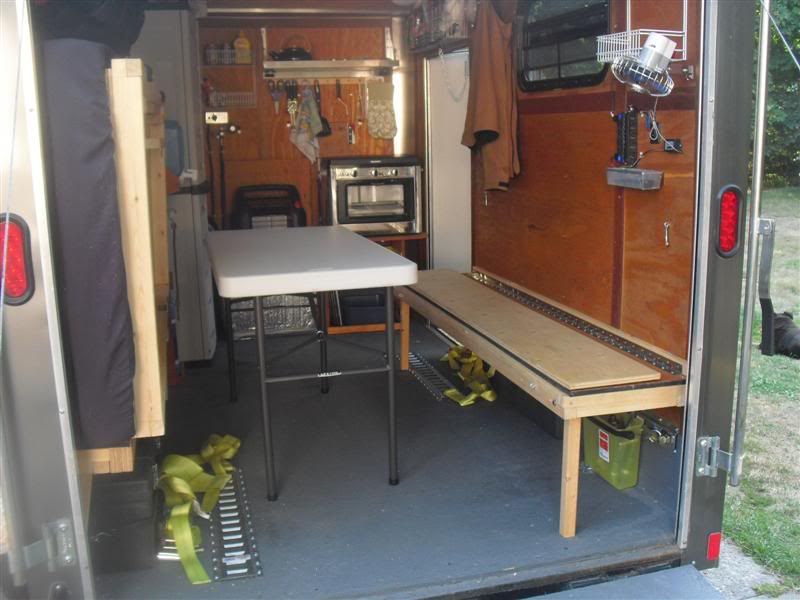
The other side becomes a bench. Swing the built in 2x2 legs out and unhook the bench and let it down off the wall. There's a bridge piece needed for the bed, that stays folded on its own piano hinge, for bench service.

Image

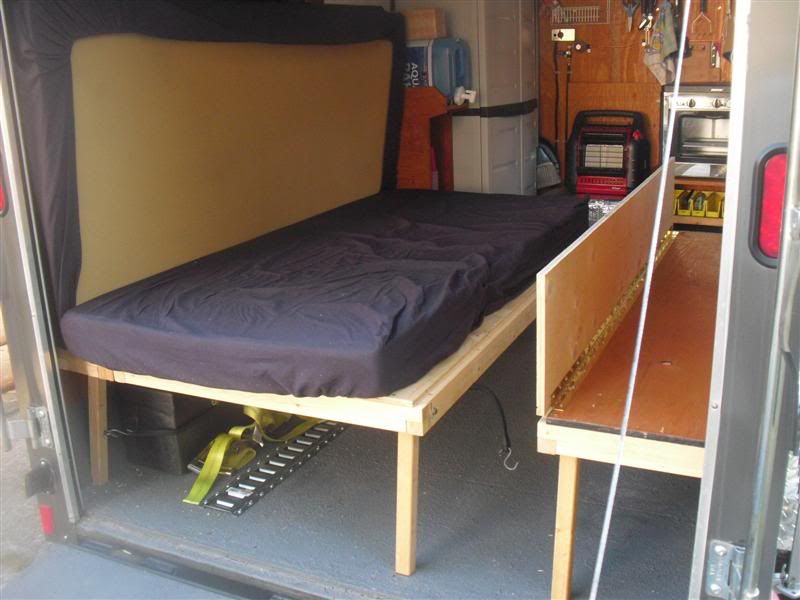
For making the bed, unhook the bigger side, unfold its legs and lower it. The bridge piece is ready to drop into place. See the step where the bridge fits into the big side.

Image

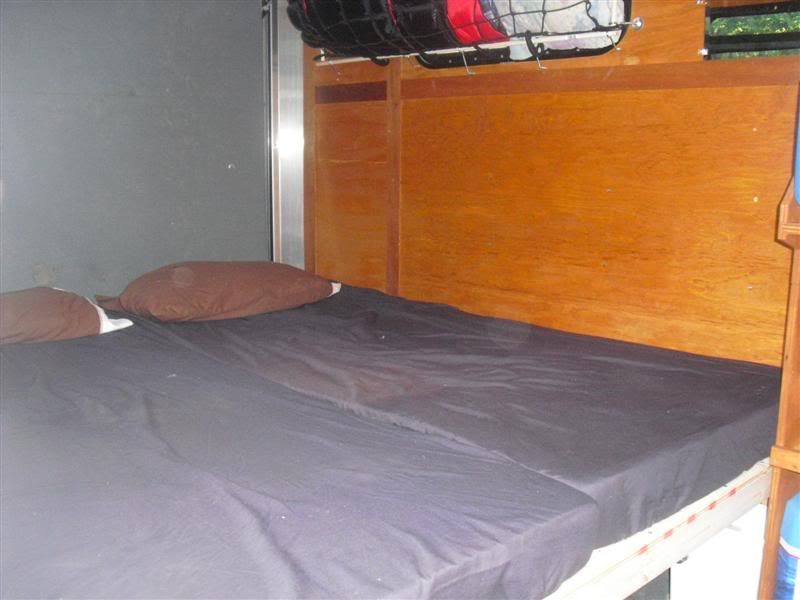
And voila: Wall to wall King size bed! (almost King size) That's a double wide sleeping bag rolled up against that window behind the netting.

Have a few more things done too, if people are interested.
Last edited by Glenlivet on Sun Jun 01, 2014 6:43 pm, edited 1 time in total.
User avatar
Glenlivet
Donating Member
 
Posts: 145
Joined: Thu Sep 08, 2011 10:07 pm
Location: Hope B.C.

Postby glwt06 » Thu Sep 08, 2011 11:07 pm

Hi Glenlivet,

Great trailer, I think your doing a great job.

Did your trailer come with windows or did you install them? What kind of wiring have you done for power?

Is that a fuse box under the fan? 12 volt?

Do I see some kind of gas line along the front wall?

Enjoy,

Paul
User avatar
glwt06
Teardrop Inspector
 
Posts: 16
Joined: Mon Jun 20, 2011 2:28 pm
Location: Michigan

Postby Glenlivet » Fri Sep 09, 2011 12:08 am

Good eye Paul! Or a darned good monitor. ;)

Image

That's a line for the Camp Mate (Edit: Camp Chef) oven/stove. Found it at the local Costco for $120.00
Some may recoil in horror at the inside install but a guy should consider that the original design of this stove was for boat cabins and included a gimbal arrangement. Some Mexican outfit seized on the idea to copy these and flog them as a camping stove/oven. They simply discarded the gimbal business and put the warning on there 'outdoor use only' to sidestep any venting directions and/or liability complications. Same working parts though.
If it didn't kill in the boat cabins it ought not do so in a cargo, adequately vented.
The 20 pounder on the tongue frees me from the tyranny of the little bottles. The inside regulator lets me accurately control the heat and the ball valve gives me an emergency shutoff. I have high and low vents as well to let any heavy propane spill out and to let any lighter gases drift away.
And I cook with the door open anyway, when possible.

It's all 12 volt, with a 95 A/H battery on the tongue. The box seen here has the master switch, fuse, and a utility outlet that I can use for the cooler, on the understanding that this would be quite a power hog. Block of ice is the preferred coolant.

That's my little fold-down kitchen counter in the up position. :D

It came with two factory installed high horizontal 15 x 30 windows.
Last edited by Glenlivet on Fri Sep 09, 2011 10:48 am, edited 1 time in total.
User avatar
Glenlivet
Donating Member
 
Posts: 145
Joined: Thu Sep 08, 2011 10:07 pm
Location: Hope B.C.
Top

Postby David_L6 » Fri Sep 09, 2011 6:14 am

That's nice! What brand / size is the ATV? I'm trying to do basically the same thing you have done. I'm building two trailers. A 6' X 10' to haul an ATV or a couple of dirt bikes and a 7' X 16' to haul two ATVs and maybe a dirt bike also. I have two Kawasaki Brute Force 750 ATVs and they fill up a trailer quickly!
User avatar
David_L6
Donating Member
 
Posts: 150
Images: 16
Joined: Wed Jun 01, 2011 10:09 pm
Location: Northwest Louisiana
Top

Postby Pyrofish » Fri Sep 09, 2011 9:08 am

Very nice! I doubt you'll get much "horror" on the camp mate, I bought the Camp Chef from Amazon and plan to install it inside as well. :thumbsup: I'm just nowhere the level of completion of your trailer. I still have alot to do. :?

I might swipe some of your ideas though :thumbsup:
User avatar
Pyrofish
Teardrop Master
 
Posts: 182
Images: 14
Joined: Thu Jun 02, 2011 8:53 am
Location: Mims, Fl
Top

Postby Glenlivet » Fri Sep 09, 2011 9:21 am

That's my Suzuki King Quad 700.

Image :thumbsup:
User avatar
Glenlivet
Donating Member
 
Posts: 145
Joined: Thu Sep 08, 2011 10:07 pm
Location: Hope B.C.
Top

Postby David_L6 » Fri Sep 09, 2011 10:14 am

Glenlivet wrote:That's my Suzuki King Quad 700.


Thanks. That's a large ATV also. Your picture gives me a good idea of the room I have to work with.
Last edited by David_L6 on Fri Sep 09, 2011 4:20 pm, edited 1 time in total.
User avatar
David_L6
Donating Member
 
Posts: 150
Images: 16
Joined: Wed Jun 01, 2011 10:09 pm
Location: Northwest Louisiana
Top

A cooler cooler

Postby Glenlivet » Fri Sep 09, 2011 10:59 am

One thing I found when I had my old 7 x 14 cargo was a way to make my cooler ice last longer.
I went back to the trailer one hot day and found that the coolers plastic exterior was hot to the touch. I reasoned that this can't be good, and the insulation can only do so much. Too much heat must be getting in at my ice block.
I had some aluminized space blankets and I wrapped the cooler loosely with one of them.
Instant difference! Next time I went to the cooler I found that the outside was now cool to the touch under that simple flimsy little reflective cover.

My buddy had a 7 x 14 too, parked right beside mine, making it a perfect control test platform.
He used coolers too, and as it turned out, my ice lasted twice as long as his, due to that simple trick.

So I made myself a blanket for the cooler out of Reflectex insulating material, cut to shape and duct taped. Just like the energy saving hot water tank blankets you can buy. The cooler blanket's lid has velcro tabs to help it stay closed, that can barely be seen in this pic.

Simple mod, big benefit. :thumbsup:

Image
Last edited by Glenlivet on Fri Sep 09, 2011 11:04 am, edited 1 time in total.
User avatar
Glenlivet
Donating Member
 
Posts: 145
Joined: Thu Sep 08, 2011 10:07 pm
Location: Hope B.C.
Top

Well Done!

Postby Engineer Guy » Fri Sep 09, 2011 11:02 am

REALLY NICE and pragmatic implementations in your Rig there! I've had similar ideas on folding Beds/Benches that meet to create our desired large Bed, etc.. It's invigorating to such ideas deployed.

Upgrading Cooler performance was a lively discussion here some time ago. I advocated using that same 'Astrofoil' pictured above. I used it under my new House Walls as an Infrared reflector. It really ups the total R Value while also acting as the Vapor Barrier.

Well done, and thanks for jumping in and posting.

I've been to your namesake Distillery in Scotland in a lil rented Class B RV. Lovely setting...
~Reality proceeds with or without your consensus~
User avatar
Engineer Guy
The 300 Club
 
Posts: 480
Images: 118
Joined: Wed Mar 17, 2010 5:19 pm
Location: W. CO
Top

Postby rebapuck » Fri Sep 09, 2011 12:17 pm

I love that you have fold aways with everything needed attached. No looking for legs etc. And the table storage is perfect.
Judy
1966 VW camper
1967 VW singlecab
Image
User avatar
rebapuck
.
 
Posts: 2243
Images: 1
Joined: Thu May 14, 2009 1:55 pm
Location: Chapel Hill NC
Top

Postby MegC » Fri Sep 09, 2011 1:17 pm

Dumb question: how big is that trailer? It's such a lovely layout, definitely tempting to repeat.

ETA: jeez guys, I'm sorry I missed the subject of the thread, it's right there. I'm gonna blame this lapse on a rough week of work instead of my blond brain this time.... :?
Last edited by MegC on Sun Sep 11, 2011 11:02 am, edited 1 time in total.
~ intel gathering until we get more $. If anyone's got a line on a winning lotto ticket or a tooth fairy I can shake down for cash, PM me.
"...believing in human perfectibility starts with trying to force people into a mold, then into a prison, and then into an oven."
User avatar
MegC
Teardrop Advisor
 
Posts: 91
Images: 6
Joined: Tue Oct 13, 2009 12:07 am
Location: Central Wa
Top

Postby Glenlivet » Fri Sep 09, 2011 4:31 pm

It's a 6 x 10 Cargo Mate.
User avatar
Glenlivet
Donating Member
 
Posts: 145
Joined: Thu Sep 08, 2011 10:07 pm
Location: Hope B.C.
Top

Postby d30gaijin » Fri Sep 09, 2011 6:53 pm

Glenlivet,

You have definitely maximized the use of space. What a great job you've done! :thumbsup: I take it you maximized available space through trial and error over time. I am doing the same thing but it can be a costly lesson without more forethought, as I have found (the hard way). I think you gave your 6x10 more forethought than I did mine when I started my conversion.

Thank you for posting your pics and welcome to the Forum!

Don
User avatar
d30gaijin
Titanium Donating Member
 
Posts: 594
Images: 139
Joined: Sat Jun 12, 2010 9:27 pm
Location: Boise, Idaho
Top

Postby Glenlivet » Mon Sep 12, 2011 9:35 pm

Thanks, but I'm just fumbling along as I go. No big master plan. Here's a side-of-the-road campout this weekend.

Image

Spent two days there, checking out a whole bunch of back trails I hadn't seen before.

Image

Cindy's setting up camp. Doesn't take long. But it took me only a few minutes to realize I'd forgotten to pack some important accessories, the anti-gravity lounge chairs! How can a guy kick back creekside with a beer, without a lounge chair? Idiot!

Here's how I solved the dilemma of how to carry a 20 pounder, a spare tire, and a 95 ah battery. I welded up this...

Image

...rack for the tongue A frame. I can still turn way sharp jacknife to almost 80 degrees without the truck hitting anything and it's outside where the battery and propane tank can breathe free.
The spare tire carrier needed some head scratching. This frame...

Image

...has angle iron cradle pieces that support the tire by its tread surface and they are just wide enough that when I drop it in, the tire squeaks down in there snugly and needs no other mounting to keep it solid.
I can shove it back far enough to make it touch the rock guard but it doesn't move enough to ever do that on its own. Just sits in there. A cable lock round under and through the hole keeps it from coming out accidentally or otherwise.

The 20 pounder is held by the holes in the base ring, a stud sticks through the back hole and a 1/4" shaft removable bolt holds the front. Nine inches wide is just the right width to make an inch and a half angle iron box for containing both the base ring of the propane tank, and the 'marine' plastic battery box too! What luck.
A piece of 1/2" plywood makes the base. I put it in place and donked it with a hammer, to see where the mount nuts are and then drilled most of the way through each nut location on the underside with a Forstner wood bit at each nut location, so it sits flat in there.
3" muffler clamps make perfect box frame U-bolts, especially at the angle they are. Just the right length too, making them just flush with the nuts, when properly torqued. Sometimes the stars align. :thumbsup:
User avatar
Glenlivet
Donating Member
 
Posts: 145
Joined: Thu Sep 08, 2011 10:07 pm
Location: Hope B.C.
Top

Postby Wolfscout » Tue Sep 13, 2011 3:50 am

I put it in place and donked it with a hammer, to see where the mount nuts are and then drilled most of the way through each nut location on the underside with a Forstner wood bit at each nut location, so it sits flat in there.

:lol:
But that is a really neat idea for tongue carriers.
Larry Fulmer, Jr.

2016 8X20 Homestead Patriot CTC
CTC 2

'90 6x12 Wells Cargo Trailer Conversion
my 1st build= CTC 1 FB album history.
User avatar
Wolfscout
500 Club
 
Posts: 511
Images: 32
Joined: Tue Jun 14, 2011 5:01 pm
Location: Newberry, S.C.
Top

Next

Return to Cargo Trailer Conversions

Who is online

Users browsing this forum: No registered users and 8 guests