Page 3 of 7

Re: New Proline conversion coming...

PostPosted: Mon Aug 24, 2015 8:27 pm
by deceiver
Gettin Started wrote:Looks good...what kind of hinges did you use for the cabinet doors? Any pics of them?


My favorite cabinet hinge Blum overlay hinges

Image

Re: New Proline conversion coming...

PostPosted: Thu Aug 27, 2015 3:50 pm
by deceiver
IMG_0838.jpg
Antenna closeup, from amazon. Not too expensive, comes with all the parts, matching transformer etc.
IMG_0838.jpg (85.07 KiB) Viewed 4868 times
IMG_0837.jpg
Antenna mounted and ready to plug in.
IMG_0837.jpg (69.03 KiB) Viewed 4868 times
Painting done on floors and some trim, polying done on cabinets. Antenna mounted.

The floor is done. I used a latex porch and deck. I've got it in the shop and it just won't wear and won't scratch (Behr, Home Depot) The wood trim around the back edge is to mount the screen on and the bed goes up against it. Storage underneath. You'll see later.

Interesting. I wanted to see how long my dry cell (agm) battery would last. I've had lights on and my maxxfan on 100% for the second day, about 14 hours now and it's still running full speed. I'll continue with the battery longevity test tomorrow.

I ordered a small antenna and mounted it on an old tripod I had laying around. The tripod shrinks to about 15" and the antenna comes off with the mast, about 40". It will store under the bed via the back doors. The antenna's height is designed to clear the trailer. UHF waves hate traveling through metal. I've got a cable connection on the driver side with the power sockets. Our TV will play movies off a thumb drive and has a dvd player built in but sometimes it's nice to get the local channels if we end up in a place that's not too rural.

Back screening/wall and bed frame installed

PostPosted: Fri Aug 28, 2015 5:37 pm
by deceiver
Okay, So today after going into town to pick up a few items at Lowes, I managed to move the bedframe into the camper, screw it into place, and install the back wall panel and screen. There is a neat screening system at Lowes. You screw on a plastic frame onto the wood. Put the screen into special tracks on it, then snap a white cover over it. It comes in 1.5" and 3". I chose the 3" one.

Re: New Proline conversion coming...

PostPosted: Fri Aug 28, 2015 5:47 pm
by Spotman
Wow that is nice. More ideas!!!

Bed, small counter, heat

PostPosted: Mon Aug 31, 2015 3:52 pm
by deceiver
Today I installed the 500 watt 110 volt baseboard heater. Unfortunately the cheap thermostat on the wall (Lowes) turns it off an don but won't act like a thermostat. I guess I'll swap it out with a better one. In the picture you can also see the maple baseboard I made today. It has an ogee edge. Looks pretty good. I decided to the aluminum strips for the top molding. I painted them white before installing them. A darker molding that divides the wall from the ceiling tends to lower the ceiling and give a 'smaller' effect.

I also finished the small cabinet and put the door on it. It will be the storage spot for my triton Coleman propane stove and 1 lb. gas bottles. I've gone the larger stove 20 lb propane bottle route and wonder why I did. A few small bottles and the best stove I can find and we're all set.

I did a rail on the bed. This is like the rails you see on beds called 'captain's beds'. I liked the style and it will hold in the queen sized 8" memory foam mattress we pulled from our teardrop before we sold it. I also finally put in the drawers and applied plywood to the platform part of the bed.

Tomorrow two little strips of molding on the bed edges, Call my sister to poly them for me (she's good and willing) Then I think I'll install the TV and USB movie playing device. I'll try out the antenna too while I'm about it. I've got a very large homemade antenna on my roof and know what channels are good and what ones are fringe. I'll be able to compare it with the small one I have for the camper and see how reception is.

IMG_0853.jpg
The bed rail is on and the drawers inserted. On the side is a small cabinet for the stove.
IMG_0853.jpg (29.08 KiB) Viewed 4775 times

IMG_0854.jpg
A better view of the cabinet.
IMG_0854.jpg (31.52 KiB) Viewed 4775 times

IMG_0856.jpg
I've installed the electric baseboard heater and baseboard. Wiring is down underneath the trailer through conduit.
IMG_0856.jpg (22.89 KiB) Viewed 4775 times

Re: New Proline conversion coming...

PostPosted: Mon Aug 31, 2015 7:45 pm
by 2Tornadoes
:thumbsup:

Re: New Proline conversion coming...

PostPosted: Mon Aug 31, 2015 7:47 pm
by lrrowe
Nice woodwork.

Re: New Proline conversion coming...

PostPosted: Wed Sep 02, 2015 6:12 pm
by deceiver
Today I managed to get the rear screened window framed. Then a roll down shade was installed. It uses a crank to roll it up and down. You can see the crank on the right. Yesterday my sister came over and put the last coat of paint on that rear wall.

I then installed the TV. As you can see below the tv gets in local channels using the antenna I assembled that you saw in a previous post. The TV is a 22 inch NAXA.... I know, a weird brand, but there aren’t many that run on 12 volts. The TV is mounted above the foot of the bed. It’s connected to a jack on the wall to the antenna and to the Sardine sound system that I had ordered earlier. The sound device sits on the counter and plugs into the wall.

Also connected to the TV is a USB and SD card movie player. I can load dozens of movies onto a thumb drive and this little device will play it
through the TV.
Everything needed has been installed in the wall, cable tv connection, Audio jacks, USB and 12 volt power sources, Video playing device.

The device comes up with a menu to play a variety of different things. I’ve got about 30 movies loaded onto the little thumb drive you see hanging from the blue video device.

The Sardine sound system connects to the wall jacks and picks up sound from the TV. It is also a radio and bluetooth sound device.

I also mounted the indoor/outdoor temperature, clock to the wall.

Tomorrow will be time to haul the mattress out and make the bed up. It’s the memory foam mattress from the old teardrop we had. Then I’ll make it up with a surprise. My neice delivered a gorgeous hand made quilt she recently finished for us.

IMG_0861.jpg
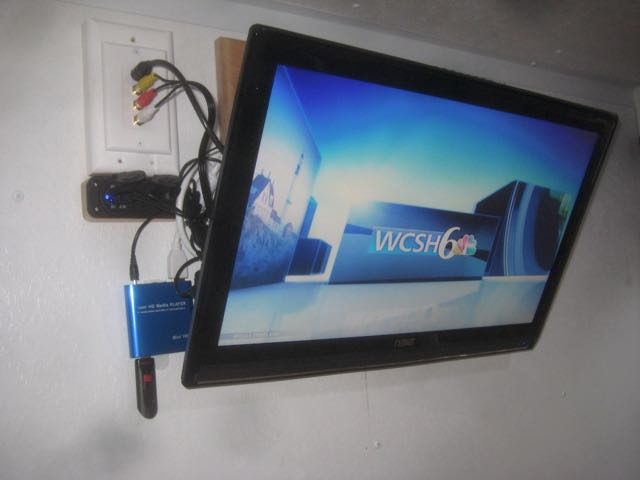
Entertainment system plays over the air TV, cable when available, DVD, and video files from a thumb drive. All 12 volts.
IMG_0861.jpg (31.74 KiB) Viewed 4681 times

IMG_0871.jpg
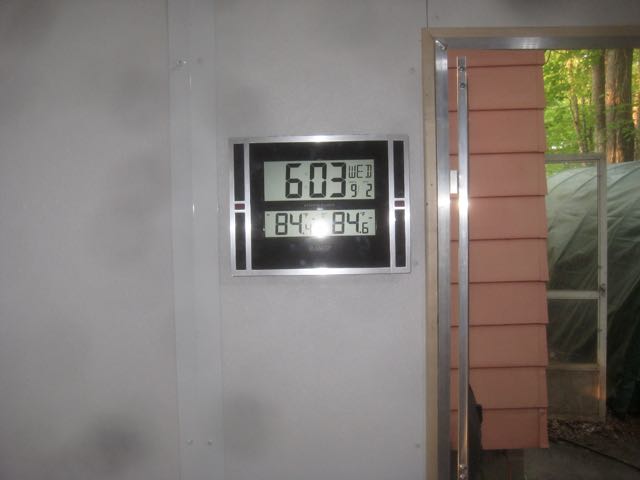
Clock, indoor/outdoor thermometer.
IMG_0871.jpg (29.96 KiB) Viewed 4681 times

Re: New Proline conversion coming...

PostPosted: Fri Sep 04, 2015 4:50 pm
by deceiver
Today included:
relocating power and thermostat.
Making a shelf for the microwave.
Modifying tire mount so that I could get one on the trailer.

I started the day by making a microwave shelf. Even though I bought the smallest I could find, with the V shaped counter it still took up to much space. I decided to relocate the light, switch the plug and thermostat locations and mount it higher.
IMG_0880.jpg
Thermostat is now in the previous plug location. Plug is behind microwave. Microwave is now on a shelf up and out of the way.
IMG_0880.jpg (25.62 KiB) Viewed 4618 times


I had also tussled with how to mount the spare tire. I thought about beneath the trailer but worried about bottoming out with it. The tongue on my new cargo trailer is short. If mounted on the side of the fork it might hit the truck bumper on a tight turn. My solution was to purchase a simple curved pipe mount and extend and offset it so that the tire would be able to be mounted facing forward and center on the tongue fork. A couple of feet of pipe and a few welds and voila....
IMG_0874.jpg
Raised and forward...
IMG_0874.jpg (49.89 KiB) Viewed 4618 times


And with the new cover...
IMG_0879.jpg
New vinyl cover (trailer grey)
IMG_0879.jpg (47.97 KiB) Viewed 4618 times


Below are some pictures of the original tire hanger as purchased and some views of my modification to raise it and offset it so that it is centered. It has three coats of Automotive primer on it. I was going to paint it too but the color was close enough.

The original unit as purchased
135582

The extended unit and offset pipe to get it onto the center of the trailer tongue
135583

From the other side..
135584

And for added safety, I put the tire bolt in the drill press to make a hole for a cotter pin in one of the bolts to stop the nut from loosening.
135585

Bumping, furnishing and leveling

PostPosted: Sat Sep 05, 2015 3:59 pm
by deceiver
Today we cleaned a bit. We took the trailer to home depot with us to see what might fall off. Thankfully nothing did. I purposely took a bumpy backroad. I was hoping no wiring would shake loose, things like that. Didn't expect it but better now that hundreds of miles away from home.

We made up the bed and put the new Native American motif carpet down. Still sparse looking but I figure we can keep a lookout for things in our travels.

I also installed a small level set I had picked up awhile back. Not good to sleep with your head lower than your feet. I personally can't stand that.

IMG_0883.jpg
New quilt made for us by my niece. pretty nice huh?
IMG_0883.jpg (46.31 KiB) Viewed 4571 times


IMG_0885.jpg
Rug we picked up
IMG_0885.jpg (45.05 KiB) Viewed 4571 times


IMG_0886.jpg
Rug with cabinets and microwave
IMG_0886.jpg (29.14 KiB) Viewed 4571 times


135602

Awning and packing for first trip

PostPosted: Thu Sep 10, 2015 2:10 pm
by deceiver
Well, it's been exactly a month since I started the conversion. It's done now.

Today I installed the awning that my sister sewed up for me. It's made of sunbrulla material. Same stuff they use for boat tops. I designed it using aluminum U, round, and square stock. I found some metal bars with large pins on them at the hardware store. I don't even know what they're for. I modified them a bit by bending them at the right angle and they look like they came with the trailer once I screwed them on. The awning will allow us to keep the doors open in the rain and not worry about getting wet.
IMG_0888.jpg
Awning installed.
IMG_0888.jpg (46.01 KiB) Viewed 4541 times


IMG_0892.jpg
IMG_0892.jpg (41.95 KiB) Viewed 4541 times


spring clips hold the U Channel in the drip edge that's on the back of the camper.
135831

The modified dohickeys bent at 45 degrees work perfectly to hold up the awning posts (square stock aluminum)
135832

I also installed the lower cover for the storage under the bed. It's made of a leather looking vinyl. It's fairly thick like upholstery and has velcro on both sides to keep it in place. The bottom is longer so that it laps out over the edge so water won't come into the camper.
IMG_0894.jpg
Lower cover with velcro sides
IMG_0894.jpg (34.23 KiB) Viewed 4541 times


Getting ready for our first trip from Maine to Michigan with a return through Ontario and Quebec Canada. Leaving tomorrow... see you on the flipside!!
135833

135834

Re: New Proline conversion coming...

PostPosted: Thu Sep 10, 2015 3:02 pm
by Spotman
Awsome looking and great ideas.

Re: New Proline conversion coming...

PostPosted: Thu Sep 10, 2015 4:01 pm
by Padilen
Post the trip too!

Re: New Proline conversion coming...

PostPosted: Thu Sep 10, 2015 5:05 pm
by deceiver
Padilen wrote:Post the trip too!


I will when I get back. I used to blog as I went along then opted for a desktop over a laptop when I retired. But here's the tentative trip plan. Right now the upper "alternate route" is probably the path we'll take. And after talking with some people on this forum we'll be doing the western side of Michigan not the east. Why Michigan? Well, it's not too far away and it's one of the three 48 states I haven't camped in. We're from Southern Maine. By the time I come back I should know what works/doesn't work and if anything falls off!

The dip through NY is because my daughter lives in the Albany area... a short visit, sort of on our way.

Re: New Proline conversion coming...

PostPosted: Thu Sep 10, 2015 6:29 pm
by Padilen
I'm glad your going to the west side. I guess we'll have to wait until the trip is over for pic's and story