Page 3 of 5

April 2nd

PostPosted: Tue Apr 11, 2017 9:01 pm
by rxberg
Another Sunday= another day working on the trailer...
Lynne worked on priming all the new stuff while I tackled the kitchen sink. (there's an "everything but" joke there somewhere, but I'm too tired to think of it) The idea is that we'll pump water from one of two 5.5gal jerry cans and use a shorter 5 gallon jug to catch the waste. This way the water will be easily removed and stowed wherever I need it to be for weight purposes, and I don't have to figure out any water tank installations...which is nice. We're using a shurflo revolution on demand 3gal/min self-priming pump we picked up on sale at Amazon. Here's a pic of the pump and water containers:

Image

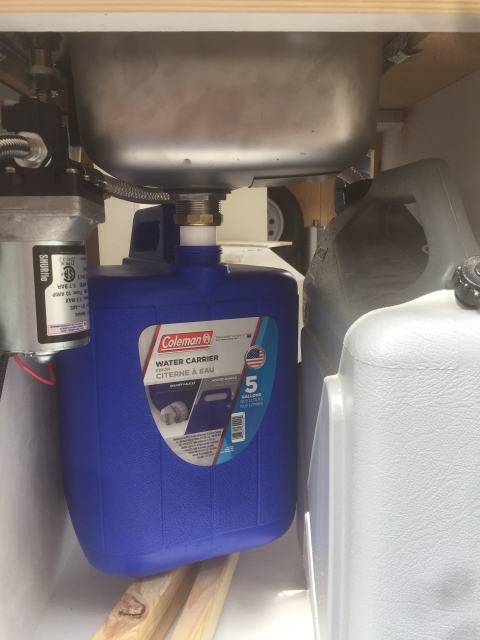
I've got the waste container propped up because I forgot to buy a small piece of discharge hose last time I was at the store and didn't feel like making a special trip.

So after about 3 hours, we can successfully pump water from one bucket into another. Hooray!

Image

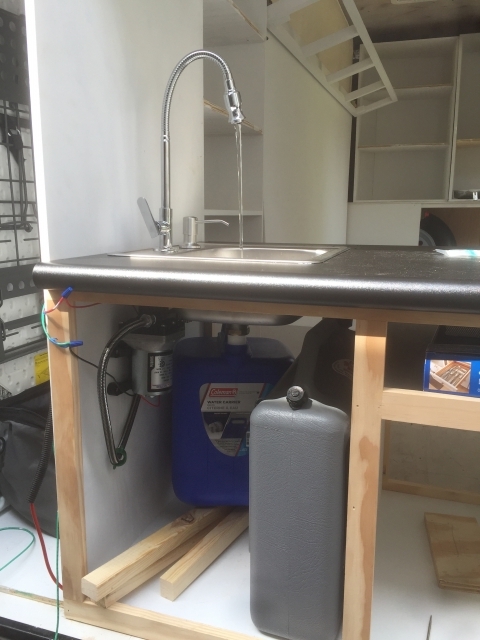
Oh, and the wiring is temporary for trial purposes. I'm going to install a lit switch somewhere behind the faucet-just need to figure out a few other things to decide where.

Re: 6x12 Interstate cargo trailer conversion

PostPosted: Wed Apr 12, 2017 5:57 am
by McDave
Very Slick.
I see some darn nice work on those cabinets. :thumbsup:

McDave

April 15th

PostPosted: Mon Apr 17, 2017 4:21 pm
by rxberg
We had a busy weekend with work and Easter things, so we only got a few hours in on the trailer. Lynne worked on giving it some color while I worked on face-framing the upper kitchen cabinet and installing the 12v receptacles/voltmeter.

The shop vac worked nicely to keep the sawdust out of the wet paint and mostly out of the garage.

Image
Image
Image
Image
Image
Image
Image

Less than 4 weeks until we head to Wyoming, so hopefully we can get things going. It seems like the finish stuff takes forever.

I also realized while measuring for the face-frames on the middle and front cabinets that my bed board and legs are a little too long to clear the extra 3/4" from the boards, so I took the leg off and will need to cut it down to rebuild it this week. There's not much worse than having to take apart something you already spent your time making, so hopefully it goes quickly.

April 22nd

PostPosted: Mon May 08, 2017 4:24 pm
by rxberg
With a visit from Lynne's parents and a couple of concerts to attend, the weekend off didn't see as much work done as we'd hoped. We did manage to get a few things done, and we definitely took advantage of her mom's fabric and cushion expertise to get some cushions made for the bench.

Image

Image

Image


With the girls inside making cushions, I worked on yet more cabinet facing. I think I"ll make this in my sleep for a few months...

Image

Image

It got a little tricky with the curved roof and the odd middle shelf, but I think it turned out pretty good considering.

I also had the chance to put in the closet rod for the hang-up clothes. I just cut and drilled a hole in a couple 2x4s and put a wooden dowel through them. I didn't drill the hole all the way through, so I could put a screw in the end to hold it in place

Image

We also tried out the cushions to see what they'd look like. We plan to staple some industrial strength Velcro to the both the cushions and the bench to hold them in place.

Image

May 5th

PostPosted: Tue May 09, 2017 1:26 pm
by rxberg
With the torrential downpours and flooding that hit the area coupled with other plans, we lost a weekend to work on the trailer. We got to May 5th (last weekend to work on the trailer before our trip) with lots of stuff to do. We decided what we wanted finished before we left and what could wait and got to work.

I put the tile back-splash in and drilled a hole for the pump switch.

Image

With that done, I installed the fold-up table inside the trailer and built the triangle supports.

Image

Image

Lynne got home and worked on some painting and I decided it was time to put the floor in. We decided to do something simple, and like the idea of foam exercise mats because they seem pretty cushioned, would be easy to put in and replace if damaged, and seemed like they'd help insulate a bit. I have no idea what the R-value is, but surely not bad right? We found some wood printed mats on amazon.

Image

I think it looks pretty good, considering the material. Plus cutting it to fit with a box knife was pretty cake...

Image

Re: 6x12 Interstate cargo trailer conversion

PostPosted: Tue May 09, 2017 1:52 pm
by ffemtp
Great job!!!

Re: 6x12 Interstate cargo trailer conversion

PostPosted: Tue May 09, 2017 2:04 pm
by rxberg
ffemtp wrote:Great job!!!


Thank you! It's been both fun and frustrating.

May 6th & 7th

PostPosted: Tue May 09, 2017 2:23 pm
by rxberg
We kicked it into high gear for the final stretch before the trip, and probably put in 30+ hours of work between the two of us on Saturday and Sunday. Lots of building on Saturday and small details and fine tuning things on Sunday.

We grouted the tile back-splash (which was a PITA with the faucet installed) Next time, I'll know to wait to put the faucet in until after the tile, but no way I was going to take it out and put it back...

Image

We finished up the interior table and got to work on the fold up table on the back door for extra counter space. With a little extra room (and smaller dimensions) I was able to make the rear table out of true 3/4" plywood, so it was much sturdier for slicing, dicing, and other food prep duties. For the supports, I used left-over 1x2s from the cabinet facing and glued and tacked them together with a brad nailer, then installed a couple hinges on each to allow them to fold against the wall when they aren't in use. We got most of the hinges at the Habitat ReStore for $1 each, so I probably used more than it needed, but what the heck - better safe than sorry right?

Image

Image

Image

May 6th

PostPosted: Tue May 09, 2017 2:32 pm
by rxberg
Lots of cleaning, small details, and packing it up a bit for our trip saw us finishing up after dark. We took the time to take some pictures though before we headed inside.
We still need to build and install cabinet doors and need to do lots more painting, but we're pretty happy with how much we've accomplished before our trip.
Here's what we've got to work with for its maiden voyage to five national parks and two national monuments...

Image

Image

Image

Image

Re: 6x12 Interstate cargo trailer conversion

PostPosted: Wed May 10, 2017 1:02 am
by McDave
:applause: :applause: :applause: :applause: :thumbsup:
Oh Man! You guy's Rocked IT !!! That is NICE!! The colors and fold up tables and the whole indoor/outdoor his n' hers kitchenette. Well, it's cuter than a speckled pup! Outstanding work. You can tell Miss Lynn she did a damn fine job, and you're lucky to have her. I Don't know what else to say cept' Y'all probably better stop by here and maybe cook us a meal in that kitchen while you're up this way. My wife would love the way everything is so bright and colourful. She'd probably try to stow away and go back with you. She's half Razorback and half Okie, sooo...Well, what ya gonna do?
Anyways, Y'all are Super Stars. Really nice job. Have a Great Time at Jellystone and the Grand Tetons, it's startin to get real nice now. And you have earned it.
If you need anything, you can get a hold of me here.

McDave

Re: 6x12 Interstate cargo trailer conversion

PostPosted: Wed May 10, 2017 5:27 am
by onehoser
beautiful work!

Re: 6x12 Interstate cargo trailer conversion

PostPosted: Wed May 10, 2017 6:50 am
by flboy
Wow! Nice work! That is one nice trailer! Enjoy.

Sent from my SM-G935P using Tapatalk

Re: 6x12 Interstate cargo trailer conversion

PostPosted: Wed May 10, 2017 7:54 am
by hankaye
rxberg, Howdy;

Beautiful job fixin' up the ct. :thumbsup: , :thumbsup: !

hank

Re: 6x12 Interstate cargo trailer conversion

PostPosted: Wed May 10, 2017 10:35 am
by kathy chorjel
:thumbsup: :shock: :thumbsup: :applause:

Love your build! Saw a lot of inspiration there.

Re: 6x12 Interstate cargo trailer conversion

PostPosted: Wed May 10, 2017 7:23 pm
by low277
:thumbsup: Very nice!