Page 3 of 16

Re: 7x16x6.5 Featherlite Build

PostPosted: Sun May 14, 2017 12:30 pm
by onehoser
it's a bit of an optical illusion, the reflection of the rivets make them appear closer to the edge than they actually are. zoom in on the pic

Re: 7x16x6.5 Featherlite Build

PostPosted: Sun May 14, 2017 1:23 pm
by featherliteCT1
Thank you Hank,
See new photos.

exterior rivet head (480x640).jpg
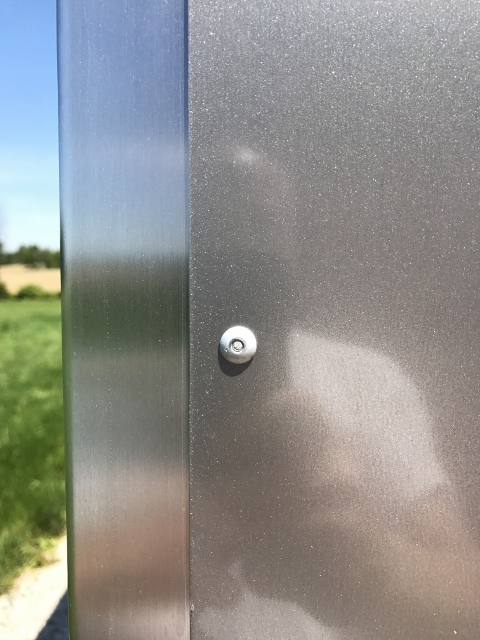
exterior rivet head and edge of rear corner
exterior rivet head (480x640).jpg (184.28 KiB) Viewed 3665 times

interior stud screw hole (480x640).jpg
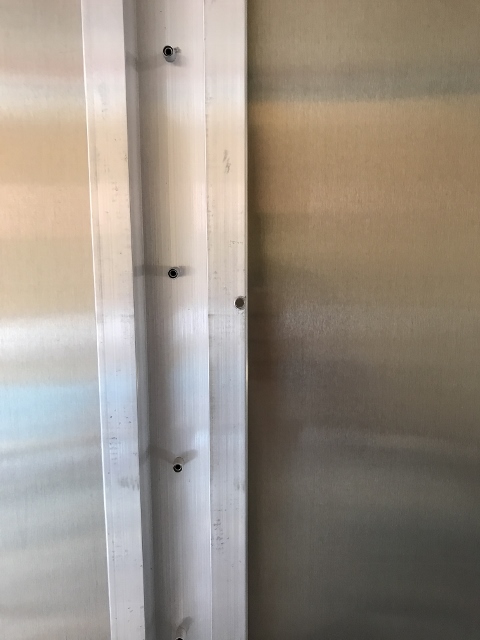
interior stud and screw hole
interior stud screw hole (480x640).jpg (125.11 KiB) Viewed 3665 times


The rivet heads are 3/8” diameter, the shanks are 3/16” and the distance from the center of the rivet shank to the edge of the panel is 1/2”. Consequently, the edge distance is more than twice the shank diameter and within the Navy specs.

The specs say: “There are no specific rules that apply to every case or type of riveting. There are, however, certain general rules that should be followed … EDGE DISTANCE.—The edge distance for all rivets, except those with a flush head, should not be less than twice the diameter of the rivet shank nor more than four times the diameter of the rivet shank.

Thanks for the sharp eye!

The studs are 1/8” thick material, the interior width of the studs is 1 5/16”” and the outer distance between the two stud flanges is 2 13/16”.

If you can see in the photo, the screw hole for one of the screws holding the interior wood panel to the stud is right on the very edge of the flange. So far, all of the screws I have looked at similarly barely catch the flange. The screws appear to be #10 screws.

As an aside, the wood panels are OSB material about 6.5’ tall and 8’ long … not conventional 4x8 sheets.

I had originally wanted to reuse the same screw holes when I re-attach the wood panels and/or screw new wood furring onto the studs when I insulate. For some time, I have been concerned about the thin gauge of this stud material. My original thought was to use the original screw holes, assuming I can line the screws up with the original holes.

A while back, I took one of the wood panels off in the V area to see what the studs looked like. After a couple of days, when I tried to reinstall the panel, I had difficulty lining up the panel because the screw holes in the wood no longer lined up with the holes in the studs. Evidently, the wood either expanded or contracted due to humidity fluctuations. At that time, I suspected that I might have to use larger diameter screws if removal of the original screws wallowed out or deformed the threads in the studs. I was able to get the panel reinstalled but was not entirely confident that I had hit all the original holes.

The point is, the aluminum studs are relatively fragile compared to steel studs.

Re: 7x16x6.5 Featherlite Build

PostPosted: Mon May 15, 2017 8:10 am
by hankaye
featherliteCT1, Howdy;

Happy to hear that the fasteners are done right. Never know when a new guy/gal might be put on the job
and miss the mark.
With the interior screws ... don't know what to recommend, measure and mark with a string line or :worship:

hank

Re: 7x16x6.5 Featherlite Build

PostPosted: Tue May 16, 2017 9:45 am
by McDave
When re installing interior panels, after insulation, wiring etc., I would just plan to go thru new wood and new stud with self drilling screws. In theory, the panel won't be removed again, so holes will all be "virgin", pardon my French. Probably the best case for longevity. Sink it once and leave it there.

McDave

Re: 7x16x6.5 Featherlite Build

PostPosted: Sat May 27, 2017 1:14 pm
by featherliteCT1
I talked to the dealer from whom I purchased the trailer about the fact that there is no VHB tape or other kind of gasket between the exterior panel(s) and the side wall posts. As it turns out, that is the way Featherlite manufactures the trailer. So, I will caulk the seams … interior and exterior. I am not overly concerned, but now I need to figure out what kind of caulk to use.

Re: 7x16x6.5 Featherlite Build

PostPosted: Sat May 27, 2017 1:58 pm
by featherliteCT1
Still waiting for the weather to clear up so I can paint the roof with Henry 587.

In the meantime, I installed a first layer of 1” polyiso insulation board in the ceiling. The panels I cut fit very tight between the 1” roof bows. Consequently, the insulation board is flush with the roof bows.

I did not install the insulation with any air gap between the insulation and the roof skin My reasoning is that:

1. the dead air space only has an R value of R1 and the insulation is about R6,

2. Steel roofed pole barns around here are all built with no air gap,

3. If there is any condensation, there is nowhere for the moisture to escape (because the cavity is sealed tight),

4. I do not see how any moisture laden air can get into the cavity (because the cavity is sealed tight).

5. The polyiso is rated for 600 degrees F.

I installed the foil face side of the foam board against the roof skin but don't think it really matters, since there is no radiant barrier effect without at least a 3/4" air gap. Also, maybe the foil facing will hold up better laying against the hot roof than the plastic coating on the other side of the board.

I plan on installing 3/4" furring running lengthwise on the ceiling, to accommodate another 3/4" layer of polyiso, followed by another 1" layer of polyiso, for a total of 2 3/4" of insulation.
Insulation Ceiling 1 (640x480).jpg
1" polyiso. The oval hole is where an existing two-way air vent is installed. There are two such vents already installed by factory.
Insulation Ceiling 1 (640x480).jpg (218.88 KiB) Viewed 3475 times


One technique i used to cut the panels was to measure the width between the roof bows in five different places: one at each side, one in the middle and two between the previous measurements. Then I transposed those dimensions onto the foam board with a long straight edge and a pencil. Ink pen would not work on the plastic side and the wet ink just smeared if touched.

Re: 7x16x6.5 Featherlite Build

PostPosted: Sat May 27, 2017 2:03 pm
by featherliteCT1
Insukation Tools (480x640).jpg
Here is my make shift work table comprised of a 4x8 sheet of 3/4" plywood, ripped in half lengthwise laying on top of two saw horses. The gap between the two boards gave me a slit to cut the foam board with the jigsaw .
Insukation Tools (480x640).jpg (169.86 KiB) Viewed 3474 times

Re: 7x16x6.5 Featherlite Build

PostPosted: Sun May 28, 2017 5:32 am
by McDave
Very cogent and well thought out argument on the insulation. It is nice that you can afford the height for the additional insulation. And Yes, additional layers of polyiso is more effective than an air gap, if you have the headroom to spare.
You are off to a great start and the way you do your homework will serve you well throughout this project. Keep it up.

McDave

Re: 7x16x6.5 Featherlite Build

PostPosted: Tue May 30, 2017 6:42 pm
by featherliteCT1
McDave wrote:Very cogent and well thought out argument on the insulation. It is nice that you can afford the height for the additional insulation. And Yes, additional layers of polyiso is more effective than an air gap, if you have the headroom to spare.
You are off to a great start and the way you do your homework will serve you well throughout this project. Keep it up.

McDave


Thanks for the encouragement!

Re: 7x16x6.5 Featherlite Build

PostPosted: Tue May 30, 2017 7:23 pm
by featherliteCT1
3 ceiling 1 inch fur w screw (480x640).jpg
I used 3/4" thick x 2" wide plywood fur strips. I tried to minimize the amount of wood because 3/4 inch plywood only has an R value of about R1. Less wood enabled me to fill more space with precious insulation.
3 ceiling 1 inch fur w screw (480x640).jpg (168.52 KiB) Viewed 3379 times
2 #8 screws (480x640).jpg
I wanted to use #8, 1 1/8 inch long screws, but could only find 1 1/4 inch so I ground off 1/8 inch from the tips to avoid risk of roof penetration. I had to pre-drill each hole, then cut threads into the roof bow using a long virgin screw, then install the shorter ground screw with the blunt end into the hole. Not as time consuming as it sounds
2 #8 screws (480x640).jpg (238.13 KiB) Viewed 3379 times
1 ceiling 1 inch fur1 (480x640).jpg
1 inch polyiso made by GAF with red print verbiage from Home Depot ... it cost $19 per sheet. Later, I found some John Mansfield product I bought at Menards for $13 per sheet.
1 ceiling 1 inch fur1 (480x640).jpg (237.43 KiB) Viewed 3379 times

Re: 7x16x6.5 Featherlite Build

PostPosted: Tue May 30, 2017 7:30 pm
by featherliteCT1
5.1 ceiling tent pole mechanism (480x640).jpg
5.1 ceiling tent pole mechanism (480x640).jpg (244.03 KiB) Viewed 3399 times
5 ceiling pole n fur 2 (480x640).jpg
I used some adjustable tent poles to hold the materials in place. These were incredibly useful and worked great.
5 ceiling pole n fur 2 (480x640).jpg (235.21 KiB) Viewed 3399 times
4 ceiling 1 inch V (480x640).jpg
4 ceiling 1 inch V (480x640).jpg (198.88 KiB) Viewed 3399 times

Re: 7x16x6.5 Featherlite Build

PostPosted: Tue May 30, 2017 7:35 pm
by featherliteCT1
[/attachment]
6 ceiling pole on fur (480x640).jpg
6 ceiling pole on fur (480x640).jpg (222.89 KiB) Viewed 3397 times
5.2 ceiling tent poles (480x640).jpg
5.2 ceiling tent poles (480x640).jpg (248.65 KiB) Viewed 3397 times
[attachment=0]7 ceiling 34 inch layer (480x640).jpg

Re: 7x16x6.5 Featherlite Build

PostPosted: Tue May 30, 2017 7:43 pm
by featherliteCT1
9 ceiling 34 inch poles (480x640).jpg
9 ceiling 34 inch poles (480x640).jpg (216.54 KiB) Viewed 3394 times
9.1 ceiling 34 inch V (480x640).jpg
9.1 ceiling 34 inch V (480x640).jpg (193.21 KiB) Viewed 3394 times
9.3 ceiling 34 inch 2 (480x640).jpg
I taped the seams with Duck brand HVAC tape rated at 600 degrees F. I loved installing this stuff!
9.3 ceiling 34 inch 2 (480x640).jpg (203.86 KiB) Viewed 3394 times

Re: 7x16x6.5 Featherlite Build

PostPosted: Tue May 30, 2017 7:44 pm
by featherliteCT1
10 ceiling 34 inch taped (480x640).jpg
10 ceiling 34 inch taped (480x640).jpg (173.91 KiB) Viewed 3393 times


This is the third layer of 1 inch polyiso.

The first layer of 1 inch GAF was friction fitted between the roof bows.
The second layer of 3/4 inch JM was friction fitted between the fur strips.
The third layer of 1 inch JM was screwed into the fur strips using #8, 1 1/4 inch panhead screws (no grinding required) with 1 1/4 inch fender washers. I did not want to use the metal washers because of their mass but that was all I had. I had originally intended on pulling off the plastic washers from some Grip Tight nails I had left over when I had some sheathing installed on my house some time ago but could not find them.

Finally, I started reinstalling some of the white roof lining that originally came with the trailer. You can see it being held up with a pole. It is 1/8 inch thick flimsy wood-like material with a white, textured vinyl coating. Not sure if I will use it or not. I will put a few pieces up and see how it works. It may be too flimsy for my taste.

Re: 7x16x6.5 Featherlite Build

PostPosted: Wed May 31, 2017 6:30 pm
by featherliteCT1
3 white ceiling ac hole (480x640).jpg
The yellow tape marks where the ceiling fan will later be installed. You can see the fender washers I used. A couple of the screws are offset a bit when I tried to cover a factory hole. This turned out to be a mistake because the holes are out of line. ...oops. I will probably paint he screw heads and washers with white paint. Perhaps that will soften the look a bit.
3 white ceiling ac hole (480x640).jpg (104.74 KiB) Viewed 3342 times
2 white ceiling poles (480x640).jpg
Again, these tent poles are awesome. I could not have installed the flimsy roof liner and gotten the tongue and groove to mate without them.
2 white ceiling poles (480x640).jpg (192.32 KiB) Viewed 3342 times
1 white ceiling bench.jpg
This is the original roof lining that has a plastic tongue and grove feature. I had to cut 1 inch off each side to accommodate insulation that I will later install in the cove areas where the walls meet the roof. The holes are where the factory screws were located. I will later fill the holes with white caulk ... I presume that will completely hide them. If not, no big deal.
1 white ceiling bench.jpg (178.01 KiB) Viewed 3342 times