Hey, Marosell -- thanks for the feedback!
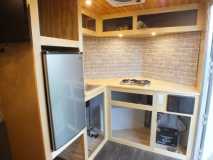
We started with a drawn up plan, (after months of thinking about it!!), but that kind of went by the wayside as we moved along. We knew we wanted an unobstructed load length of 7 feet, since we're planning to haul two dirt bikes. Once we reserved that space, we kind of built everything else to fit. The tall cabinet and the kitchen lowers are 21" deep. The uppers we kept kind of small so that they wouldn't encroach while cooking. They are only 12" tall. The cabinet doors haven't been started yet, but they will have aspen frames with birch plywood panels. The tall cabinet panel facing the rear is also birch plywood. We're planning two fold down beds, one on each side. We just started building those today, so that's going to take a little time.
We got our windows and the hatch for the AC from teardroptrailerparts.com:
https://www.teardroptrailerparts.com/pricing.htmlWe went with the 14" x 21" windows. Because our studs are 16" on center, they fit right in. The AC hatch is on that same page - it's the WD19 Baggage Door. We had to cut a stud for that. We framed in 1" thick plywood using Kreg system and self-tapping screws into the steel framing studs. It turned out great, but you've got to make sure that the AC you get will fit in there. We went with the Frigidaire MiniCompact, and got it from Amazon here:
https://www.amazon.com/gp/product/B00W2KG92Y/ref=oh_aui_detailpage_o09_s00?ie=UTF8&psc=1We had to put the interior "decorative" frame around it, because the cargo hatch is made for 2" thick walls. It's funny that you asked if we considered putting the AC in the top compartment of the tall cabinet. Initially, that was our plan. However, we decided to move it to the other wall for a couple of reasons. We wanted the additional storage cabinet, and we wanted to be able to mount the tv on the rear-facing wall of the tall cabinet. It all worked out great.
We got the tongue-in-groove cedar on the ceiling came from Menards, and we were surprised and pleased by the quality of it.
The little LED ceiling lights came from Amazon here:
https://www.amazon.com/gp/product/B012ZOI3ZW/ref=oh_aui_detailpage_o00_s00?ie=UTF8&psc=1 We were pleased with those, too. They're very nice quality.
The shiplap we made out of 1/4" plywood, ripped into 6" widths. We went with carpet on the lower walls because we figured it would be unscuffable when hauling.
Since the trailer is only 6"x12", we didn't have the room for a bathroom. We're going with a porta-potty which we'll store in the floor level bottom section of the tall cabinet. We installed an outdoor shower from Amazon:
https://www.amazon.com/gp/product/B004NBKNM2/ref=oh_aui_detailpage_o05_s00?ie=UTF8&psc=1 Again, we were surprised by the nice quality of it. You can buy little pop-up shower tents, (who knew?!?), so we're planning to get one of those eventually. Not sure, but will probably buy this one:
https://www.amazon.com/dp/B01AT3T0GC/?coliid=I1Q0JIV3MWYQ9E&colid=MUJUMY3Y9V10&psc=0&ref_=lv_ov_lig_dp_itThe other utility hookups are all from Amazon:
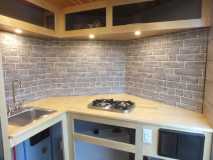
https://www.amazon.com/gp/product/B002XLGRAG/ref=oh_aui_detailpage_o05_s00?ie=UTF8&psc=1https://www.amazon.com/gp/product/B002XLGSHS/ref=oh_aui_detailpage_o05_s00?ie=UTF8&psc=1https://www.amazon.com/gp/product/B01E6N0XFI/ref=oh_aui_detailpage_o05_s00?ie=UTF8&psc=1Just today we put some NuWallpaper up on the kitchen backsplash so it will be easy to wash. It was surprisingly easy to work with.
It has adhesive already on the back, and you can reposition it, so it went up pretty easily. We also got the sink and cooktop installed. The countertop is aspen - Menards sells "MasterCraft" boards of various widths. We went with 24" wide for the counter, and had to do our own glue ups for the extra depth of the front V.
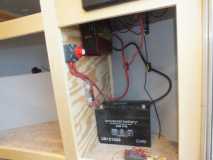
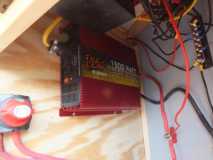
Also today the inverter came. We went with the TigerClaw 1500W. We'd seen an electrician on YouTube do a test/review of it, and he really liked it. He seemed VERY knowledgable, and really gave it a good test, so we felt confident buying it. Tonight we tested it - we were running the refrigerator and the tv, and we plugged in and ran an 1850 watt hair dryer just to see what would happen. It ran for about 30 seconds before it went into its safety shut-down mode. We also got an AGM battery. We're hoping to get by with just one, since they're kind of expensive. The PD4045 converter/charger made the high and low voltage wiring very easy. Just needed a terminal block for the grounds and a couple larger terminals for the heavy wires.
So, that's kind of where we are right now. We're happy to answer any questions you have. If you don't have a Kreg tool, I would recommend getting one. That thing has made everything so much easier!!


