7x18 EZ Hauler Build

Converting Cargo Trailers into TTTs

7x18 EZ Hauler Build

Postby travist » Wed Mar 20, 2019 8:26 pm

Alright, so this is the build journal.

I bought a new custom 7x18 EZ Hauler with the windows, the roof vent, cargo doors and the AC support already in, and the stabilizer jacks on the outside. Then my unusual request for the rear door to lift up, tear drop style for a rear kitchen.

157633

The exterior drivers side. You can see the rear door open up

157634

The inside all blank and ready to go. First up, Layout. Second, take of the corner trim and insulate the ceiling

157635

Layout.

1 = rear kitchen
2= dinette seats
3 = dinette table
4 = bathroom
5= clothes drawers
6= queen bed

Not picture, two bunks, one above the kitchen, one above the queen bed and cabinets running front to back.
travist
Teardrop Advisor
 
Posts: 63
Images: 43
Joined: Tue Jul 31, 2018 2:35 pm

Re: 7x18 EZ Hauler Build

Postby aggie79 » Thu Mar 21, 2019 7:29 am

That sure is a nice looking trailer! :applause: :thumbsup: :applause:

It should be a fine platform for CT conversion. I look forward to your build! Take lots of :pictures: along the way.
Tom (& Linda)
For build info on our former Silver Beatle teardrop:
Build Thread

93503
User avatar
aggie79
Super Duper Lifetime Member
 
Posts: 5405
Images: 686
Joined: Tue Aug 07, 2007 5:42 pm
Location: Watauga, Texas

Re: 7x18 EZ Hauler Build

Postby travist » Sat Mar 30, 2019 10:43 am

Update:

Insulation is finished, I also did some spray foam around the doors and windows.
157715

I also cut out all the holes (scary stuff) used butyl where I could, and used silicon caulk on the edges where I could as well. Going to have an external shower (no internal one)
157717

157714

157716

The salem vent is to allow some air flow for the dc fridge, as the kitchen will be closed off from the main trailer most of the time.

Wiring has been started, hopefully finish it today, and get the walls back on.
travist
Teardrop Advisor
 
Posts: 63
Images: 43
Joined: Tue Jul 31, 2018 2:35 pm
Top

Re: 7x18 EZ Hauler Build

Postby McDave » Sat Mar 30, 2019 12:24 pm

That a boy! Got most of the time consuming stuff out of the way. Progress will come lot faster now. Don't forget to tape those seams before you put the walls and ceiling back in. Looking forward to the rest of your build. How heavy is that ramp door to lift to the full open position? Do you just use poles to hold it open? You may want to open that up and insulate as well.
Good luck and keep us posted..

McDave

Edit: I just noticed the struts holding the door up. Those gotta be some strong struts, hopefully they assist in the opening of the door.
User avatar
McDave
Donating Member
 
Posts: 2288
Images: 412
Joined: Sun Jan 25, 2015 5:21 am
Location: Tiny Town, Montana
Top

Re: 7x18 EZ Hauler Build

Postby travist » Sat Mar 30, 2019 11:31 pm

Thanks! Wiring is taking longer than insulation, but that's ok.

Yeah the struts are from factory, and the door is quite easy to lift. Somewhat harder to close the door.

Yeah I wasn't sure whether I should open up the door and insulate. I can always do that later if need be. I will definitely tape up the seams once the wiring is all done.
travist
Teardrop Advisor
 
Posts: 63
Images: 43
Joined: Tue Jul 31, 2018 2:35 pm
Top

Re: 7x18 EZ Hauler Build

Postby kirkupnorth » Sun Mar 31, 2019 4:55 pm

Things are looking good in there -- nice work! :thumbsup:
User avatar
kirkupnorth
Teardrop Master
 
Posts: 144
Images: 180
Joined: Thu Apr 12, 2018 2:27 pm
Location: Northern Minnesota
Top

Re: 7x18 EZ Hauler Build

Postby travist » Fri Apr 12, 2019 6:09 pm

I'll post an update hopefully later tonight.

However, my next step is to put luaun on the ceiling, and i"m not sure how to attach it in a way that when I fill and paint the screws won't be visible, but they also will be strong enough to hold. Will screws work? I didn't really think I wanted to glue it, but maybe that's the better option?

Other ideas?

I don't really want to have to put additional strapping on, looking for a smoother look if I can get it.
travist
Teardrop Advisor
 
Posts: 63
Images: 43
Joined: Tue Jul 31, 2018 2:35 pm
Top

Re: 7x18 EZ Hauler Build

Postby McDave » Fri Apr 12, 2019 10:25 pm

Construction adhesive might work, hopefully you would never have to take it down. What if you had screws only around the perimeter that were hidden by moulding and where the vent or A/C come thru. Then had Velcro strips running down the length of the roof spars to keep it from sagging? It would still be dependent on the strength of the adhesive that holds the Velcro to the luan and roof spars but you may be able to avoid all the screws in the visible area.
Maybe?

McDave
User avatar
McDave
Donating Member
 
Posts: 2288
Images: 412
Joined: Sun Jan 25, 2015 5:21 am
Location: Tiny Town, Montana
Top

Re: 7x18 EZ Hauler Build

Postby ZColorado » Sat Apr 13, 2019 2:36 pm

cut some 3/8" or more plywood battens. Attach the battens to the ceiling and brad nail the luan to the battens. Thats what i am going to do.
ZColorado
Teardrop Advisor
 
Posts: 54
Joined: Wed Mar 27, 2019 2:35 am
Location: Near Boulder CO
Top

Re: 7x18 EZ Hauler Build

Postby travist » Mon Apr 15, 2019 5:08 pm

Well been working away at it.

I've basically done wiring, although I realized I want to make a couple of tweaks. Most of the wiring is going to run in angled channels along the wall/ceiling corner, and up the front two vertical corners. I'm also going to strategically cut through those channel pieces so that I can open up that area even after I put in the bathroom and bunks.

157954

On both side walls there was a small space between the stud supporting the window and the next stud, which I decided to leave uninsulated as a wire channel, as that channel comes out under the dinnette, and is the most likely location for me to pull more wires, so I'm thinking I'll have a lot of flexibility should I need to ever adjust my wiring plans in the future.

157955

And then I got the walls back on, but like I said, I want to make a couple of tweaks on the left side. I decided I want to put actual wall plugs to terminate those 120v lines sticking out in the middle ish on the left side.

157956

I haven't gotten a good picture yet, but I have half the ceiling lauan tacked on with minimal screws. We decided we are just going to tack on some strips to cover the screws after, but thanks for all the suggestions! I hope to have the ceiling on, and then the first coat of paint on this coming weekend, then I can start building the interior, that's when all the fun stuff happens!
travist
Teardrop Advisor
 
Posts: 63
Images: 43
Joined: Tue Jul 31, 2018 2:35 pm
Top

Re: 7x18 EZ Hauler Build

Postby featherliteCT1 » Mon Apr 15, 2019 6:52 pm

You have accomplished a lot so far ... looking great!
featherliteCT1
1000 Club
1000 Club
 
Posts: 1124
Joined: Wed Dec 28, 2016 6:54 am
Location: Southern Indiana
Top

Re: 7x18 EZ Hauler Build

Postby travist » Sun May 05, 2019 1:28 am

Well its been a bit over due for an update. Although these photos are already a bit out of date. I have the front diamond plate back on and am about to start building the queen bed in the front, but here is the progress.

So we went with 1/8" luaun on the ceiling, we will be putting trim strips on the ceiling to cover the screws at some point.

158088

My eldest and wife both got in on the painting. Originally we were just painting the osb which was factory sanded, thinking it might be smooth enough for your hopes. Alas, it was not good enough.

158089

So we added 1/8 luaun onto the walls as well. That slowed us down a bit. I just finished that job today, and like I mentioned got the metal edging at the front back on. Hopefully have most of a bed frame tomorrow.

158090

Thanks for everyone's help thus far!
travist
Teardrop Advisor
 
Posts: 63
Images: 43
Joined: Tue Jul 31, 2018 2:35 pm
Top

Re: 7x18 EZ Hauler Build

Postby travist » Mon Aug 05, 2019 11:00 am

Ok, so first, I had another post running about a leak in one of the windows, which I thought I had fixed, but then I hadn't, two rounds of that and I ultimately had to bring the trailer back to the dealer and they completely redid the window and water tested it, and it should be all fixed now.

Also, I'm now going to do a massive update. Life got away, and I was in a crunch to get enough of the trailer done to use it camping (plus a few extras for comfort) and work was crazy and then camping happened and holidays etc, and now I'm finally updating where it is as of today. Lots of pictures, feel free to comment or ask questions about any of this. Hopefully these ideas get others excited like I have benefitted from so many people's work here, and I'd also love suggestions or ideas if you think of them as you are looking.

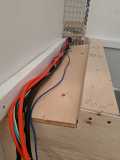
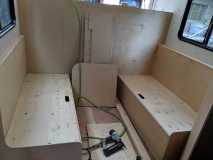
So we last left it above with basically a wired/first coat of paint and an empty box. So I basically built front to back on the inside, starting with the queen bed in the front which provided the outside access storage underneath the front most 2/3rds, and then some inside storage and a place for the breaker/fuse panel and a couple more drawers on the second 1/3rd. I also got struts off an old rv (thank you craigslist) for pretty cheap, which makes this way better for future maintenance with wiring. You might be able to spot that under the queen bed I painted a few coats of floor enamel for additional protection.

158965

I spent a lot of time thinking about keeping the wiring relatively easy to get back at, so all the metal trim around the trailer is strategically cut so that I could take pieces off and re-access the wiring anywhere in the trailer until the last few feet where the wiring goes from the top angled channel to the terminal (plugs etc). This continues with a wiring channel under the bed on each side.

158966

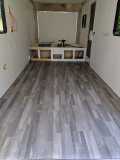
Ok, so now we wanted to put flooring on the rest before any additional walls etc went up, or the base metal trim.

158967

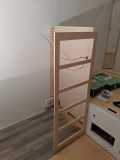
Once that was in I was able to start building the remaining structures of the trailer. First came the large storage drawers that would also serve as support for a bunk above the queen. The drawer cabinet is 30.5" deep, but the drawers are 28" deep for the top 4 and 26" deep for the bottom to allow for piping to reach the external shower that is there.

158968

Next came the bathroom space. Going to put a small pocket door in there. Bathroom will hold an rv toilet that flushes directly into a 32 gallon black tank that will be installed underneath the trailer between the floor studs. It will also have a small vanity in the angled part of the bathroom and above in the faux medicine cabinet will mostly just hold the tankless water heater (I bought an aquah direct vent tankless as seen on someone elses build thread, which sucks in its own combustion air, forgetting who at the moment, but thanks!) that will vent out the roof behind the ceiling vent/fan.

158969

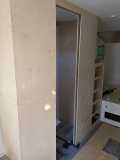
Ok, so after the bathroom was framed, I started building the dinette and the wall that separates the inside of the trailer from the outside access only kitchen (tear drop style).

158971

That dinnette will convert to a standard sized double bed if needed. For those thinking through that is a queen at the front, with a 30" wide (cot size) bunk above, and a convertable double bed, and then above the kitchen wall divider is one more bunk that is also 30" wide.

158972

Ok, so that's all the planned structures for the inside, although some may have realized that one the opposite wall fro the bathroom is some unused space that originally was just going to allow the trailer to be a bit roomier, but my wife is thinking may be we should be building some narrow storage there too. Since we are no longer trying ultra hard to keep it super light (I bought an older pickup instead of towing with the van), that might be a decent option. But low on the priority list right now.

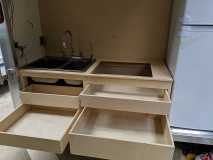
Ok, so the kitchen is in the back, tear drop style. There is a 12v solar fridge at the back that supposedly averages 40W (doesn't seem to be totally true in my first run with it) but it is very nice and spacious, so it is a unique 6.6 cu ft fridge.

As you can see in the mockup below there will be a stove and a sink. Stove will run off of 11 w.c. propane like the tankless water heater, and possibly a heater eventually (although we mostly just summer or shoulder season camp). I'll put a 20-30lb tank at the front. The kitchen sink, like the bathroom sink will pull from a 38 gallon water tank that will sit underneath the trailer between the floor studs right between the front and back axle of the trailer (will fit nicely there). I have a 12 volt pump which will go under a dinette bench.

158976

As the priority for now has been simplifying our loading/unloading time and also increasing organization, drawers have gotten priority over plumbing, so I built all the drawers for the kitchen. I had some left over drawer slides from my house kitchen renovation way back when we moved in (the cabinet supplier we used just included extras for some reason) and one new set of slides for that small 8" drawer.

158977

I'm currently building the uppers for the kitchen and may have those in before we go camping again tomorrow. Additional tasks in the near future are slide prevention mechanisms. My current plan is to use camlocks because I dislike using the other clasp type methods that make opening and closing drawers and cabinets really loud. (our kids are young and are usually sleeping several hours before we sleep at night, and one still naps.

Love to hear thoughts, or ideas, plus hope this is some helpful ideas for others.
travist
Teardrop Advisor
 
Posts: 63
Images: 43
Joined: Tue Jul 31, 2018 2:35 pm
Top

Re: 7x18 EZ Hauler Build

Postby kirkupnorth » Tue Aug 06, 2019 4:48 pm

You weren't kidding when you said "massive update"!!

Things are looking so good in your camper. I'm pretty sure that's the nicest camper stove I've ever seen! Your drawers look great, your floor looks amazing -- it's clear that it's turning out great.

Very nice work!! :D
User avatar
kirkupnorth
Teardrop Master
 
Posts: 144
Images: 180
Joined: Thu Apr 12, 2018 2:27 pm
Location: Northern Minnesota
Top

Re: 7x18 EZ Hauler Build

Postby hankaye » Tue Aug 06, 2019 4:52 pm

travist, Howdy;

Makin' progress. Looks good. Don't forget weights & Balance.
These are designed (generally), for a 60% Front/40% Rear.
Keep those updates comin' .

hank
Striving for a less complicated life since 1949 ...
Every day I beat my own previous record for number of consecutive days I've stayed alive.
hankaye
2000 Club
2000 Club
 
Posts: 2567
Images: 1
Joined: Thu Dec 06, 2012 5:35 pm
Location: S.W. New Mexico
Top

Next

Return to Cargo Trailer Conversions

Who is online

Users browsing this forum: Google [Bot] and 10 guests

cron