Window Air Conditioner Intake/Exhaust

Converting Cargo Trailers into TTTs

Window Air Conditioner Intake/Exhaust

Postby foxontherun » Fri Jun 26, 2020 12:33 pm

Good afternoon,
Would an intake/exhaust idea like this picture work? :thinking: My plan is to use a custom size louvered vent with a baffle to seperate the intake from exhaust. My concern is would the intake suck in the exhaust and make the AC work harder. Thought about going thru floor but the refrigerator goes under my AC and there isn't a real large cavity behind the fridge to allow for sufficient intake air (at most 3" between wall and back of fridge 60" tall).

Picture of my idea below, hope it makes sense.
Thanks,
Harry

Air Conditioner Idea.JPG
Air Conditioner Idea.JPG (51.04 KiB) Viewed 3081 times
foxontherun
Teardrop Master
 
Posts: 186
Images: 67
Joined: Tue Aug 29, 2017 5:13 pm

Re: Window Air Conditioner Intake/Exhaust

Postby flboy » Fri Jun 26, 2020 12:49 pm

I suppose it is possible you will get some mixing, but given the exhaust is warmer, it should rise and not drop into the intake much except for any turbulence. Just make sure the exhaust output doesn't somehow deflect the exhaust downward. I am using an RV Propane refrigerator vent on the side of my CTC for AC exhaust, and it does deflect downward, but my intake is through the ceiling again using an RV rooftop Propane Fridge Vent.

Give it a try and see how well it cools. If you think there is too much mixing going on and the AC just can't work well, you will need to find a way to improve airflow separation.

In most situations there is "ideal" and then there is good enough. Sometimes good enough is good enough! ;) ;)

You could do a few different things... move the fridge over the AC and go through the floor. Some folks do that, but not ideal to have AC at ground level... better to have up high. Or you can move it to the top of the appliance stack and put the intake on the roof (that is how I did mine). Unfortunately, these are decisions that need to be made before you start cutting holes.

I will throw in a few pics below to give you some ideas. Good luck on your decisions... they are all tradeoffs.
Last edited by flboy on Fri Jun 26, 2020 1:02 pm, edited 1 time in total.
Don (Flboy)

YouTube Video of Finished 6x12 Trailer:
https://youtu.be/6_-8cVdWUIA
YouTube Video of 7*18 with 2ft V-nose Trailer:
https://youtu.be/MUcMM86LA2g
User avatar
flboy
Gold Donating Member
 
Posts: 4218
Images: 378
Joined: Tue May 15, 2012 6:13 pm

Re: Window Air Conditioner Intake/Exhaust

Postby flboy » Fri Jun 26, 2020 12:57 pm

Here's is how I did it.. just another way:

Image


Image


Image

The exhaust is isolated from the intake.

Image


Image

Drain Hose will drain down through the floor. Already draining water tonight.

Image

The sides are sealed up so the air to cool the compressor and condenser is drawn through the vent in the roof.

Image

All in. Just needs to be taped up with foil tape and then paneled when I do the paneling.

Image

The Outside View of the side and roof vents. I used the LP Gas RV Refrigerator Vents which are readily available. T

Image


Image
Don (Flboy)

YouTube Video of Finished 6x12 Trailer:
https://youtu.be/6_-8cVdWUIA
YouTube Video of 7*18 with 2ft V-nose Trailer:
https://youtu.be/MUcMM86LA2g
User avatar
flboy
Gold Donating Member
 
Posts: 4218
Images: 378
Joined: Tue May 15, 2012 6:13 pm
Top

Re: Window Air Conditioner Intake/Exhaust

Postby foxontherun » Fri Jun 26, 2020 1:24 pm

Trying to avoid any holes in roof if I can. The louver vent I am considering is a storm proof vent that is for houses/buildings. Asked the mfg if it would work for the trailer and they indicated it shouldn't be a problem I like this vent because I can order it custom size. This is a link to the website:

https://www.hvacquick.com/products.php/commercial/Dampers-and-Louvers/Louvers/Dayus-Exterior-1-and-2-inch-Louvers#price

I plan to use their DAL2-FF model . I can actually order it taller and put some extra space between intake/exhaust; perhaps that would work better???

Thanks,
Harry
foxontherun
Teardrop Master
 
Posts: 186
Images: 67
Joined: Tue Aug 29, 2017 5:13 pm
Top

Re: Window Air Conditioner Intake/Exhaust

Postby flboy » Fri Jun 26, 2020 1:37 pm

It may... I have no way of knowing. Try what you have planned and then if that doesn't do the job... modify it. Just consider what you'd do to modify it up front and make sure that will be possible from where you are at.

In any case, I wouldn't be afraid to put holes in the roof. Done right and inspected every year or so, you will have no issues. These roof vents have such a wide flange and with Dicor tape between the flange and metal roof and the Dicor self leveling sealer over all the screws and seams..... I don't suspect it will ever be an issue. I did have an issue with an antenna I put on the roof... and that was my fault.... it did it poorly.. since fixed.

Good luck... this is the hard stuff.

You should check out Karebru's AC install. He used two louvered fridge vents on the wall and a very innovative mount (at least I thought so). If I was ever going to do a wall mount and not cut a hole in the roof... I'd build something similar. Her e is a link to his thread. He has a sketch on page 1 and actual build starts about page 5 to 7... just browse it. It is awesome! He later built cabinets around all of it and it is very well done.


viewtopic.php?f=42&t=70347
Don (Flboy)

YouTube Video of Finished 6x12 Trailer:
https://youtu.be/6_-8cVdWUIA
YouTube Video of 7*18 with 2ft V-nose Trailer:
https://youtu.be/MUcMM86LA2g
User avatar
flboy
Gold Donating Member
 
Posts: 4218
Images: 378
Joined: Tue May 15, 2012 6:13 pm
Top

Re: Window Air Conditioner Intake/Exhaust

Postby foxontherun » Fri Jun 26, 2020 1:43 pm

Thanks, Don, I knew that I saw something somewhere on the forum and I just couldn't find it. Karebru's idea is what I remember. I will have to check that out again and see how his is working out.

Appreciate it!
Harry :D
foxontherun
Teardrop Master
 
Posts: 186
Images: 67
Joined: Tue Aug 29, 2017 5:13 pm
Top

Window Air Conditioner Intake/Exhaust

Postby cardude01 » Mon Jun 29, 2020 7:29 am

Here is how I recently installed my AC, similar to how others here did it. Separated the warm condenser exhaust with a duct that has its own exhaust port(hole) , then ducted the side evaporator cooling vents to another port. These are cheap $37 plastic marine portholes from Amazon. I needed something that would seal up well since they are on the front and subject to driving rain at times, and they seem to fit the bill. Have not tested them for water leaks yet tho. Sealed them with butyl tape.

I just got it all working yesterday, and it seems to work well. Quickly got down to 70 degrees and started condensing lots of water in this crazy humid coastal Texas air.

I’m terrified of cutting a hole in the roof so that was the reason for the side ports.


“Semi-Stealth” window AC design
https://r.tapatalk.com/shareLink/topic? ... source=app


Sent from my iPhone using Tapatalk
cardude01
Teardrop Inspector
 
Posts: 7
Joined: Sun Jun 21, 2020 4:48 am
Top

Re: Window Air Conditioner Intake/Exhaust

Postby foxontherun » Tue Jul 07, 2020 9:42 pm

I have completed the construction of the AC test and ran the initial 6 hour test today. Temp in trailer at start was 93 degrees with 48% humidity; west side of trailer in the sun all afternoon. AC is temporarily built into the side door on the east side of trailer which receives sun until early afternoon. Test was from 2 PM to 8 PM. AC used 3.35 KWH, startup was 4.3 amps if I read meter correctly. The interior temperature was 64 degrees 45% humidity at the end of the test. I was impressed with how cold it was in the trailer. I didn't think it would get that cold in such a short time with the trailer in the sun all afternoon.
:thumbsup:

Don, does this seem like a reasonable test of my venting idea? Grant it, this is only one test. I do plan to run more. I am attaching pictures of my mock set up. It was interesting to build this especially since i was using the side door as my hole in the wall. I have a ramp door so that was out of the question, ha! I can't seem to find the drain hole but there didn't appear to be any water in the floor or under the AC anywhere. The AC is a Frigidaire FFRA0611U1 6000 BTU model. I emailed the factory to ask but haven't heard from them yet.

Harry :D

These first three pictures are my plywood exit/entry door under the AC platform.

162432162434162433

These are the exterior views of the AC in side door. One picture fully enclosed side door and one picture with temporary plywood door removed. The next two pictures are looking inside the intake port hole to the left (fan side) and right (compressor side).

162424162431162430162429

These next four are the frame the AC sits on and the ductwork (upper and lower).
162425162427162426162428
foxontherun
Teardrop Master
 
Posts: 186
Images: 67
Joined: Tue Aug 29, 2017 5:13 pm
Top

Re: Window Air Conditioner Intake/Exhaust

Postby flboy » Wed Jul 08, 2020 6:28 am

Harry, that looks great. I think it is a very reasonable test. I like the way you built up a test case like that. Nice work!
Don (Flboy)

YouTube Video of Finished 6x12 Trailer:
https://youtu.be/6_-8cVdWUIA
YouTube Video of 7*18 with 2ft V-nose Trailer:
https://youtu.be/MUcMM86LA2g
User avatar
flboy
Gold Donating Member
 
Posts: 4218
Images: 378
Joined: Tue May 15, 2012 6:13 pm
Top

Re: Window Air Conditioner Intake/Exhaust

Postby aggie79 » Wed Jul 08, 2020 7:25 am

Regarding the drain hole, there isn’t one. Window units are designed so that the condensate from the evaporator coil collects in a lowered portion of the floor pan just interior to the condenser coil. The condenser fan spins into the pool of condensate and “slings” the condensate onto the condenser coil.

It does this for efficiency, but it can be noisy and there is no control of the water once it gets thrown onto and through the condenser coil.

If you want a drain, you’ll need to drill a hole in the lowered portion of the floor pan. Just be sure to not drill into the coils or refrigerant lines.


Sent from my iPhone using Tapatalk Pro
Tom (& Linda)
For build info on our former Silver Beatle teardrop:
Build Thread

93503
User avatar
aggie79
Super Duper Lifetime Member
 
Posts: 5405
Images: 686
Joined: Tue Aug 07, 2007 5:42 pm
Location: Watauga, Texas
Top

Re: Window Air Conditioner Intake/Exhaust

Postby flboy » Wed Jul 08, 2020 7:37 am

aggie79 wrote:Regarding the drain hole, there isn’t one. Window units are designed so that the condensate from the evaporator coil collects in a lowered portion of the floor pan just interior to the condenser coil. The condenser fan spins into the pool of condensate and “slings” the condensate onto the condenser coil.

It does this for efficiency, but it can be noisy and there is no control of the water once it gets thrown onto and through the condenser coil.

If you want a drain, you’ll need to drill a hole in the lowered portion of the floor pan. Just be sure to not drill into the coils or refrigerant lines.


Sent from my iPhone using Tapatalk Pro


Harry, that is the way my AC was also. If you decide to put drain in, be careful as mentioned. I put one in because I did not like the noise and also, being in a high humidity state, the water may not evaporate quick enough to keep up and I do not want leaking in the trailer. Hanging out a window, it would not matter if it overflowed. Her is where I put my drain. The "T" is important to vent the hose so it does not vapor lock at the 90 deg turn and drop.


Image


Image
Don (Flboy)

YouTube Video of Finished 6x12 Trailer:
https://youtu.be/6_-8cVdWUIA
YouTube Video of 7*18 with 2ft V-nose Trailer:
https://youtu.be/MUcMM86LA2g
User avatar
flboy
Gold Donating Member
 
Posts: 4218
Images: 378
Joined: Tue May 15, 2012 6:13 pm
Top

Re: Window Air Conditioner Intake/Exhaust

Postby flboy » Wed Jul 08, 2020 7:38 am

deleted - redundant
Last edited by flboy on Wed Jul 08, 2020 10:11 am, edited 1 time in total.
Don (Flboy)

YouTube Video of Finished 6x12 Trailer:
https://youtu.be/6_-8cVdWUIA
YouTube Video of 7*18 with 2ft V-nose Trailer:
https://youtu.be/MUcMM86LA2g
User avatar
flboy
Gold Donating Member
 
Posts: 4218
Images: 378
Joined: Tue May 15, 2012 6:13 pm
Top

Re: Window Air Conditioner Intake/Exhaust

Postby foxontherun » Wed Jul 08, 2020 7:57 am

I live in TN so plenty humidity; I will have to do something as I don't want excess water in the trailer. Don, did you just drill a hole and fit a tube in with caulk around it or is it a fitting with a hose attached to it in the back of your AC? What size hole did you make?

Thanks,
Harry
foxontherun
Teardrop Master
 
Posts: 186
Images: 67
Joined: Tue Aug 29, 2017 5:13 pm
Top

Re: Window Air Conditioner Intake/Exhaust

Postby flboy » Wed Jul 08, 2020 9:25 am

foxontherun wrote:I live in TN so plenty humidity; I will have to do something as I don't want excess water in the trailer. Don, did you just drill a hole and fit a tube in with caulk around it or is it a fitting with a hose attached to it in the back of your AC? What size hole did you make?

Thanks,
Harry


I just drilled a hole for the tubing to slide in tightly and then caulked. No fitting as it was too close to coils and did not want to risk damage. It is not under pressure so this works fine. No leaking so far. Just secure the hose so it is stable.
Don (Flboy)

YouTube Video of Finished 6x12 Trailer:
https://youtu.be/6_-8cVdWUIA
YouTube Video of 7*18 with 2ft V-nose Trailer:
https://youtu.be/MUcMM86LA2g
User avatar
flboy
Gold Donating Member
 
Posts: 4218
Images: 378
Joined: Tue May 15, 2012 6:13 pm
Top

Re: Window Air Conditioner Intake/Exhaust

Postby working on it » Wed Jul 08, 2020 10:28 am

flboy wrote:
aggie79 wrote:Regarding the drain hole, there isn’t one. Window units are designed so that the condensate from the evaporator coil collects in a lowered portion of the floor pan just interior to the condenser coil. The condenser fan spins into the pool of condensate and “slings” the condensate onto the condenser coil.

It does this for efficiency, but it can be noisy and there is no control of the water once it gets thrown onto and through the condenser coil.

If you want a drain, you’ll need to drill a hole in the lowered portion of the floor pan. Just be sure to not drill into the coils or refrigerant lines.


Harry, that is the way my AC was also. If you decide to put drain in, be careful as mentioned. I put one in because I did not like the noise and also, being in a high humidity state, the water may not evaporate quick enough to keep up and I do not want leaking in the trailer. Hanging out a window, it would not matter if it overflowed....


* My window A/C unit never drips, which sorta makes me mad because of the effort I put into making a drain pan and outlet for overflow, but I didn't expect it to, anyway. It's an LG 5k unit, and since I already had experience using an 8k btu LG A/C in my wife's old home office, I knew that there would likely be little overflow, if any. But, I did drill a 1/4" drain hole just to be safe, even though my LG 5012J unit didn't require one (as opposed to a similar model LW 5012).
LG model LW5012.JPG
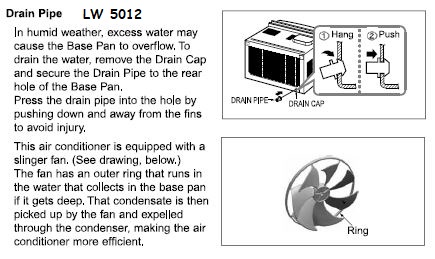
LG model LW5012.JPG (56.92 KiB) Viewed 2735 times


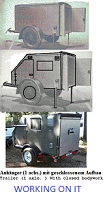
* The way I enclosed the exhaust and routed it out to the right in an insulated duct may explain some of the reason for no excess moisture. The exhaust enclosure retains enough heat to evaporate excess (not being used to cool the coils via the inner fan), but having a high flow inline axial fan in the duct expels the retained heat fast enough to prevent moisture build-up and/or thermal shutdown.http://www.tnttt.com/viewtopic.php?f=21&t=54945&hilit=thermal

* In any case, the A/C system works fine, never drips, and was worth the time invested in it, though the right angle ducting could've been replaced with a box attached to the rear hatch, with exhausting louvers thru it (so it would still function at night with the hatch closed).
  • 103366103367 
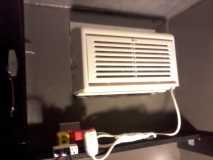
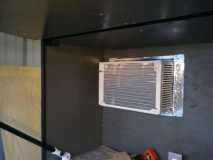
installed in rear bulkhead
  • 104347 
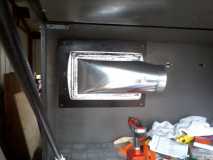
right angle vent boot attached
  • 104348 
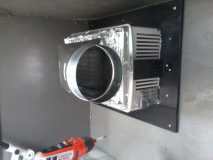
8" diameter outlet, to be reduced to 6" ducting
  • 104739 
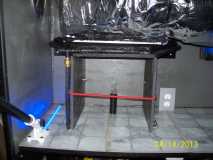
drain pan and overflow outlet tube
  • 104740 
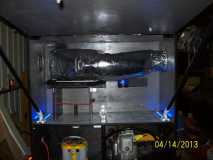
as completed (at first)
  • 125895 as it is now, years later
2013 HHRv "squareback/squaredrop", rugged, 4x8 TTT, 2225 lbs
  • *3500 lb Dexter EZ-Lube braked axle, 3000 lb.springs, active-progressive bumpstop suspension
  • *27 x 8.5-14LT AT tires (x 3) *Weight Distribution system for single-beam tongue
  • *100% LED's & GFCI outlets, 3x fans, AM/FM/CD/Aux. *A/C & heat, Optima AGM, inverter & charger(s)
  • *extended-run, on-board, 2500w generator *Coleman dual-fuel stove & lantern, Ikea grill, vintage skillet
  • *zinc/stainless front & side racks *98"L x 6" diameter rod & reel carrier tube on roof
173193172890148599
User avatar
working on it
2000 Club
2000 Club
 
Posts: 2176
Images: 457
Joined: Tue Oct 04, 2011 9:05 pm
Location: DFW Texas
Top


Return to Cargo Trailer Conversions

Who is online

Users browsing this forum: No registered users and 22 guests