Planning a new camper

Design & Construction of anything that's not a teardrop e.g. Grasshoppers or Sunspots

Postby depatty » Thu Oct 23, 2008 11:19 am

john wrote:Concerning the drop floor you might want to throw into consideration an uneven road surface. Entering a gas station for example.

The dip for the roadside gutter combined with the hump of the gas station entrance can cut into your clearance.


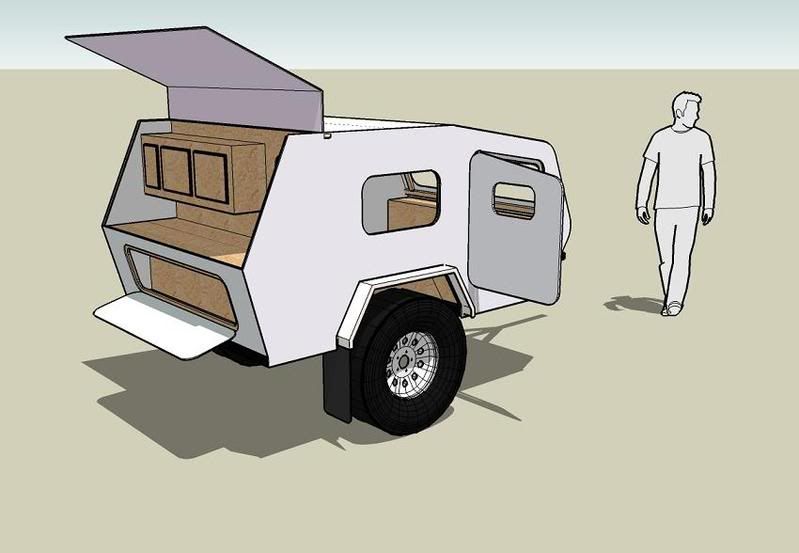
From what I've been able to measure the bottom of the box is about level with the bottom of the axle. The line is worst case coming off the hitch with the jack all the way up. But you're right about some of those speed bump and gutter combos being a real pain in the undercarriage. I'm planning on framing it in with angle iron and may add a couple of skids from the front of the frame to the front edges of the box just for such places. This drop floor idea is gonna depend on what the frame looks like once I get it stripped and will most likely move toward the back a bit which should increase clearance.

Thanks for the input! I'll certainly keep it in mind. :thumbsup:
User avatar
depatty
Teardrop Master
 
Posts: 280
Images: 175
Joined: Thu Oct 04, 2007 10:39 am
Location: Weaver, Alabama

Re: my 2 cents

Postby depatty » Thu Oct 23, 2008 11:40 am

John T. Hodgen wrote:being a southern countryboy with different slant on things, but I think it would be easier to buy a bigger truck 8) and live with what you built and enjoy it til someone with a offer you can't REFUSE buys it.:thinking: and build a new one and invest the leftover$$$ into a dream!?! :lol: I do like your design with outside cargo/bench system, good luck. John T.


As another southern country boy (with several bigger trucks sitting in the field due to the price of fuel :cry: ), don't think I didn't consider about doing just that! But (and as they say that's a BIG but :lol: ), the camper body as I built it was just too heavy for the frame/axle and to get it off and put it on another frame well, lets just say there was no way due to the way I built it. :x And the skin that I used was not designed for exterior use which I didn't know at the time. Twas free and worked easy but is not sunlight or heat stable. So that was gonna have to be replaced. There were also a few (quite a few as it turned out) other things that needed to be changed inside that would have entailed a LOT of work. So after sitting and thinking, over a beer or three for a few months, about how to best salvage some of the work, I decided to just start over and try to learn from my mistakes. :oops: I built it for the out of pocket cost of the screws and a couple of tubes of caulk so the only real loss is the time and I'm just marking that up to experience... :roll: :lol: Here's hoping that this one turns out a little better... ;)

Thanks!
User avatar
depatty
Teardrop Master
 
Posts: 280
Images: 175
Joined: Thu Oct 04, 2007 10:39 am
Location: Weaver, Alabama

Postby Alan Wood » Thu Oct 23, 2008 7:50 pm

depatty wrote:I do like the grasshopper design and you do make a good point about the height. I'll take a look at changing the angle on that back wall and see what it looks like with the top moved forward 10 to 12 inches. That would still let me keep the hinge on the (almost) vertical portion of the wall but reduce the knots on the head quite a bit... :thinking:

Thanks for the input!

What I was thinking was more like Stomperxj's saw tooth xl. He rendered it better than I can describe it so... Image But with the rear end still vertical. Although reinforcing the angle seam and the sealing issues are real. :thinking:
Alan Wood
User avatar
Alan Wood
5000 Club
5000 Club
 
Posts: 5130
Images: 2
Joined: Tue Feb 07, 2006 1:26 am
Location: Sacramento California
Top

Postby depatty » Sat Oct 25, 2008 1:14 pm

Just got the last of the old camper flooring taken off of the frame it ain't pretty. Looks like the best way to handle this one is gonna be to cut the side rails off, cut the cross rails to fit and put it all back together with a LOT of added bracing. Which means I can move the axle where ever it needs to go, like under the galley. 8)
Since I'm gonna get to start from scratch on the frame, it looks like my best bet is gonna be to pitch the plans I've been working on and start completely over. :cry:
I really appreciate the input from all of y'all and will take it into consideration with whatever gets built! :thumbsup:

Alan,
Thanks for the picture of Stomperxj's saw tooth xl. I had missed that thread but went back and read it all. I like the overall design and am leaning toward a body style along those lines. Still not sure about that type of hatch though. I noted that later in the thread he has changed the hatch design a bit and made the frame for it out of metal tubing which eliminates the structural problem with the bend in it. And I just had an idea that I will have to see if will work. Got an old camper shell with an aluminum frame that might just work out for the hatch. Will have to measure and see it the support members are in the right places. :thinking: If not tis about time to learn to weld aluminum anyway. :roll: 8)

Thanks again for all the input! Will post the new plans here as soon as I figure out what I'm gonna do...

Dave
User avatar
depatty
Teardrop Master
 
Posts: 280
Images: 175
Joined: Thu Oct 04, 2007 10:39 am
Location: Weaver, Alabama
Top

overbuilding

Postby John T. Hodgen » Sat Oct 25, 2008 4:39 pm

Hey There,
I know what you mean about overbuilding somethings. It must be that way for us Southern folks because of hurricanes :lol: sounds like you have this going on, good luck with your build, I'll check your progress. I like your plans. ----- John T. :thumbsup:
User avatar
John T. Hodgen
The 300 Club
 
Posts: 415
Images: 8
Joined: Thu Jul 24, 2008 5:50 am
Location: Summersville, West Virginia
Top

Frame stripped

Postby depatty » Sat Oct 25, 2008 8:05 pm

Well got the frame stripped earlier today and finally got around to getting some pictures of it.

From the hitch:
Image

From the side:
Image

From the back:
Image

This is as stripped and before any mods are done. I'm thinking of cutting a foot off each side which will leave it 52" wide and give a inch and a half clearance for the tires. Gonna cut some off the back too but haven't decided how much yet. Am thinking about taking it down to between 8 and 9 feet which will leave the axle about where it is now in relation to the hitch. Will get out with the grinder and saw tomorrow and see how damage I can inflict on it.

Got the scales out and total weight is 324 lbs. Hitch weight is 48 pounds. So with the bare frame as it sits, the hitch percent of total is 14.8%. Rough calculation on cutting the width and length will drop at least 35 pounds. Will know for sure tomorrow after I cut a few chunks off. 8)
User avatar
depatty
Teardrop Master
 
Posts: 280
Images: 175
Joined: Thu Oct 04, 2007 10:39 am
Location: Weaver, Alabama
Top

Re: Frame stripped

Postby Alan Wood » Sat Oct 25, 2008 8:13 pm

depatty wrote:Well got the frame stripped earlier today and finally got around to getting some pictures of it.

From the hitch:
Image

From the side:
Image

From the back:
Image

This is as stripped and before any mods are done. I'm thinking of cutting a foot off each side which will leave it 52" wide and give a inch and a half clearance for the tires. Gonna cut some off the back too but haven't decided how much yet. Am thinking about taking it down to between 8 and 9 feet which will leave the axle about where it is now in relation to the hitch. Will get out with the grinder and saw tomorrow and see how damage I can inflict on it.

Got the scales out and total weight is 324 lbs. Hitch weight is 48 pounds. So with the bare frame as it sits, the hitch percent of total is 14.8%. Rough calculation on cutting the width and length will drop at least 35 pounds. Will know for sure tomorrow after I cut a few chunks off. 8)

Looks like a good start to me. :)
Alan Wood
User avatar
Alan Wood
5000 Club
5000 Club
 
Posts: 5130
Images: 2
Joined: Tue Feb 07, 2006 1:26 am
Location: Sacramento California
Top

Re: pendulum

Postby brian_bp » Sun Oct 26, 2008 1:33 pm

coal_burner wrote:Good balance front to back is important, but to ensure good road manners, having the mass centered near the axle is also important. With large amounts of mass at either end, when the tow vehicle hits a bump in the road,the trailer tongue will begin to oscillate up and down. The rear suspension of large tow vehicles damps this down rather quickly, but a mid sized tow vehicle like yours may get uncomfortable.

I learned this towing about 1000LB of misc junk while helping a friend move. I strapped everything to the front and rear walls of my utility trailer to get an almost perfect 100 lbs of tongue weight. after every bump on the freeway, the nose of my 3000LB tow vehicle would bob up and down for about 30 seconds. I eventually pulled off of the freeway, dragged everything near the center of the trailer and strapped everything down as best i could. Still had 100 LBS tongue weight (a bathroom scale was one of the things in the trailer). It towed beautifully with no bouncing for the rest of the 50 mile trip.


This is a great illustration of excessive moment of inertia around the lateral axis causing pitch problems. The same loading causes the moment of inertia around the vertical axis (the "polar" moment of inertia) makes the trailer prone to sway.

Thanks! :applause:
brian_bp
1000 Club
1000 Club
 
Posts: 1355
Images: 9
Joined: Sun Nov 19, 2006 1:25 pm
Location: Alberta
Top

Postby jimqpublic » Tue Oct 28, 2008 5:51 pm

Somewhat off topic- That's an interesting frame design. I haven't ever seen one with outboard frame rails. The same basic concept would make a dropped floor easy. I wonder how hard it is to change a tire?

Jim
Jim
2002 Chalet Arrowhead but always wanted a Teardrop
2 kids and a Dear Wife
http://community.webshots.com/user/jimqpublic
User avatar
jimqpublic
The 300 Club
 
Posts: 398
Images: 2
Joined: Fri Jun 18, 2004 12:41 pm
Location: Long Beach, CA
Top

Postby depatty » Fri Nov 21, 2008 1:57 pm

jimqpublic wrote:Somewhat off topic- That's an interesting frame design. I haven't ever seen one with outboard frame rails. The same basic concept would make a dropped floor easy. I wonder how hard it is to change a tire?

Jim


Sorry for the late reply. Somehow got dropped from watching my own topic... :(

As for changing a tire, it was a bit of a pain. Will be no longer though as I have cut the frame apart and am in the process of welding it back together, with the frame rails inside the tires where they should be. There will be no more of the having to crawl half way under the *&%$#%@ thing to get to the lug bolts and then try to get them realigned in the dark usually in the mud...

Will get pix (soon as the battery in the camera charges) of the new frame design and try to get some posted later today.
User avatar
depatty
Teardrop Master
 
Posts: 280
Images: 175
Joined: Thu Oct 04, 2007 10:39 am
Location: Weaver, Alabama
Top

Bit of progress

Postby depatty » Fri Nov 21, 2008 9:21 pm

Got a canopy put up to work in,
Image
and a platform built to work on.
Image
Moved the welder and some tools into it,
Image
and started by cutting the frame apart. Welded a couple of old shelving pieces
Image
across the spring mount cross pieces
Image
before cutting them loose from the frame so I wouldn't have to realign them when welding back into the new frame. Did some layout with the frame after cutting it apart
Image
as well as with the tongue
Image
using the new hitch.
Image
Took the springs apart and coated them, the jack, the side rails and some of the other rusty pieces with rust converter
Image
prior to doing any reassembly. After the side rails dried overnight I clamped them to the spring mounts and did a bit of welding.
Image
Image
Did a bit more welding but it was getting dark and I didn't get any more pictures.
I'm doing a bit of reinforcing on the C channel on the front, and back crosspieces and the tongue pieces by welding a piece of the shelving support across the back of the C. I figure it won't add much weight but will make it a LOT stronger. Will get more pix tomorrow after I get more done.

I still haven't decided exactly what kind of teardrop I'm gonna build. I figured I'd get the frame rebuilt and go from there. :roll: 8) :lol:
User avatar
depatty
Teardrop Master
 
Posts: 280
Images: 175
Joined: Thu Oct 04, 2007 10:39 am
Location: Weaver, Alabama
Top

Postby Juneaudave » Fri Nov 21, 2008 10:34 pm

Dave...your my HERO...what a inspirational story of gung-ho trailer reconstruction coupled with a "haven't decided exactly what kind of teardrop I'm gonna build." attitude!!!! I've been doing the "well...that looks about the right" design method for awhile now!!!!

Gotta love it!!! You da MAN!!! :thumbsup: :thumbsup: :thumbsup: :thumbsup:
User avatar
Juneaudave
Super Duper Lifetime Member
 
Posts: 3237
Images: 380
Joined: Sun Jul 03, 2005 12:11 pm
Location: Juneau, Alaska
Top

Postby GPW » Sat Nov 22, 2008 7:13 am

All starts with a good trailer underneath....no matter what you put on top... :thumbsup:
There’s no place like Foam !
User avatar
GPW
Gold Donating Member
 
Posts: 14912
Images: 546
Joined: Thu Feb 09, 2006 7:58 pm
Location: New Orleans
Top

Postby depatty » Sat Nov 22, 2008 8:43 pm

Juneaudave wrote:Dave...your my HERO...what a inspirational story of gung-ho trailer reconstruction coupled with a "haven't decided exactly what kind of teardrop I'm gonna build." attitude!!!! I've been doing the "well...that looks about the right" design method for awhile now!!!!

Gotta love it!!! You da MAN!!! :thumbsup: :thumbsup: :thumbsup: :thumbsup:


Thanks for the kind words! My problem with the kind of teardrop/camper is that I want/need to use it for both a camper and a cargo trailer, sometimes on the same trip. So I'm torn between building a conventional teardrop IE "generic benroy" style and the cargo style that I laid out in the plans earlier in this thread. The big plus that the square cargo style has is the added cubic footage inside for loading product into. The big plus the conventional teardrop has is looks and style! So I'm gonna get the trailer frame done and see what mood strikes me when I get to actually building. I suspect that the cargo style will win on this build. But... I've got an old boat frame waiting to be built on in the field so am gonna have a teardrop sometime soon one way or another. :roll: 8) :thumbsup:
User avatar
depatty
Teardrop Master
 
Posts: 280
Images: 175
Joined: Thu Oct 04, 2007 10:39 am
Location: Weaver, Alabama
Top

Postby depatty » Sat Nov 22, 2008 8:44 pm

GPW wrote:All starts with a good trailer underneath....no matter what you put on top... :thumbsup:


My feelings exactly... 8) ;)
User avatar
depatty
Teardrop Master
 
Posts: 280
Images: 175
Joined: Thu Oct 04, 2007 10:39 am
Location: Weaver, Alabama
Top

PreviousNext

Return to Non-traditional Designs

Who is online

Users browsing this forum: No registered users and 5 guests