A Small Hopper--(the SunHopper)

Design & Construction of anything that's not a teardrop e.g. Grasshoppers or Sunspots

moving right along

Postby moreforles » Wed Oct 15, 2008 6:36 pm

Considering the time it sat waiting for you to get started, your making excellent progress.

:applause:

I havn't even got to the planning stage. been thinking about converting an Astro conversion van into camper and thought a teardrop would be nice for additional sleeping space/storage.

Friend of mine has a towing service and comes across old RVs and Popups from time to time, so I've been accumulating parts and components, anticipating having some time shortly to get started on it.....

I was leaning more to either the Reverse teardrop from Little Guy or the old Kampmaster Wildgoose that was also offered in plan form from Popular Mechanics in 1953, (I like the headroom option, although the latest tent additions also seem to cover that issue as well)
User avatar
moreforles
Teardrop Master
 
Posts: 143
Images: 12
Joined: Wed Oct 15, 2008 5:47 pm
Location: Cleveland, Ohio

Postby Arne » Wed Oct 15, 2008 10:35 pm

With your ground clearance, one thing comes to mind:

Don't try to straddle any big dead skunks on the road.....
www.freewebs.com/aero-1
---
.
I hope I never get too old to play (Arne, Sept 11, 2010)
.
User avatar
Arne
Mr. Subject Line
 
Posts: 5383
Images: 96
Joined: Fri Aug 13, 2004 12:25 pm
Location: Middletown, CT

Postby jimqpublic » Thu Oct 16, 2008 10:48 am

Richard,

I'm sure you know this from past experience...

To fill the nail holes I suggest a thick epoxy paste using microballoons. Use a small putty knife to spread it and then after it's gelled but not hardened use thin, flexible metal putty knife to scrape off any excess. After that the sanding should be very easy. I learned the hard way to not use a high strength filler for cosmetic/fairing work because when you try to sand it smooth you remove more surrounding material than overfill.

Another thing I might try is mixing some solvent with the epoxy paste to improve adhesion and slightly weaken it to further ease sanding.

Jim

PS: I'm still thinking and dreaming of building a trailer. One thought on a dropped footwell is to make the sides weak enough that if it does hit a rock, speed bump, or dead skunk it would break apart but not cause collateral damage to the rest of the trailer.
Jim
2002 Chalet Arrowhead but always wanted a Teardrop
2 kids and a Dear Wife
http://community.webshots.com/user/jimqpublic
User avatar
jimqpublic
The 300 Club
 
Posts: 398
Images: 2
Joined: Fri Jun 18, 2004 12:41 pm
Location: Long Beach, CA
Top

Postby rmclarke » Thu Oct 16, 2008 11:49 am

Arne wrote:Don't try to straddle any big dead skunks on the road.....


Boy, I hear ya..I have thought a lot about that since I committed to it....I'd probably have to rename it the 'SkunkHopper" :lol:

Jimq,
I'm going to use a product called QuickFair by System Three (had it left over from my boat build) it's microballons in epoxy, 2 parts, easy to mix, and you can mix small amounts easily.

I built the footwell out of 1/4" ply with a 1/2" bottom cuz I was thinking the same thing you said about if I did hit something. Here's the thread of the footwell:

http://www.tnttt.com/viewtopic.php?t=23138&highlight=1+4+inch+footwell

Richard
"When a hammer is the only tool you own, every problem begins to look like a nail..."

ImageFrom this: Image to this: Image Finally!!
User avatar
rmclarke
The 300 Club
 
Posts: 384
Images: 231
Joined: Mon Apr 09, 2007 3:22 am
Location: North Jefferson State
Top

Postby rmclarke » Sat Apr 25, 2009 4:57 am

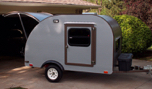
Well, 6 months later................... :oops:

Back in early November, when the rains came to Southern Oregon again, I was able to move my trailer (since I had been building it outside and I didn't have it epoxied yet) to a nice dry, vacant shop located on our church's property about half a mile from my house. Though I really appreciated the fact that it was out of the weather for the winter, it basically brought my build to a dead stop :(

I thought I would be able to just 'pop in' whenever I wanted and work on it, but the logistics of having to move tools and materials, or getting there and forgetting something at home, then going home and forgetting what I went there for in the first place :? :? ......well, you get the idea....a real PITA!

And, on top of that, my design-as-you-go approach began to get bogged down in the details.....it's easy to play with SketchUp and draw all kinds of cool ideas....bringing those ideas 'into the world' is another matter :thinking:

Well, I said all that to apologize for being a 'no show' for the past 6 months :oops: but spring has sprung real good here in North Jefferson and I'm bringing my trailer home tomorrow!! :D :D :D :D :P :dancing :dancing Let the building commence again!!

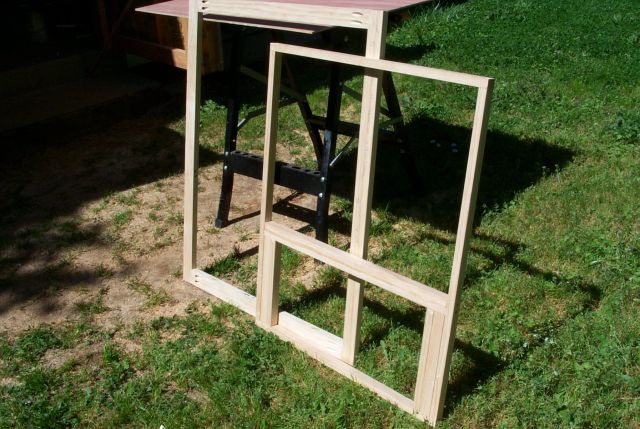
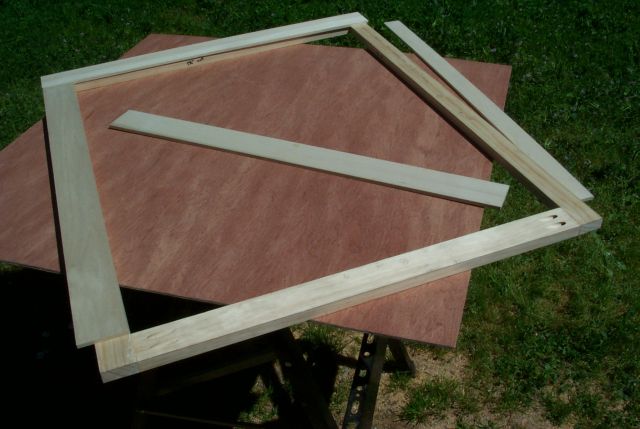
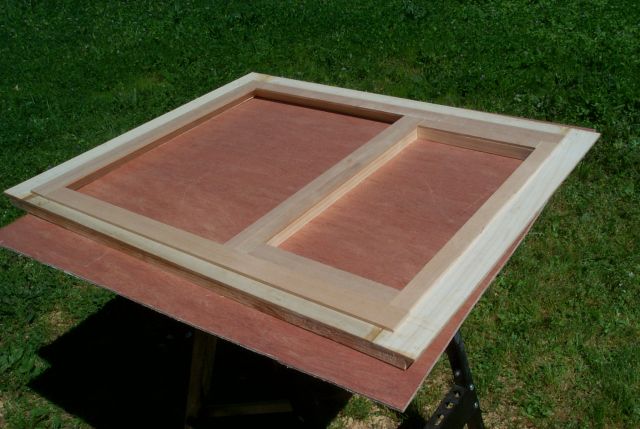
Here is a series of pics of the doors I'm doing....poplar face epoxied to clear pine frames....there will be a non- opening plexiglass window on top and a vent below it...

Inner and outer frames....doors will be inch thick...
Image

Poplar strips to be epoxied to outer frame...
Image

Overhanging face will close against the trailer side...
Image

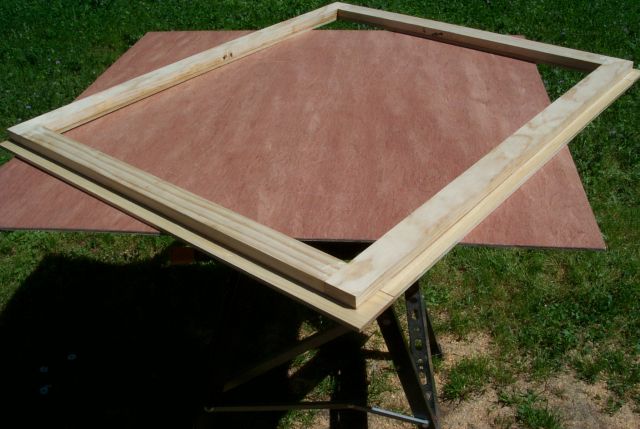
Inner frame with trim to be epoxied into outer frame; whole door to be epoxied....
Image

Well, all for now.......but it's good to be doing something again! :)

Richard
"When a hammer is the only tool you own, every problem begins to look like a nail..."

ImageFrom this: Image to this: Image Finally!!
User avatar
rmclarke
The 300 Club
 
Posts: 384
Images: 231
Joined: Mon Apr 09, 2007 3:22 am
Location: North Jefferson State
Top

Postby Barry and Darby H. » Sat Apr 25, 2009 5:27 am

Richard,

Glad to see your back to work on the trailer. It's looking fantastic and I look forward to seeing it grow closer to completion. NICE WORK !
Image
User avatar
Barry and Darby H.
Teardrop Advisor
 
Posts: 57
Images: 29
Joined: Sat Aug 30, 2008 6:53 pm
Location: Acushnet, Ma.
Top

Postby rmclarke » Sat May 09, 2009 1:59 am

It is so nice having the trailer home again...I think I've done more in the last few days than I have in the past six months.....I've got all the nail holes filled ...edges and seams filled with epoxy....Thursday and Friday I installed the upper galley shelf and divider, hatch hinge support, drilled the hole for my AC inlet, and primer/sealed the interior....


Image

Image

here's a shot of the upper shelf through the front window....the shelf and divider are sandwich construction 3/4 stick between 1/8 plys with insulation inside to give them rigidity...I prebuilt/varnished them ...they are screwed and epoxied into place.....I'm using two 9 watt florescent puck lights for galley and cabin side (along with some incandescent rope light later)
Image

the trim on the headboard creates a small lip so stuff won't fall off..and the same on the 'cubby holes'
Image

Tomorrow I'm going to try and finish up the doors and maybe do some of the dreaded sanding, so that I can finally start epoxying the exterior!

Richard
"When a hammer is the only tool you own, every problem begins to look like a nail..."

ImageFrom this: Image to this: Image Finally!!
User avatar
rmclarke
The 300 Club
 
Posts: 384
Images: 231
Joined: Mon Apr 09, 2007 3:22 am
Location: North Jefferson State
Top

Postby CPnthrfan » Fri May 15, 2009 7:00 pm

looks good so far
User avatar
CPnthrfan
Teardrop Advisor
 
Posts: 50
Images: 11
Joined: Mon May 11, 2009 5:07 pm
Location: Columbia
Top

Postby Toytaco2 » Fri May 15, 2009 8:19 pm

Richard, I am totally impressed with your build. I don't know how I could have missed this thread in the past, but, I'm now looking forward to following you progress. I know what you mean about not being able to easily work on your trailer after you move it away from home. We pulled my trailer to my son's paint shop on January 1 to be painted and finish up some odds and ends. I thought we would surely be done by the end of January. Alas, its still at his shop, although finally basically finished after packing the wheel bearings tomorrow. Work definitely goes faster when the project is at your home and you don't have to move tools and supplies every time you try to work on it.

Please keep the pics coming!! :applause: :applause: :applause:

Mike
User avatar
Toytaco2
500 Club
 
Posts: 540
Images: 368
Joined: Mon Dec 10, 2007 1:57 pm
Location: Oklahoma City, OK
Top

Postby rmclarke » Tue May 19, 2009 12:44 am

I got a start on my hatch today..... I figured the easiest way to do it was to build it in place ...so after rabbeting some side pieces, I screwed them in position and started on the cross members.
Image

put in the verticals and hopefully tomorrow I'll make some cross supports. I filled in the gap between the bottom two horizontal pieces with epoxy glue. I'll skin the hatch inside and out with 1/8 ply and put foam insulation in it.
Image

Sorry about the dark pics.....night was falling when I tore myself away from it..

Image

Richard
"When a hammer is the only tool you own, every problem begins to look like a nail..."

ImageFrom this: Image to this: Image Finally!!
User avatar
rmclarke
The 300 Club
 
Posts: 384
Images: 231
Joined: Mon Apr 09, 2007 3:22 am
Location: North Jefferson State
Top

Postby stomperxj » Tue May 19, 2009 9:07 am

Lookin good Richard. Nice progress :thumbsup:
User avatar
stomperxj
The 300 Club
 
Posts: 395
Images: 1
Joined: Tue Jul 29, 2008 12:25 am
Location: Kuna ID
Top

Postby rmclarke » Mon May 25, 2009 12:24 am

Weather got cold and rainy for a few days here, so I worked on other things. But today, I put cross bracing on the hatch and fit and measured the two lower doors.
Image
Figuring out how these 3 back doors will fit together (allowing for clearances and stuff) and how to weatherstrip them is becoming a major time-consuming pain in the keester! sometimes now, I wish i would have simplified a lot of the stuff which seemed so easy while I was playing around with it in SketchUp... :scratchthinking:

It's like Clint Eastwood said in one of the 'Dirty Harry' movies......"a man's got to know his limitations".....oh well, too late to stop now

Richard
"When a hammer is the only tool you own, every problem begins to look like a nail..."

ImageFrom this: Image to this: Image Finally!!
User avatar
rmclarke
The 300 Club
 
Posts: 384
Images: 231
Joined: Mon Apr 09, 2007 3:22 am
Location: North Jefferson State
Top

Postby rmclarke » Sat Jul 11, 2009 11:31 pm

Today I figured out how to get rid of every flying gnat and insect in the neighborhood..........I finished applying my second coat of epoxy to the outside of my trailer and they all tried to commit suicide in the wet stuff!! :? :shock: :o :roll: ....it's a good thing I'll be sanding again oh joy before I prime and paint.

(Sorry the picture quality is a little cheezy....had to use the cheap camera, the nicer one broke...but hey, a pic is a pic right?)

Image

I also finished my dropped floor/table today......seems quite sturdy even though it's only supported from one side...I didn't want a support on the other side because we will be sitting in an "L" shaped arrangement...

Image

Image

Image

The galley counter is in....I'm thinking of thin glass tiles for the surface....lower right hand galley cabinet is also the home of my electrical raceway....

Image

Looks like a good place for coffee mugs and stuff..
Image

When I do need access to it, the floating shelf will just pop out and it opens on a hinge...
Image

My electric stuff is going to be very simple...incoming AC to GFCI to circuit breaker protected power strip under galley counter to another power strip overhead..
Image

I would sure like to camp out in it before winter, but I'm just not sure of that....there's so much stuff to do :? :? and the little details are just killing me timewise....I would like to say I'll be able to make the next Dam gathering but right now, I wouldn't take that bet either..oh well, I'm still workin' at it :)

Richard
Last edited by rmclarke on Sun Jul 12, 2009 2:21 am, edited 1 time in total.
"When a hammer is the only tool you own, every problem begins to look like a nail..."

ImageFrom this: Image to this: Image Finally!!
User avatar
rmclarke
The 300 Club
 
Posts: 384
Images: 231
Joined: Mon Apr 09, 2007 3:22 am
Location: North Jefferson State
Top

Postby High Desert » Sun Jul 12, 2009 12:16 am

I really like your table idea Richard, thats slick! :thumbsup:

Keep up the good work, it's coming along nicely :applause:
Shaun

"it's not the years honey, it's the mileage"
High Desert
Platinum Donating Member
 
Posts: 8780
Images: 27
Joined: Wed Apr 08, 2009 1:46 pm
Location: SW Washington state
Top

Postby schaney » Tue Jul 14, 2009 5:52 pm

I agree with Shaun, that's a clever table design.
Scott
Camping the "Compact Way"
Image
User avatar
schaney
500 Club
 
Posts: 804
Images: 262
Joined: Tue May 02, 2006 9:27 pm
Location: Salem, OR
Top

PreviousNext

Return to Non-traditional Designs

Who is online

Users browsing this forum: No registered users and 7 guests