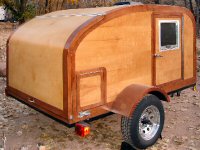
structural insulated panels for the whole shell

Design & Construction of anything that's not a teardrop e.g. Grasshoppers or Sunspots

Postby Ageless » Mon Mar 01, 2010 10:31 pm

I'm planning a similar layup. I made some sample pieces using 1/2" styrofoam and 2 layers of cloth on each side. Extremely liteweight and very rigid; which I will use on the roof. The cloth I used? T-shirt material
Strangers on this road we are on; we are not two, we are one - Raymond Douglas Davies
User avatar
Ageless
Platinum Donating Member
 
Posts: 1603
Images: 8
Joined: Tue Aug 04, 2009 8:34 am
Location: Pt. Orchard, WA

Postby RAYVILLIAN » Mon Mar 01, 2010 10:32 pm

Grid
Just for grins watch this video and look close at the wall construction, I can see no wood in the window hole, and the way the roof is put on. These are very light trailers and alot of people think they are well constructed.

http://www.youtube.com/watch?v=DbFV-b0drXA

I don't know what they use on the inside of the roof but it seems very flexible.

GAry
Where ever we raise the hatch is home.
Darn blank states keep getting further away and we keep traveling slower ain't never gona get this map full.
111961Image
User avatar
RAYVILLIAN
Lifetime member
 
Posts: 1434
Images: 109
Joined: Thu Aug 05, 2004 9:33 pm
Location: Rayville MO

Postby RAYVILLIAN » Mon Mar 01, 2010 10:35 pm

Ageless
I've made light weight camping storage boxes using luan with house paint and bed sheets on the outside. you'd be surprised how strong they are.

Gary
Where ever we raise the hatch is home.
Darn blank states keep getting further away and we keep traveling slower ain't never gona get this map full.
111961Image
User avatar
RAYVILLIAN
Lifetime member
 
Posts: 1434
Images: 109
Joined: Thu Aug 05, 2004 9:33 pm
Location: Rayville MO
Top

Postby Grid Runner Adventures » Mon Mar 01, 2010 10:44 pm

this is whats great about this forum. the plethora of knowledge and pass experiments.

so the roof is all figured out now.

so i have two ways so far i've been thinking of fastening the roof to the walls.

keep in mind i have a perimeter of wood around each panel. so there is something solid to work with. i've thought of taking a skillsaw and running a 45 angle on the roof and wall panels so they fit together nice and then cap and screw with the trim piece.

the other way i could do it is do a lap joint and rest the roof panel ontop of the wall panels. and tie it in to the wall panels by bringing the frp of the wall panels up and using the polyurethane to glue it to the ends of the roof panel and then cap it and screw.
wich way do you guys suggest i go about this.

also anyone have a link to that trim that was suggested earler in the thread.
www.offgridrving.com
Follow my build of a off grid camper that is 6x8 and I will live in it for an entire year!
Google Is My College
User avatar
Grid Runner Adventures
Teardrop Master
 
Posts: 273
Images: 4
Joined: Sun Feb 28, 2010 6:15 pm
Location: southern wisconsin
Top

Postby Ageless » Mon Mar 01, 2010 11:07 pm

Remove the plastic from th. inside surface of the foam so it bends easier. I'd lay the ceiling on top the walls then apply the cloth and resin. Cover it with plastic and smooth it out (a foam paint roller works good). Once it has set; apply resin and cloth to the inside. You could get creative here. As the resin is beginning to set, you may want to add a texture to it.
Strangers on this road we are on; we are not two, we are one - Raymond Douglas Davies
User avatar
Ageless
Platinum Donating Member
 
Posts: 1603
Images: 8
Joined: Tue Aug 04, 2009 8:34 am
Location: Pt. Orchard, WA
Top

Postby Grid Runner Adventures » Mon Mar 01, 2010 11:47 pm

wasnt planning on using cloth just frp, foamboard and 1/4 inch lauan
www.offgridrving.com
Follow my build of a off grid camper that is 6x8 and I will live in it for an entire year!
Google Is My College
User avatar
Grid Runner Adventures
Teardrop Master
 
Posts: 273
Images: 4
Joined: Sun Feb 28, 2010 6:15 pm
Location: southern wisconsin
Top

Postby Ageless » Tue Mar 02, 2010 12:30 am

OK, then epoxy the foam to the top edge of the walls. Then bond the FRP; once set; bond the ply. You're gonna need some creative clamping to get a good surface bond on the interior
Strangers on this road we are on; we are not two, we are one - Raymond Douglas Davies
User avatar
Ageless
Platinum Donating Member
 
Posts: 1603
Images: 8
Joined: Tue Aug 04, 2009 8:34 am
Location: Pt. Orchard, WA
Top

Postby Grid Runner Adventures » Tue Mar 02, 2010 8:41 am

oh hey i grew in in port orchard wa. just noticed your profile :)
www.offgridrving.com
Follow my build of a off grid camper that is 6x8 and I will live in it for an entire year!
Google Is My College
User avatar
Grid Runner Adventures
Teardrop Master
 
Posts: 273
Images: 4
Joined: Sun Feb 28, 2010 6:15 pm
Location: southern wisconsin
Top

Postby RAYVILLIAN » Tue Mar 02, 2010 9:07 am

I think I tried to post this before and had a browser crash.

Did another test with latex contact cement and luan. put a foam and luan sandwich and let it float in rain barrel to see if the latex contact cement would hold up. The luan delaminated after about 2 months but the contact cement still held. I could pull it off but it still took some doing. The frp cement should do better.

I usually run the outside wall skin up past the edge of the roof frame and run the roof skin over the edge of the wall.

I'm currently playing with latex paint and thick felt with bed sheet on the outside. Problem is that it takes to long for the paint to dry when that thick. epoxy would work better.

GAry
Where ever we raise the hatch is home.
Darn blank states keep getting further away and we keep traveling slower ain't never gona get this map full.
111961Image
User avatar
RAYVILLIAN
Lifetime member
 
Posts: 1434
Images: 109
Joined: Thu Aug 05, 2004 9:33 pm
Location: Rayville MO
Top

Postby Grid Runner Adventures » Tue Mar 02, 2010 10:50 am

so its cures strong enough using cotton sheets and polyurethane or fiberglass resin and bonded to foamboard eh? wow.

would you route in channels for wood strips for anchor points before fiberglassing the one side
www.offgridrving.com
Follow my build of a off grid camper that is 6x8 and I will live in it for an entire year!
Google Is My College
User avatar
Grid Runner Adventures
Teardrop Master
 
Posts: 273
Images: 4
Joined: Sun Feb 28, 2010 6:15 pm
Location: southern wisconsin
Top

Postby RAYVILLIAN » Tue Mar 02, 2010 1:14 pm

I've never used the bedsheet and paint on a whole camper yet but I've seen it done on a standy. with the boxes it works great. I cut the wood and assemble it with duct tape than hot glue the seams on the inside remove the tape and paint the box work the bedsheet into the paint than add a couple of more coats and they seal up good and are strong. I have 2 that have dutch ovens in them and two that we just fill up with stuff to take with us.

The problem with using latex paint or epoxy and bed sheet on just foam isn't the lateral strength but the penetration strength, A road rock or stick could go right through it. That's why I'm playing with the felt hoping that it will work like fiberglass matt to add some penetration resistance.

By the way where are you getting the frp. Colaw's in Joplin Mo has it on rolls I think it is 8' wide and about $12 a running foot. That would be quite a drive but I think that they would ship it.

http://www.colawrvsalvage.com/

They don't list it but email them for a parts search Ron is the guy I've talked to.

Gary
Where ever we raise the hatch is home.
Darn blank states keep getting further away and we keep traveling slower ain't never gona get this map full.
111961Image
User avatar
RAYVILLIAN
Lifetime member
 
Posts: 1434
Images: 109
Joined: Thu Aug 05, 2004 9:33 pm
Location: Rayville MO
Top

Postby Grid Runner Adventures » Tue Mar 02, 2010 1:28 pm

i priced at lowes and a local builder supply frp 4x8 sheets 22 bucks a pop.

i was just reading another post guy got the whole camper rhino lined. sure looks snazzy. that would sure help with sticks and flying rocks.

only added 62 lb to his total weight.

if i were to do something like that i'd have to skin it inside and out with lauan instead of frp on the outside for the laminate effect.
www.offgridrving.com
Follow my build of a off grid camper that is 6x8 and I will live in it for an entire year!
Google Is My College
User avatar
Grid Runner Adventures
Teardrop Master
 
Posts: 273
Images: 4
Joined: Sun Feb 28, 2010 6:15 pm
Location: southern wisconsin
Top

Postby Grid Runner Adventures » Tue Mar 02, 2010 2:11 pm

trying to teach myself google sketchup this morning. so i can get some pictures for you guys.
www.offgridrving.com
Follow my build of a off grid camper that is 6x8 and I will live in it for an entire year!
Google Is My College
User avatar
Grid Runner Adventures
Teardrop Master
 
Posts: 273
Images: 4
Joined: Sun Feb 28, 2010 6:15 pm
Location: southern wisconsin
Top

Postby Grid Runner Adventures » Wed Mar 03, 2010 12:06 am

the polls are in. I will be going with the rhino liner on the outside of the trailer as well as the floor inside. Im having some pretty good sucess with google sketchup for a first time user. all of that time wasted in Second Life came in handy heh.
www.offgridrving.com
Follow my build of a off grid camper that is 6x8 and I will live in it for an entire year!
Google Is My College
User avatar
Grid Runner Adventures
Teardrop Master
 
Posts: 273
Images: 4
Joined: Sun Feb 28, 2010 6:15 pm
Location: southern wisconsin
Top

Postby Grid Runner Adventures » Wed Mar 03, 2010 1:01 am

www.offgridrving.com
Follow my build of a off grid camper that is 6x8 and I will live in it for an entire year!
Google Is My College
User avatar
Grid Runner Adventures
Teardrop Master
 
Posts: 273
Images: 4
Joined: Sun Feb 28, 2010 6:15 pm
Location: southern wisconsin
Top

PreviousNext

Return to Non-traditional Designs

Who is online

Users browsing this forum: No registered users and 15 guests